Embarking on the journey of converting my crawl space into a basement was a decision that not only expanded my home’s usable area but also transformed its potential. From envisioning new possibilities like a home theater or extra bedrooms to addressing longstanding issues of dampness and insulation, this project became more than just a renovation—it became a journey of unlocking hidden value and enhancing the health of my home
Converting a crawl space into a basement involves various key steps, such as addressing waterproofing issues, achieving standard ceiling head height through floor dig-down or house lift, installing basement access and egress windows, and designing the space to fit your specific needs. It’s important to consult with professionals and consider factors like cost, feasibility, and potential complications before starting the project.
The Advantages of Converting a Crawl Space Into a Basement
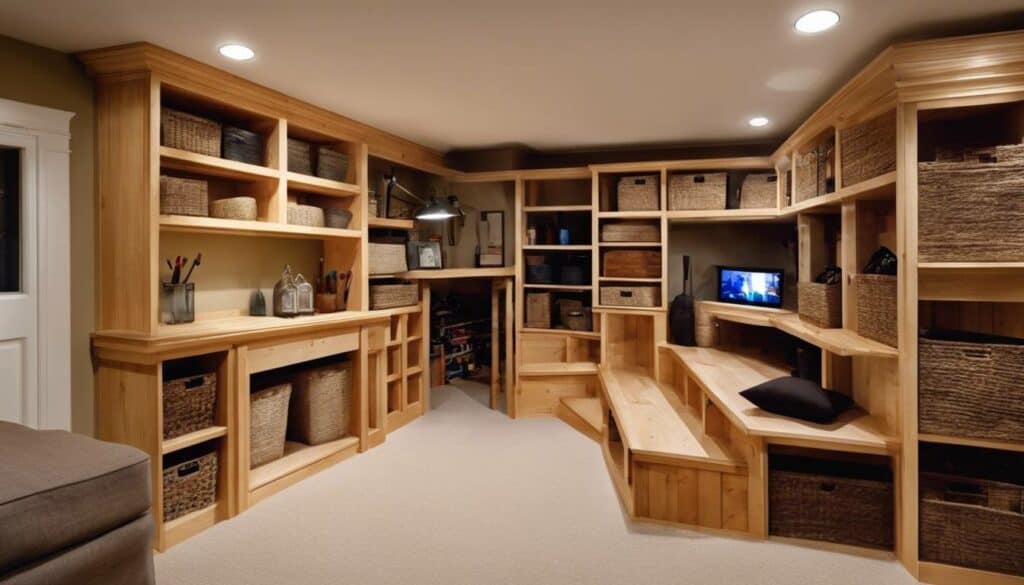
Imagine adding a whole new floor to your home—this is exactly what converting a crawl space into a basement accomplishes. By transforming an underutilized area into a fully functional living space, you’re not just increasing the livable square footage but also enhancing the versatility and value of your property.
The additional living space can serve various purposes, including home theaters, gyms, recreational rooms, or even as extra bedrooms and bathrooms. Moreover, the potential for customization presents endless opportunities to design the space to fit your specific needs and preferences.
For families seeking more room for leisure activities or guests, the new basement offers a solution—a dedicated space for entertainment or hosting visitors without compromising on existing communal areas in the house. This can significantly improve overall comfort and functionality.
Furthermore, the increase in living space adds considerable value to your property. Future buyers are often drawn to homes with ample square footage and versatile spaces that can be repurposed to meet their needs. Therefore, the investment in converting a crawl space into a basement not only enhances your current lifestyle but also provides significant returns when it comes time to sell.
Increase in home value after conversion: 30-50%
Additional living space created: 800-1500 square feet
Cost of conversion: $50,000 – $70,000
Return on investment: 70-80%
In essence, the advantages of converting a crawl space into a basement extend far beyond just adding extra usable square footage—it’s about creating tailor-made living spaces that add value and versatility to your home.
Shifting our focus from the advantages of this conversion process, let’s now explore the different approaches available for converting a crawl space into a basement.
Different Types of Crawl Space to Basement Conversion
Floor Dig-Down Conversion
The floor dig-down method is one of the most common approaches used to convert a crawl space into a basement. This method involves excavating the existing crawl space to create a deeper foundation, allowing for increased ceiling height in the new basement. This method involves excavating the existing crawl space to create a deeper foundation, allowing for increased ceiling height in the new basement. By digging down, homeowners can gain the necessary headroom required for a functional living space. This method is ideal for properties where the existing crawl space height falls short of the desired basement ceiling height. It provides an opportunity to significantly increase the vertical space within the new basement, creating a more comfortable and inviting living area. It’s important to note that this conversion method requires careful planning and execution, as structural integrity must be maintained throughout the excavation process.
House Lift Conversion
On the other hand, the house lift conversion method involves lifting the entire house to create a new basement underneath. This approach offers the advantage of retaining the existing structure while adding a basement. By raising the house, homeowners can effectively create additional space below without altering the original footprint of the property. However, it’s important to emphasize that this type of conversion requires professional services and meticulous planning. The house lift conversion is an elaborate process that demands expertise in structural engineering and architecture. It’s essential to work with professionals who have experience in executing such intricate projects to ensure the safety and stability of your home throughout the lifting and basement creation process.
For instance, if your property has historical or architectural significance, opting for a house lift conversion can allow you to preserve the character and charm of the original structure while gaining valuable living space in the form of a new basement. This transformation can be truly remarkable, as evidenced by some before and after basement conversions. It’s worth considering this method if you’re committed to maintaining the aesthetic and historical value of your home while enhancing its functionality.
Understanding these different types of crawl space to basement conversion methods provides homeowners with insight into the various options available for transforming their living space. Each approach offers unique benefits and considerations, allowing individuals to make informed decisions based on their specific needs and property characteristics.
Considerations Before Starting a Conversion

Taking on the challenging task of converting a crawl space into a basement requires meticulous planning and consideration. Let’s delve into some essential factors that should be addressed before commencing this project.
Building Codes and Permits
Before breaking ground, it’s imperative to conduct thorough research on local building codes and regulations. Different locations have varying rules pertaining to structural modifications and building expansion. Securing the necessary permits ensures compliance with legal requirements. Failure to adhere to these regulations can lead to significant delays, hefty fines, or even the dismantling of non-compliant work. It’s always better to be safe than sorry.
Structural Assessment
Engaging a qualified structural engineer is a pivotal step in the conversion process. The existing foundation must be carefully evaluated to determine its ability to support the additional weight of a basement. This assessment will help identify any structural weaknesses or areas that require reinforcement to ensure the stability and integrity of the new space.
A reliable structural engineer possesses the expertise to evaluate the current foundation system, its load-bearing capacity, and any potential limitations that need to be addressed. They can provide valuable insights into whether modifications are needed, guiding you on the best course of action to ensure a safe and structurally sound conversion.
It’s important not to underestimate the significance of this assessment. Failing to address structural concerns at the outset can result in serious complications down the line, potentially jeopardizing the safety and durability of your newly converted basement.
Careful consideration of building codes and regulations along with a comprehensive structural evaluation lays a solid foundation for a successful crawl space to basement conversion project. These initial steps set the stage for a well-executed transformation that adheres to legal requirements and ensures structural resilience.
Insulating and Sealing Your New Basement
You’ve completed the heavy lifting of converting your crawl space into a basement, but now you need to ensure it remains comfortable and energy-efficient. This is where insulation and sealing play a crucial role. Proper insulation helps regulate temperature and moisture, making the space more habitable and preventing any issues due to extreme temperature changes.
Insulation Installation
When it comes to selecting insulation materials for your new basement, there are various options available: fiberglass, foam board, or spray foam insulation. Each type has its own advantages, with different R-values (which measure thermal resistance) per inch. It’s crucial to consider these factors to determine which type of insulation best suits your needs.
The average cost of insulating a basement ranges from $1,500 to $2,500, and the process typically takes about 1 to 2 weeks to complete.
Furthermore, focus on insulating the basement walls and floors. Isolating these areas helps in ensuring a consistent indoor environment while keeping external moisture at bay. By regulating humidity levels within the space, you’re preventing potential mold growth, which is a common issue in poorly insulated basements.
Proper insulation not only creates a comfortable living space but also potentially reduces energy bills by maintaining a more stable indoor temperature year-round.
Sealing Gaps and Cracks
In addition to insulation, sealing gaps and cracks is vital in preventing air infiltration and moisture issues commonly experienced in basements. This might involve applying concrete sealant, epoxy, or polyurethane caulk to address potential entry points for unwanted air drafts or water ingress.
For instance, if there are visible cracks in the walls or flooring, these should be addressed promptly to prevent any dampness or unwanted airflow from impacting the space. Taking these precautions will help maintain a dry and comfortable environment while preserving the structural integrity of your newly converted basement.
Now that we’ve discussed the essentials of insulating and sealing your new basement, you’re well on your way to creating a well-insulated, comfortable living space with manageable energy costs.
Assessing Air Quality in Your Basement
Your basement holds the potential to become a versatile, comfortable part of your home if it maintains a healthy environment. Poor air quality can lead to an array of health issues and discomfort, making it crucial to address ventilation and test for radon gas accumulation.
Ventilation
Proper ventilation in your basement significantly reduces the buildup of indoor pollutants. Inadequate airflow can result in moisture buildup, leading to mold growth and odors that can impact air quality, particularly concerning for individuals with asthma or allergies. Encouraging fresh air circulation lowers the concentration of harmful pollutants, ensuring a healthier living environment. If your basement is linked to your HVAC (heating, ventilation, and air conditioning) system, it’s essential to guarantee that the ductwork extends into the basement for proper airflow and temperature regulation throughout the space. Installing exhaust fans near areas prone to moisture and odors, such as laundry appliances or bathrooms, can also help. Additionally, a dehumidifier aids in managing moisture levels, preventing mold growth and maintaining an optimal humidity level.
Radon Testing
Radon is a colorless, odorless gas that naturally occurs in soil and rock. It seeps into homes through cracks in the foundation or other openings, accumulating in indoor spaces. Prolonged exposure to radon poses serious health risks, including an increased likelihood of lung cancer. Performing radon testing in your basement helps identify potentially dangerous accumulations of radon gas. Do-it-yourself testing kits available at hardware stores can be used for radon testing or you can contact a professional for more accurate results. In regions with higher radon levels, frequent testing is recommended to ensure ongoing safety. Professional testing services provide comprehensive assessments of radon levels in different parts of your home and offer tailored solutions based on the results.
By addressing ventilation and conducting radon testing, you take proactive steps towards ensuring that your basement provides a safe, healthy living environment for you and your family. With these key strategies in place, you can enjoy your newly converted basement worry-free. For inspiration on how to style your new space, consider browsing through our grey basements lookbook for modern and elegant design ideas.
A well-ventilated and radon-free basement sets the stage for an ideal living space. Now, let’s tackle another critical aspect of safeguarding your basement—waterproofing and combating moisture infiltration.
Basement Waterproofing and Moisture Problems
When converting a crawl space into a basement, one of the most critical considerations is waterproofing. Prioritizing the management of water and moisture issues is essential for the long-term integrity of the newly created space.
A solid foundation for managing water is key to preventing future headaches caused by dampness. Effective drainage systems are crucial for directing water away from your new basement and preventing flooding. This can involve installing gutters and downspouts that direct rainwater away from the home, as well as ensuring proper grading around the perimeter. Additionally, French drains can be installed to capture and redirect groundwater, safeguarding your new basement from potential water damage.
However, even with a reliable drainage system in place, it’s essential to have a backup plan for excess water. This is where sump pump installation becomes crucial, especially for those living in wet climates or areas prone to heavy rainfall. A sump pump helps to remove any accumulated water from the basement, keeping the space dry and free from potential flooding.
For example, a homeowner in an area with high water tables or frequent heavy rains could quickly encounter moisture-related issues such as mold, mildew, and damage to stored belongings without proper drainage and a functioning sump pump.
In ensuring effective drainage systems and considering the installation of a sump pump are vital steps in safeguarding your newly converted basement from potential water-related problems.
Estimating the Cost of Crawl Space to Basement Conversion
Converting a crawl space into a basement is an exciting project, but it’s crucial to be aware of the associated costs before diving in. The total expenditure for this conversion can vary significantly, and it’s essential to understand the factors that contribute to this fluctuation. Obtaining a precise estimate requires careful consideration and evaluation of these factors.
The size of your property is one of the primary determinants of the overall cost. Larger properties unsurprisingly tend to incur higher expenses due to the greater amount of material and labor required. Additionally, basements constructed in regions with complex geographies or limited access generally involve higher labor costs.
Furthermore, the chosen method of conversion significantly impacts the overall cost. For instance, converting a crawl space into a finished basement typically ranges from $47,500 to $135,000, whereas excavating a new basement from scratch could potentially reach as high as $150,000. It’s important to select a method that aligns with your budget and requirements.
Understanding Specific Project Requirements
To ensure an accurate estimation, it’s essential to consider specific project requirements. This involves assessing whether any additional work, such as plumbing installation or raising the home on jacks or underpinning (bracing) is needed. The complexities involved in these additional tasks can impact the overall cost significantly.
For instance, plumbing installation expenses can range from $1,000 to $3,000 depending on fixtures and drainage systems. Moreover, if underpinning (bracing) is required, this can potentially add up to $20,000 to the project. Such additional requirements need to be carefully evaluated and factored into the estimated cost.
Material and Labor Costs
Material costs used in basement conversion play a pivotal role in determining the overall expense. Understanding whether high-quality materials are necessary becomes crucial during the planning phase. Furthermore, the labor costs for excavation and construction should also be considered.
The primary cost contributor for basement excavation is the digging process itself, which can range from $75 to $150 per cubic yard of dirt removed. Pouring a concrete slab for foundation walls and footings typically costs between $10,000 and $30,000.
Given these intricate details and varying costs associated with converting a crawl space into a basement, it’s highly advisable to seek professional guidance and vetted recommendations on navigating through this transformation.
Consider visiting our website for a comprehensive guide on crawl space to basement conversion, including expert recommendations and tips for ensuring a successful transformation.
Understanding the nuances of crawl space to basement conversion is key in making informed decisions about this significant transformation.