Here’s what I learned after battling with hidden mold in my house for years: Eradicating mold calls for careful attention and proper techniques. Implementing a step-by-step process ensures that all traces of mold are removed, contributing majorly towards a healthier home environment. But alas, simply getting rid of mold can be futile if preventative measures aren’t put in place. Surprisingly, preventing mold regrowth could be as simple as making minor adjustments in your daily routine or home maintenance practices. Now, let’s dive into the importance of safety precautions and wearing suitable gear during the entire procedure.
To safely remove mold from your home, start by wearing protective gear such as gloves, a mask or respirator, and goggles. Then, address any moisture issues and improve ventilation to make your home less friendly for mold growth. Scrub mold off hard surfaces with detergent and water, and dry completely. For porous surfaces like drywall, consider replacement if necessary. Be sure to dispose of any materials used for mold removal properly to prevent further contamination.
How to Safely Remove Mold: Step-by-Step Guide and Prevention Tips
Mold can be quite stubborn, and taking a haphazard approach to its removal might leave behind spores that allow it to grow back with a vengeance. To ensure that mold is effectively removed, it’s crucial to follow a systematic process. Here’s how you can handle this task in a safe and efficient manner, along with preventative measures to safeguard your home against future infestations.
Step 1: Limit Your Exposure to Mold
Mold can release spores and mycotoxins into the air, which can be harmful when inhaled or come in contact with your skin. Before you start the removal process, it’s important to protect yourself. Limit your exposure to mold by wearing a mask or respirator, gloves, and goggles.
Step 2: Make Your Home Less Friendly for Mold Growth
In addition to removing existing mold, it’s imperative to address any moisture issues in your home. Moisture is the primary fuel for mold growth. Be diligent in fixing leaks, improving ventilation in damp areas like bathrooms and attics, and using dehumidifiers if necessary. By reducing moisture levels, you can make your home less hospitable for mold.
Step 3: Scrub Mold Off Hard Surfaces
For hard surfaces like tile, glass, or metal, use a mixture of detergent and water to scrub away the mold. Afterward, ensure that the surface is completely dry. If mold has grown on porous materials like drywall or ceiling tiles, consider replacing them entirely to prevent further mold intrusion.
Step 4: Use Vinegar or Bleach Solution for Mold Removal
A simple but effective homemade solution for mold removal on hard surfaces includes using either vinegar or a bleach solution. These substances are known for their ability to kill mold spores while also disinfecting the area. However, remember to never mix ammonia with bleach as this creates a toxic gas.
Step 5: Remove Mold from the Exterior of Your House
Mold doesn’t just grow indoors—it can take root on the exterior of your house too. A solution of bleach and water can be used to scrub away outdoor mold growth. Consider using a stiff-bristle brush which is effective in removing tough outdoor mold.
Step 6: Dispose of Contaminated Items Carefully
When cleaning up after mold removal, be mindful of the contaminated items such as rags used for cleaning. Dispose of these in a sealed garbage bag so as not to spread the mold spores further. Wash your clothes separately in hot water after dealing with mold.
Step 7: Utilize Mold and Mildew Removers
If you prefer using commercial products for mold removal, companies like Home Depot offer various options for purchase. These specialized solutions are formulated to effectively tackle existing mold and mildew problems within homes.
Prevention Tips
Preventative Measures |
Details |
|---|---|
Regularly inspect caulking around areas prone to mold |
– Replace caulking if necessary |
Control humidity levels |
– Ideal humidity level should be below 60% |
Proper ventilation |
– Ventilate damp areas such as bathrooms and kitchens |
Use high-quality caulk |
– Lower quality caulking tends to get moldy at a faster rate |
Use recommended cleaning solutions |
– 1 part vinegar to 1 part water is an effective natural cleaning solution |
By following these detailed steps and adopting preventive measures, you can effectively remove mold from your home while minimizing the risk of its return. Creating a safe, healthy environment for you and your family is well worth the effort!
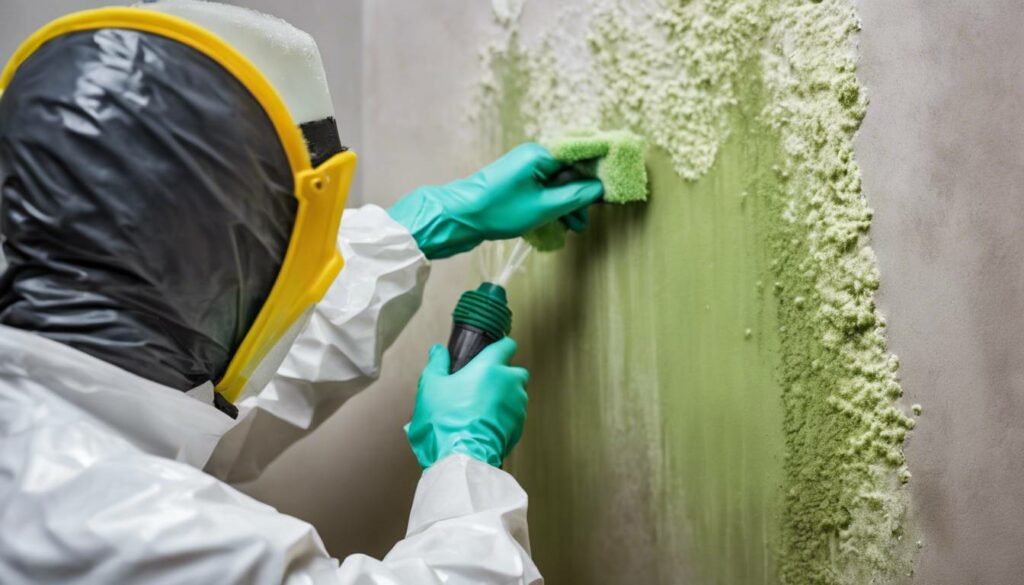
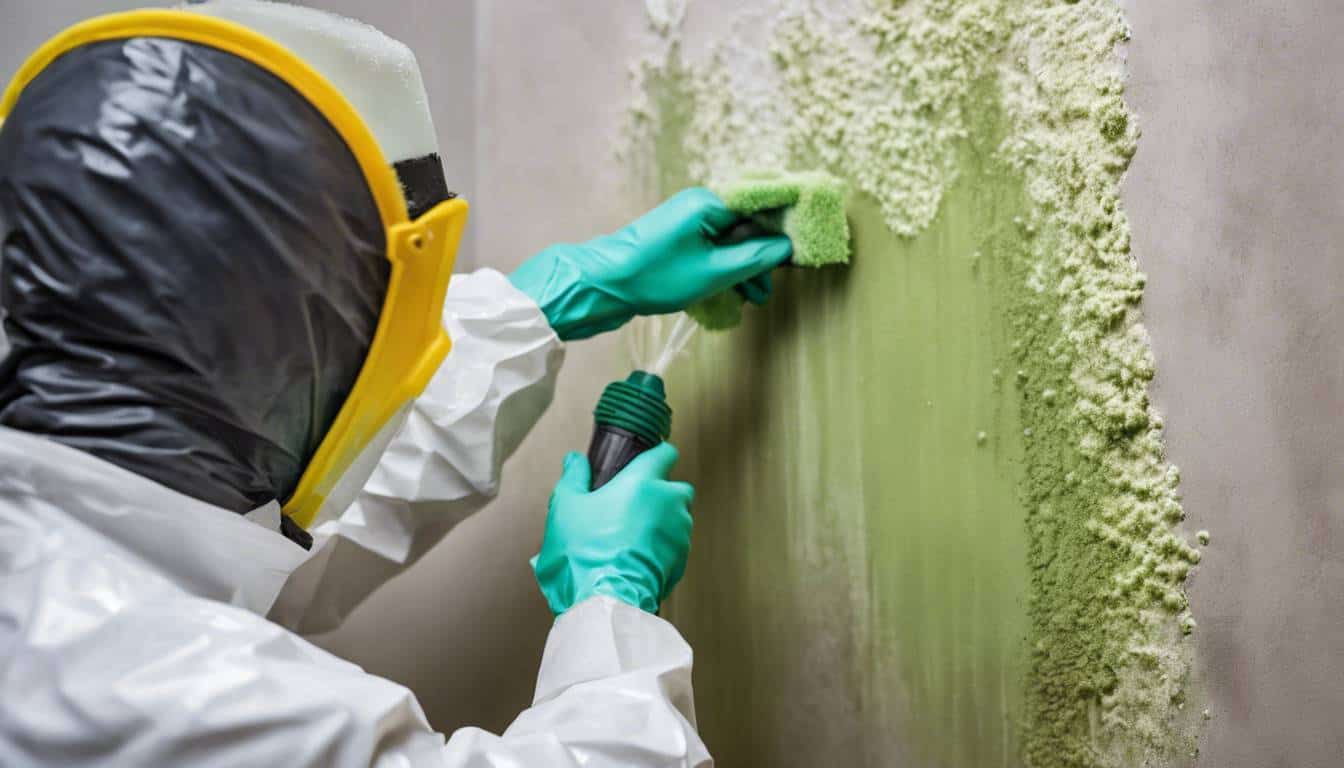
Taking precautions when dealing with mold removal is essential for ensuring the safety of everyone in your household. Let’s explore the specific safety measures and protective gear that play a crucial role in this process.
Safety Precautions and Protective Gear
Mold is not just a nuisance; it can pose serious health risks if proper safety measures are not taken. Exposure to mold can lead to respiratory issues, allergic reactions, skin irritation, and in some cases, more severe health complications. Therefore, it’s paramount to prioritize safety when handling mold infestations.
Protective gear acts as your shield from potential health hazards associated with mold exposure. Wearing gloves, goggles, a mask or respirator, long-sleeved shirts, and pants can help minimize the risk of inhaling mold spores or coming into direct contact with the mold. Let’s break down the significance of each protective measure:
- Gloves: Protect your hands from direct contact with mold and cleaning solutions. Opt for chemical-resistant and durable rubber gloves to ensure full protection.
- Goggles: Shield your eyes from mold spores and cleaning agents, minimizing the risk of irritation or injury.
- Mask or Respirator: A quality respirator like an N95 mask filters at least 95% of airborne particles, safeguarding your respiratory system from inhaling mold spores during cleanup.
Imagine you’re suiting up for a mission into unknown territory – protective gear is your armor against potential dangers. By wearing this equipment, you are mitigating the health risks associated with working around mold. It’s akin to putting on safety gear before engaging in any potentially hazardous activity; it provides a layer of protection while performing the task at hand.
Furthermore, proper ventilation is essential when dealing with mold to prevent exposure to airborne spores. Ensure that the area being cleaned is well-ventilated to minimize the concentration of mold spores in the air. This reduces the likelihood of inadvertently inhaling harmful particles.
It’s vital to understand that prevention is always better than cure when it comes to your health. Prioritizing safety and using the recommended protective gear significantly reduces the risk of adverse health effects due to mold exposure.
Having prioritized safety precautions and protective gear when dealing with mold, let’s now explore effective methods for removing and preventing mold growth in your home.
Solutions for Removing Mold
When it comes to battling mold, it’s crucial to have a strategy that combines effectiveness and safety. Fortunately, there are numerous options available to help you tackle mold growth without resorting to harsh chemicals.
Natural Remedies
Natural remedies such as white vinegar, baking soda, and hydrogen peroxide possess powerful mold-fighting properties and are gentle on both the environment and surfaces in your home.
White Vinegar: Vinegar is an acidic solution that can effectively eliminate mold while also neutralizing musty odors. To use white vinegar as a natural mold remover, mix equal parts water and vinegar in a spray bottle, then spray the affected area. Let it sit for an hour, then wipe clean with a damp cloth. The acetic acid in vinegar not only kills mold but also inhibits its growth, making it an excellent natural solution for mold removal.
Baking Soda: Baking soda is a gentle yet effective abrasive cleaner that can help lift and remove mold from surfaces. Mix a teaspoon of baking soda with water to form a paste, then apply it to the moldy area. Scrub gently with a brush or sponge to remove the mold, then rinse the surface thoroughly.
Hydrogen Peroxide: Hydrogen peroxide is another natural alternative for removing mold. It serves as an antifungal, antibacterial, and antiviral agent, making it an excellent choice for tackling mold and mildew. Apply a 3% concentration hydrogen peroxide solution directly to the moldy area and let it sit for 10 minutes before scrubbing the area with a brush and wiping clean.
These natural remedies are not only effective at removing mold but also safer for both your health and the environment than traditional chemical-based cleaners.
Commercial Mold Cleaners
Commercially available mold cleaners offer additional options for combating stubborn mold growth, providing specialized formulations designed to target specific types of surfaces and mold species.
Specialized Products |
Effectiveness and Safety |
|---|---|
There are various specialized mold cleaning products available on the market designed specifically for tackling different types of surfaces. These products come in spray or liquid form and often include ingredients such as bleach or other powerful antifungal agents to effectively combat mold growth. |
Before using any commercial mold cleaner, carefully follow the manufacturer’s instructions regarding application and safety precautions. While these products can be highly effective at removing mold, they may also contain stronger chemicals that require proper ventilation and protective gear during use. |
It’s crucial to consider the specific needs of your situation when choosing between natural remedies and commercial cleaners. While natural remedies provide eco-friendly alternatives for everyday use, commercial cleaners can offer targeted solutions for more severe or stubborn mold infestations. Always ensure that you are using these products in a well-ventilated area with suitable protective gear to minimize exposure.
Armed with these effective solutions, you can confidently address mold issues in your home while prioritizing safety and environmental consciousness.
Eradicating Mold from Surfaces
When it comes to mold growth on hard surfaces, scrubbing becomes your go-to ally. The good news is, it’s usually quite effective in tackling mold that’s taken root. For this task, you’ll need some simple yet essential supplies: detergent and water.
Here’s how to go about it:
- Protection First: Before you start scrubbing, make sure to protect yourself from exposure to mold spores by wearing a mask or respirator as well as gloves and goggles.
- Prepare the Cleaning Solution: Mix detergent with water to create a cleaning solution. This is an effective way to break down and remove the mold from hard non-porous surfaces like tile, metal, and glass.
- Scrub Diligently: Use a brush or sponge and start scrubbing the affected area vigorously. This will help dislodge the mold and remove it from the surface.
- Dry Thoroughly: After scrubbing, ensure that the area is dried completely. Mold thrives in moist environments, so it’s crucial to eliminate any lingering dampness to prevent regrowth.
However, when dealing with porous surfaces like drywall that have been heavily affected by mold, replacement might be the most viable option. Once mold has deeply penetrated porous materials, it can be extremely challenging to fully remove it without damaging the material itself.
Now let’s talk about removing mold from the exterior surfaces of your house.
Mold on Exterior Surfaces
The exterior of your house is just as susceptible to mold growth as the interior. However, tackling exterior mold requires a different approach due to exposure to outdoor elements.
Here are some steps for effectively removing mold from exterior surfaces:
- Prepare a Bleach Solution: Using a mixture of bleach and water, you can create a powerful cleaning agent to combat mold on exterior walls and surfaces.
- Apply the Solution: Apply the bleach solution generously to the affected areas using a sprayer or spray bottle. Let it sit for some time so that it can penetrate and break down the mold.
- Scrub with Care: Use a stiff bristle brush to scrub the affected areas thoroughly. This physical action helps to dislodge and remove the mold from the surface.
- Rinse Completely: Once the scrubbing is done, rinse the area with clean water to wash away all traces of the bleach solution.
It’s essential to take precautions when using bleach, especially outdoors. Protect nearby plants and vegetation by covering them or rinsing them thoroughly with water before and after applying the bleach solution.
By following these steps diligently, you can effectively rid your home of exterior mold and prevent it from making a comeback.
Mold Prevention Tips

Mold isn’t something most people usually think about until it shows up unexpectedly. But by then, it may have already begun to take hold. That’s why taking proactive measures is crucial to avoiding its potentially harmful effects. The first step to preventing mold is addressing any moisture issues within your home.
Addressing Moisture Issues
Moisture is mold’s best friend, so controlling moisture levels is essential in preventing mold growth. One way to accomplish this is by improving ventilation in areas prone to moisture build-up, such as bathrooms, kitchens, and basements. Proper airflow helps reduce the likelihood of dampness lingering and creating a conducive environment for mold spores to thrive.
Improving ventilation can be achieved through the installation of exhaust fans or by opening windows periodically to allow fresh air circulation. In places like the bathroom, where steam from showers can increase humidity levels, consider using a dehumidifier to effectively reduce moisture in the air.
Limiting Mold-Friendly Conditions
In addition to addressing moisture issues, another vital step in mold prevention is limiting mold-friendly conditions throughout your home. You can do this by keeping your home dry and well-ventilated at all times, promptly fixing any leaks that could lead to water accumulation, and using dehumidifiers in areas with high humidity levels.
By maintaining humidity levels below 60%, regularly inspecting and repairing leaks in plumbing or roofing, and using dehumidifiers in damp areas, you create an environment less favorable for mold growth. Moreover, using mold-resistant products such as paints and drywall can further inhibit the potential for mold to take root and spread.
By being proactive in addressing moisture issues and limiting mold-friendly conditions, you’re taking significant steps toward a mold-free environment. Prevention is truly the best defense against the insidious presence of mold in your home.
Taking these proactive measures can significantly reduce the likelihood of mold growth in your home. Now, let’s move on to explore how to effectively sanitize an area infected with mold.
Sanitizing the Mold-Infected Area
When it comes to dealing with mold, simply removing the visible patches isn’t enough. What’s equally important is sanitizing the affected area to eliminate any remaining spores and prevent the mold from coming back. This step helps ensure a safe and healthy environment for you and your family.
To start, it’s essential to limit your exposure to mold during the cleaning process. Wear a mask or respirator, gloves, and goggles to protect yourself from inhaling or touching mold spores. Also, make sure the area is well-ventilated to prevent the spread of spores to other areas of your home.
After removing any visible mold growth, it’s time to sanitize the area thoroughly. One effective method for sanitizing hard surfaces is to use a bleach solution. A simple mixture of bleach and water can help kill mold spores and prevent regrowth. Remember, never mix ammonia with bleach as this combination can produce toxic fumes.
When cleaning hard surfaces like walls and countertops, use a scrub brush and the bleach solution to thoroughly clean the area. Make sure to allow the solution to sit for a few minutes before rinsing and drying the surface completely.
For porous surfaces like drywall that can’t be effectively sanitized, it’s often best to consider replacement rather than risking further mold growth. This critical step ensures that any lingering mold spores are eliminated, reducing the risk of future contamination in your home.
Recommended Sanitizing Methods
Proper disposal of cleaning materials and clothes used for mold removal is often overlooked but crucial in preventing re-contamination. Dispose of rags used for mold removal in a sealed garbage bag and wash your clothes separately in hot water to ensure any remaining spores are removed.
To effectively remove mold from the exterior of your house, create a solution of bleach and water and scrub the surface with a stiff bristle brush. This helps eliminate any outdoor mold present on surfaces which can easily spread to indoor areas if not addressed.
Popular hardware stores like Home Depot offer various mold and mildew removers for purchase that can aid in this process, providing convenience and accessibility in undertaking this essential task.
By following these recommended sanitizing methods, you can effectively eliminate mold spores and ensure a clean, safe environment after mold removal, reducing the risk of re-contamination and safeguarding the well-being of your home and family.
In maintaining a pristine living environment, specific methods tailored to different surfaces play a vital role. Let’s now explore how to tackle mold on various surfaces with targeted techniques.
Specific Methods for Different Surfaces
When dealing with mold on different surfaces, you must match the method to the material. Each surface requires a particular approach to ensure that mold is removed completely. Let’s start with porous surfaces like drywall.
Porous Surfaces
Porous materials like drywall can be especially challenging when it comes to removing mold. The nature of drywall means that mold can penetrate deep beyond the surface layer, making it difficult to fully eradicate. In such cases, it is often recommended to consider replacing the affected drywall altogether to ensure complete removal of the mold. This may seem drastic, but it eliminates any risk of remaining spores causing further issues. Mold can affect indoor air quality, and porous surfaces are particularly good at trapping spores and mycotoxins within their structure. By replacing the affected drywall, you not only remove the visible mold but also address any potential hidden mold inside the material.
Hard Surfaces
Unlike porous surfaces, hard surfaces provide a better foundation for cleaning and removing mold effectively. The process includes scrubbing the affected areas with an appropriate cleaning solution. Using solutions such as vinegar or a bleach solution can help break down and remove mold from hard surfaces. However, it’s essential to be cautious when using these solutions and to avoid mixing ammonia with bleach, as this can produce harmful fumes. It’s crucial to emphasize the importance of thorough drying after cleaning hard surfaces because mold thrives in damp environments, so ensuring that all moisture is removed from the surface is key in preventing regrowth.
When it comes to cleaning household objects or items that can’t be easily replaced, using a mild cleaner and thorough drying can work wonders.
By understanding the specific methods for different surfaces, you can effectively tackle mold growth in your home while ensuring that the cleaning process is thorough and safe for both yourself and your living environment.
Furthermore, proper maintenance and prevention strategies are vital to ensure that mold doesn’t return after removal.
By following these methodical steps for safe mold removal and prevention, you can create a healthier living environment and safeguard your home against future mold issues.