My garage used to be dark, hot and smelled like moisture… until I finally figured out how to fix it. Here’s what I learned: Transforming a garage without windows into a remarkable space requires thoughtful design. Opting for modern garage door styles like those with front facing frosted glass panels or small, well-placed windows can fill your space with natural light while still maintaining your privacy. Interestingly, carriage-style doors or doors with decorative hardware can enhance the overall aesthetic, creating a warm and inviting entrance. Our website offers an array of stylish garage door options providing you an ample platform to choose from. You’ll soon find that accessory selection is key in developing a welcoming ambiance within your windowless garage.
One effective method to cool a windowless garage is by using powerful portable fans to improve ventilation. Additionally, utilizing a dehumidifier to lower humidity levels can help create a more comfortable environment. For a more comprehensive solution, consider air conditioning units designed specifically for garages. Always consider the amount of time spent in the garage and the desired temperature before selecting a cooling system.
Best Garage Door Styles for Windowless Garages
When it comes to choosing a garage door for a windowless garage, style and functionality are key factors to consider. A garage door is not just a practical element; it also significantly contributes to the overall aesthetic of your garage space. Modern design options have evolved to offer not only practicality but also visual appeal, ensuring that your garage door complements the overall look of your property.
One outstanding choice for a windowless garage is a modern frosted glass panel door or one with strategically placed small windows. These designs allow natural light to filter into the garage while maintaining privacy and security, creating a bright and welcoming atmosphere without sacrificing discretion.
Carriage-Style Doors and Decorative Hardware
In addition to modern-style doors with glass panels, carriage-style doors and those with decorative hardware present excellent options for enhancing the external appearance of your garage. Carriage-style doors are reminiscent of traditional barn doors and can add a touch of rustic charm to your property, complementing various architectural styles from classic to contemporary.
Considering Product Recommendations
If you’re considering specific product recommendations, you might want to explore stylish garage door options available on our website. These doors not only offer practical functionality but also contribute to the overall aesthetic of your garage space. From classic carriage-style doors to modern frosted glass panels, you’ll find a range of stylish options to choose from.
For instance, selecting a sleek, modern frosted glass panel door not only brings in natural light but also adds a contemporary touch to your overall home exterior. If privacy is important, these types of doors offer an excellent compromise between light and discreetness.
As you ponder over the ideal style for your windowless garage, remember that both aesthetic appeal and functional features should guide your decision-making process. The right garage door can redefine the look and feel of your space while providing practical benefits such as improved lighting and visual interest.
In this high-stakes game of creating an inviting yet functional space, let’s now turn our attention to enhancing the insulation in your windowless garage to ensure year-round comfort.
Insulating Your Windowless Garage
Insulating your windowless garage extends beyond just trapping cold air or keeping the summer heat at bay. It’s an investment in maintaining a comfortable and energy-efficient environment. Here are some critical steps and materials to consider when insulating your garage effectively.
Insulation Materials
When it comes to insulation for your garage, two popular options are fiberglass and foam board. Fiberglass insulation is widely used due to its cost-effectiveness and ease of installation. It is available in pre-cut batts or rolls that can be fitted between wall studs and ceiling joists. Foam board insulation, on the other hand, provides excellent thermal resistance and can be installed on the walls, ceiling, and garage door to create a more consistent temperature inside the garage door to create a more consistent temperature inside the garage.
For garage doors, insulated panels with a high R-value are recommended. The R-value measures the effectiveness of the insulation material in resisting heat flow. Look for insulation with an R-value ranging from R-13 to R-25 based on the climate in your area. A higher R-value provides better insulation against extreme temperatures, keeping your garage warmer in winter and cooler in summer.
Weather Stripping
To complement the insulating materials, it’s crucial to apply weather stripping around the perimeter of the garage door. Weather stripping helps prevent air leaks, maintaining a consistent temperature inside the garage while also keeping out dust, debris, and pests. Opt for durable, flexible weather seals that effectively block drafts and ensure a snug fit around the garage door.
Consider investing in weather-resistant materials such as vinyl or silicone for long-lasting performance. Regularly inspect and replace damaged weather stripping to preserve its efficacy in sealing off the entry points of your windowless garage.
By properly insulating your windowless garage with effective materials and weather stripping, you’ll not only create a more comfortable environment but also save on energy costs while providing protection against external elements.
Moving on from ensuring a well-insulated garage, let’s now explore the captivating transformation that can be achieved by sprucing up the interior of this space.
Transforming Interiors with Paint and Decor

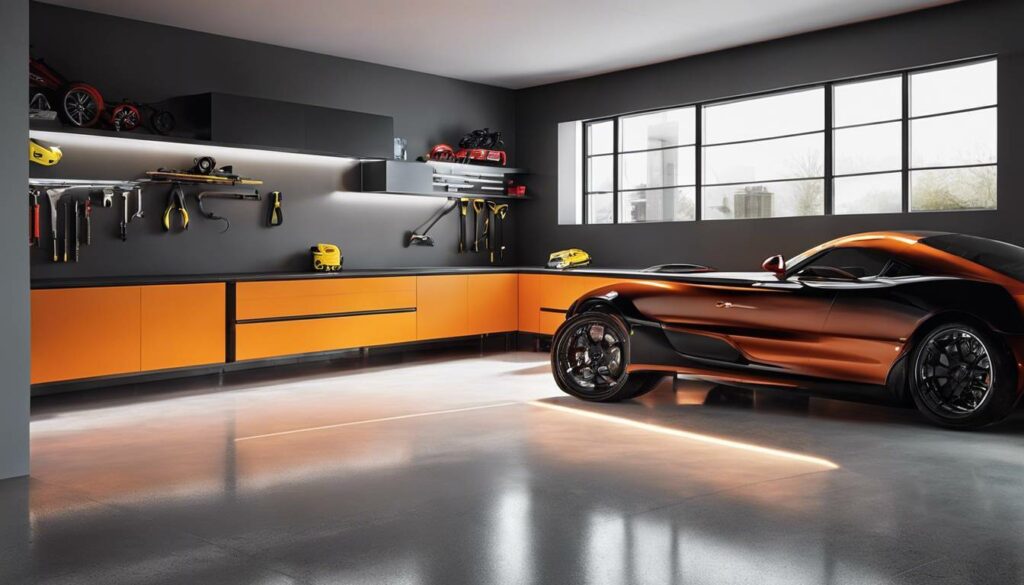
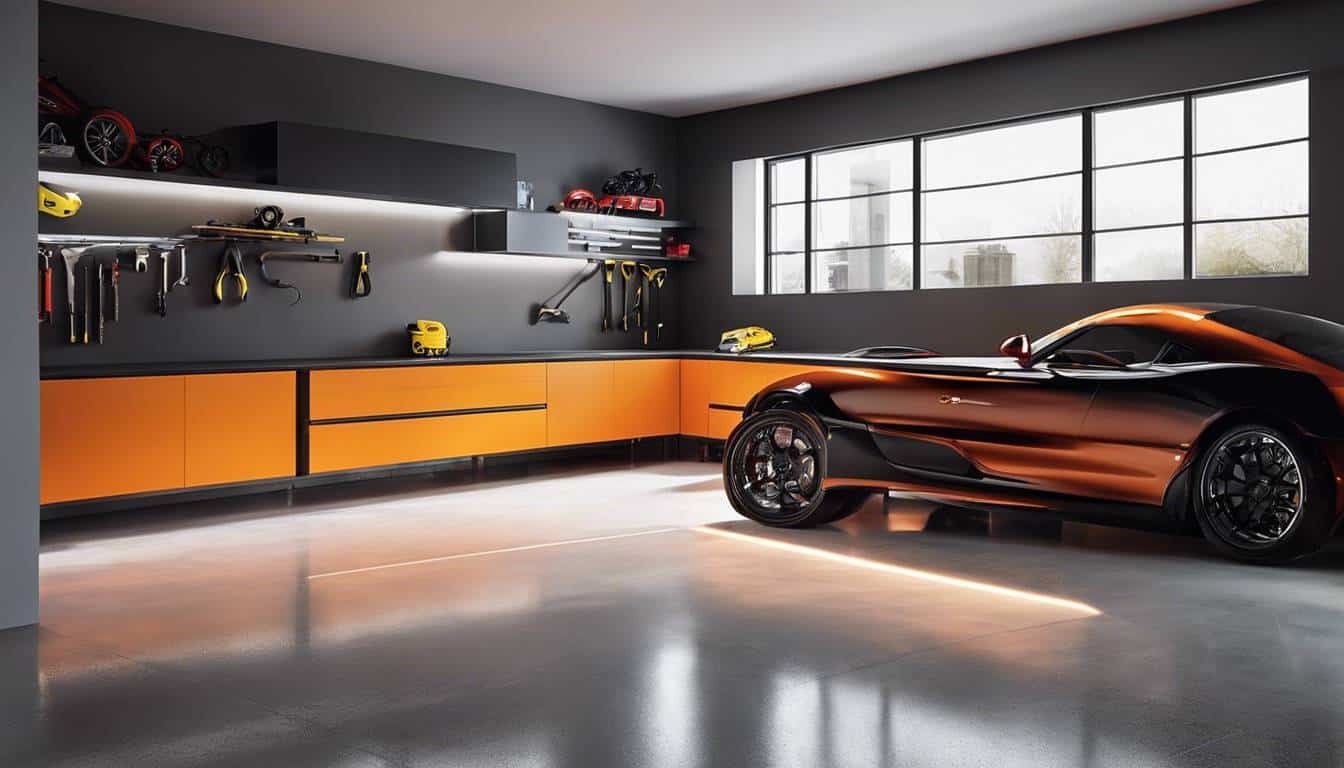
When faced with a windowless garage, the space can often feel dark and unwelcoming. However, with the right paint colors, you have the power to entirely change the atmosphere. Light colors like white, pale gray, or soft pastel tones are incredibly effective in making the space feel brighter and more open. Imagine stepping into a softly lit room filled with objects that represent comfort and warmth—this is the impact of well-chosen light colors in a garage. They truly make a significant difference in how you perceive the area.
Light-colored walls do more than giving off an impression of brightness; they also reflect artificial light, thus enhancing visibility in the garage and creating a sense of openness and spaciousness. For example, a gray garage can create a modern, spacious feel. As light bounces off the walls, it reduces shadows and contributes to improved ambient lighting, making your garage brighter without the need for additional light fixtures.
Consider wall decor as an essential component of your transformation project. Wall art, murals, or decals play an important role in adding character to the space and creating visual interest. For a bold and energetic look, you might even consider an orange garage theme. These elements help soften the industrial look often associated with garages, making it a more inviting place to spend time. If you’re setting up hobby or workshop areas within your garage, this can be especially beneficial. It’s akin to how artwork transforms a house into a home; it brings character and personality to an otherwise plain canvas.
Now think about wall murals depicting beautiful landscapes or quotes that inspire—these can truly make your windowless garage feel like a personalized retreat from everyday life.
In need of unique wall art or murals for your garage transformation? You can find suitable decor products available for purchase on our website that will help you spruce up your garage interiors beautifully.
Painting your windowless garage with light colors and adding carefully selected wall decor has the power to transform it into a bright, visually appealing space that invites you in every time you walk through those doors.
The next step in crafting an ideal environment in your windowless garage deals with illuminating the space effectively even without natural light. Let’s explore how proper lighting can further enhance the ambiance and functionality of your windowless sanctuary.
Effective Lighting for a Windowless Garage
A windowless garage can easily become dim and uninspiring, but with the right lighting, it can transform into an inviting and functional space for all sorts of projects. The key to achieving this is through well-planned lighting that offers ample brightness and focus in all the right places.
LED Lighting
When it comes to brightening up your windowless garage, LED light fixtures are an ideal choice. Not only do they provide ample illumination, but they are also energy-efficient and have a long lifespan. This means you won’t have to worry about constantly changing bulbs or high electricity bills. Additionally, LED lights can be paired with smart controls, allowing you to adjust the brightness and even schedule lighting operations according to your needs. With smart controls, you can turn the lights on and off without fumbling around in the dark or while your hands are full.
Versatility of LED Lighting
One of the best things about LED lighting is its versatility – you can choose from a variety of fixtures such as overhead lights, strip lights, and task lights to create customizable lighting designs specific to different areas within your garage. This type of flexibility allows you to tailor the lighting according to your activities, whether it’s general illumination or focused task lighting for specific work areas.
Task Lighting
In a garage where various tasks or hobbies take place, having focused task lighting is crucial for illuminating specific zones for projects or repairs. Adjustable LED work lights and under-cabinet lighting are excellent options for this purpose. Adjustable LED work lights give you the advantage of directing light exactly where you need it, ensuring that your workstations are well lit without creating glare or shadows. On the other hand, under-cabinet lighting helps brighten up darker corners and provides additional visibility for detailed tasks such as woodworking or automotive repairs.
By incorporating LED lighting and strategic task lighting, your windowless garage can transform into a well-lit and functional space where every corner is illuminated for both practical use and aesthetic appeal. Brighten up your workspace and make it an enjoyable place to spend time in by focusing on effective lighting solutions tailored to your needs.
As we’ve shed light on the importance of effective interior design elements for a windowless garage, let’s now look at ventilation solutions that contribute to a healthy environment in this unique space.
Ventilation Solutions for a Healthy Garage
A well-ventilated garage is crucial for maintaining air quality, managing temperature, and ensuring a comfortable and safe environment. Without windows, the airflow can be restricted, leading to stagnant air and an accumulation of fumes or odors, especially if the space is used for woodworking or automotive maintenance. To address these concerns and improve air circulation, several ventilation solutions can be considered.
Exhaust Fans
One effective solution is the installation of exhaust fans. These fans help remove fumes, odors, and excess humidity from the garage, contributing to a healthier indoor environment. Additionally, exhaust fans assist in preventing the buildup of potentially harmful airborne particles that can result from various activities such as woodworking or vehicle repairs.
There are different types of exhaust fans available, ranging from simple wall-mounted options to more complex systems. A strategically placed exhaust fan can efficiently remove air from the garage while simultaneously allowing fresh air to enter the space. This approach not only facilitates better air circulation but also helps regulate temperature and reduce the presence of pollutants.
Portable Air Purifiers
In addition to exhaust fans, portable air purifiers offer a comprehensive solution for improving overall air quality within the garage. These units are designed to capture and eliminate airborne particles, including dust, pollen, and pet dander, which may be present in the workspace. Moreover, portable air purifiers can effectively neutralize odors and help maintain a healthier environment.
When selecting a portable air purifier for your windowless garage, consider models equipped with HEPA (High-Efficiency Particulate Air) filters. HEPA filters are highly efficient at capturing microscopic particles, ensuring that the air circulated within the garage is clean and free from potentially harmful contaminants. Additionally, some air purifiers feature activated carbon filters that target odors and chemical vapors, further enhancing air quality.
The benefit of portable air purifiers is their mobility and versatility, allowing them to be conveniently relocated based on specific requirements within the garage. Whether it’s addressing airborne particles generated during woodworking projects or removing lingering odors from automotive maintenance tasks, portable air purifiers offer a tailored approach to maintaining a healthier indoor environment.
By incorporating exhaust fans and portable air purifiers into your windowless garage design, you can effectively manage ventilation and promote a healthier workspace conducive to various activities such as woodworking or automotive maintenance.
The next phase of optimizing your garage space involves efficient storage solutions that maximize functionality without compromising on space.
Smart Storage Solutions for Maximum Space Utilization
Are you tired of walking into a cluttered, disorganized garage? You’re not alone. Many people struggle to maintain an orderly garage due to the lack of natural light and limited space. But fear not! Several smart storage solutions can transform your cramped garage into an efficient and well-organized space. But fear not! Several smart storage solutions can transform your cramped garage into an efficient and well-organized space.
Let’s start with wall-mounted shelving. These sturdy shelves are a game-changer when it comes to utilizing vertical space effectively. By installing durable, wall-mounted shelves, you can free up valuable floor space and keep your belongings neatly organized. It’s like adding an extra dimension to your garage, making it feel more open and spacious.
Next up, we have overhead storage racks. These innovative racks take advantage of the often underutilized vertical space in your garage. They are perfect for keeping seasonal items and infrequently used belongings neatly stowed away, creating a clutter-free environment. By using overhead storage, you can maximize every inch of available space and ensure that your garage remains tidy and functional. At Amazinghomedecorco.com, we offer a variety of space-saving storage products designed specifically for this purpose.
For instance, our modular overhead storage systems are customizable and adaptable, catering to the ever-changing storage needs of a garage. Whether it’s bulky seasonal items or rarely used belongings, these racks provide a convenient solution for keeping them organized and easily accessible.
By incorporating these smart storage solutions into your windowless garage, you can create a well-organized and efficient space that maximizes every inch of available room. With clutter out of the way, you’ll be amazed by how much more functional and enjoyable your garage becomes.
With the right storage solutions, even a windowless garage can be transformed into an organized and spacious area where everything has its place. Good luck with your garage makeover project!