If it’s your first time sanding hardwood floors, you’re in for a treat! I’m going to share what I learned after refinishing hardwood floors the wrong way the first time sanding hardwood floors, you’re in for a treat! I’m going to share what I learned after doing it all wrong the first time. Sanding hardwood floors is a task that requires methodical planning and careful execution. It’s not just about running a sander over the floor but also clearing the room of obstacles, protecting your belongings from dust and ensuring optimal conditions for the task at hand. Ever noticed the fine dust suspended in sunlight after flicking a dusty rug? That’s the kind of scenario you’ll want to avoid when sanding your floors. Proper preparation is key to minimizing dust and achieving the best results. Now, grab that broom, it’s time to clear out.
Sanding hardwood floors involves several key steps, including preparing the room, performing rough sanding using a drum or belt sander, fine-tuning with a floor edger or orbital sander, applying wood stain and protective finish, and taking necessary safety precautions. These steps are crucial for achieving a beautifully refinished hardwood floor.

Preparing Your Hardwood Floors for Sanding
When it comes to refinishing your hardwood floors, proper preparation is crucial for a successful outcome. This begins with clearing the room of all furniture, rugs, and fixtures to create an unobstructed workspace. This not only prevents dust and debris from settling on these items but also provides ample space for maneuvering the sanding equipment without any hindrances.
Once the room is cleared, the next step is to meticulously inspect the floor for any protrusions such as nails, staples, or loose floorboards. These can pose safety hazards during the sanding process and potentially damage the sanding equipment. Addressing these issues beforehand will ensure a smooth and safe sanding experience, allowing the flooring to be refinished without obstructions.
After addressing any protrusions, it’s important to thoroughly clean the floor to remove any dirt or debris that could interfere with the sanding process. This initial cleaning step sets the stage for a smoother sanding process and ensures a cleaner finish. It’s best to use a combination of sweeping and vacuuming to effectively eliminate any loose particles from the surface.
The presence of dirt or debris during the sanding process can compromise the quality of the final finish, leading to inconsistencies and imperfections. Therefore, taking the time to thoroughly clean the floor beforehand is essential in achieving professional-looking results.
With our floors now pristine and clear of obstructions, let’s get into the nitty-gritty of sanding—specifically the selection of grits and optimal sander usage.
Sanding Basics: Grit Selection and Sander Usage
Sanding your hardwood floors can seem daunting, but understanding the basics of grit selection and sander usage can make a world of difference in achieving a beautifully refinished floor. With the right approach, you can transform your worn floors into stunning focal points of your home. The choice of sandpaper grit and the appropriate type of sander are crucial factors in determining the success of this DIY project.
Grit Selection
The grit of the sandpaper determines how rough or smooth the floor will be after sanding. It’s important to start with a coarse 36-60 grit sandpaper to remove the existing finish, level the floor, and eliminate surface imperfections and deep scratches. Gradually progress to medium (80-100 grit) and then fine (120-150 grit) for a smoother finish. This sequential progression ensures a uniform and polished appearance once the refinishing process is complete.
Sander Usage
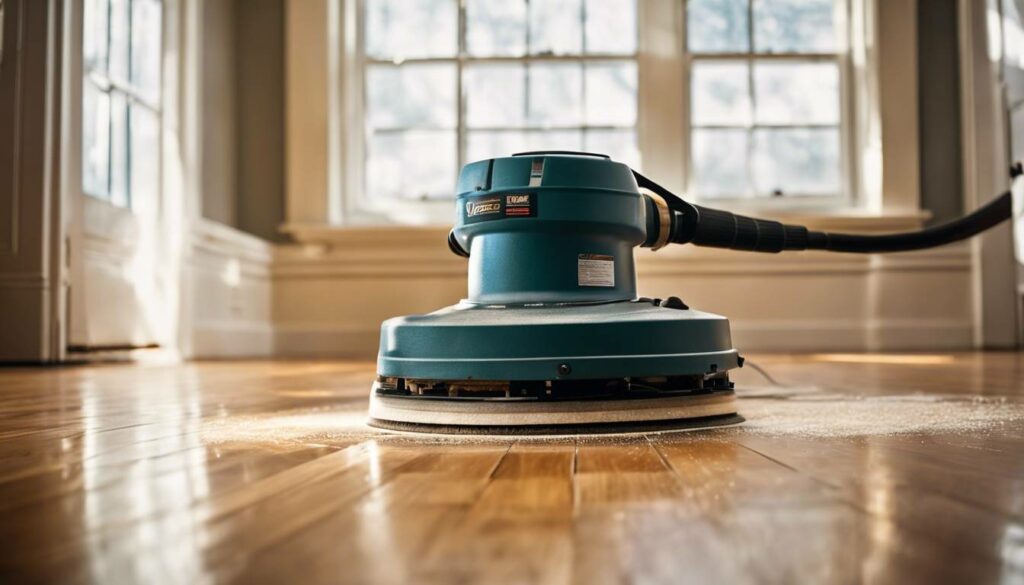
Selecting the right sander and using it correctly is paramount. For larger areas, a drum sander efficiently covers more ground, while a smaller orbital sander is ideal for edges, corners, or smaller sections that are inaccessible to the drum sander.
Just like using a brush appropriate for painting a small picture frame, choosing the correct size and type of sander ensures effective coverage for all areas of your flooring, regardless of their size or shape. It’s crucial to move the sander in the direction of the wood grain during operation to prevent unnecessary scratches or uneven sanding marks.
Now equipped with these fundamental insights, let’s explore how to execute each step effectively while keeping safety and precision in mind as we continue our refinishing journey.
Smoothing the Wood: Tools and Techniques

After sanding the floor with a drum or belt sander, achieving a uniformly smooth surface is crucial before applying any finishing touches. This is where a floor buffer with a fine-grit screening pad comes in handy. The buffer levels minor unevenness and buffs away any lingering sanding scratches, ensuring that your hardwood floor is perfectly prepped for the next phase.
The floor buffer works like magic. As it glides over the floor, it gently sands away inconsistencies and imperfections, leaving behind a level and smooth surface. Using a fine-grit screening pad ensures that your floor has a consistently smooth texture.
While the floor buffer takes care of most parts of the floor, certain areas require more focus. This is where edging tools come into play. A floor edger combined with sandpaper helps sand those tricky spots that the larger sanders couldn’t access. It ensures that every nook and cranny gets the attention it needs, resulting in consistent sanding across the entire floor.
Consistency is key when it comes to sanding hardwood floors. By using both the floor buffer and edging tools, you guarantee a uniform finish throughout, leaving no room for uneven patches or overlooked spots. This stage prepares your hardwood floor for the final steps of refinishing, allowing for an even application of stain and finish.
With these effective tools and techniques, your hardwood floor will be ready for the next phase of the refinishing process—staining and finishing.
Cleaning: Vacuuming and Wiping the Floor
Once the sanding process is complete, the floor will be covered in a layer of fine dust that needs to be removed before applying any finish. This crucial step ensures that you can protect your hardwood floors effectively with the new finish. The first step in this process is thoroughly vacuuming the floor.
A high-quality vacuum cleaner with a bare floor setting is ideal for this task. Focus on removing every last trace of sanding dust, especially from corners and edges, to ensure all dust particles are removed.
Thorough vacuuming not only eliminates surface dust but also prevents dust from interfering with the finish application later on. It ensures a clean and smooth base for the finishing process, crucial for achieving a professional-looking result.
Imagine trying to paint a wall without cleaning it first; you’d end up with smudges and an uneven finish. Similarly, any residual dust on the floor can compromise the integrity of your hardwood floor project.
Having thoroughly vacuumed the floor, the next step is wiping it using a tack cloth to remove any remaining dust particles and prepare it for refinishing.
Wiping the Floor
After vacuuming, use a tack cloth to wipe the floor surface. The tack cloth will pick up any remaining dust that might have been missed by the vacuum cleaner.
This seemingly simple step is indeed crucial as it ensures that the surface is completely clean and free of any lingering particles that could affect the finish. Any remaining dust, if not removed, can lead to imperfections in the final finish.
The purpose of using a tack cloth is to achieve a clean and smooth surface, free from any contaminants that could compromise the finishing process. It’s essentially like giving your floor a final polish before applying the new finish.
If you’ve ever tried applying nail polish after buffing your nails, you’d understand that even a small speck of dust can lead to an uneven and less desirable result. The same principle applies when preparing a hardwood floor for refinishing.
By combining thorough vacuuming with meticulous wiping using a tack cloth, you’re ensuring that your hardwood floor restoration project starts with a clean slate, setting the stage for a flawless and professional finish.
Applying the Final Finish: Tips and Tricks
Once your hardwood floor has been thoroughly sanded, it’s ready for the finishing touch. The final finish serves a dual purpose—it enhances the natural beauty of the wood while providing essential protection from daily wear and tear. Here are some important tips to remember when applying the final finish to your hardwood floors.
Choose the Right Finish
There are different types of finishes available for hardwood floors, including polyurethane, varnish, shellac, and penetrating sealers. Each type of finish has unique characteristics and levels of durability. Polyurethane is the most commonly used finish due to its exceptional durability and resistance to scratches and water. On the other hand, varnish provides a glossy finish, while shellac offers a natural, warm appearance.
Pro Tip: Water-based polyurethane finishes are a popular choice for DIY projects as they have a minimal odor, dry quickly, and are easy to clean up. Additionally, they make it easier to maintain and clean your wood floors in the long run.
Application Techniques
When applying the final finish to your hardwood floor, it’s crucial to use even and smooth strokes for a consistent finish. An applicator pad or synthetic brush is often recommended for applying the finish in thin, uniform coats. It’s essential to avoid leaving any drips or bubbles as they can harden into unattractive imperfections on your floor.
Multiple Coats for Added Protection
Consider adding multiple coats of finish for enhanced protection and resilience. Typically, two to three coats are recommended to ensure that your hardwood floor is well-protected from daily wear and tear. Each additional coat strengthens the overall durability of the finish, providing an extra layer of defense against scratches, moisture, and UV damage.
Think of it like armor for your hardwood floor—each coat acts as an additional shield against potential damage, extending the lifespan of your beautifully refinished flooring.
Ensure Proper Drying Time
After each coat of finish is applied, allow ample time for it to properly dry before adding another coat. This typically ranges from 24-48 hours depending on the type of finish used. Ideal temperature and humidity levels play a significant role in the drying process—maintaining a controlled environment within the range of 65-75°F with 40-50% humidity is optimal for achieving the best results.
Quick Tip: Time-saving tip: Use fans or open windows to improve air circulation in the room where you are applying the finish.
By paying careful attention to these tips and techniques, you can ensure that your hardwood floors not only look stunning but also receive superior protection that will stand the test of time.
As we’ve now covered essential steps in refinishing your hardwood floors, it’s time to focus on key safety measures for both yourself and your home in this next section.
Safety Measures: Protecting Yourself and Your Home
Sanding hardwood floors is a rewarding yet physically demanding task that requires careful attention to safety precautions. The process of sanding wood generates a considerable amount of dust and noise, making it essential to equip yourself with the right protective gear.
Safety Gear: Shielding Yourself from Harm
When sanding your hardwood floors, wearing a dust mask, particularly one rated N95 or higher, is vital. This ensures protection from inhaling harmful airborne particles such as wood dust and finishes. Safety goggles rated ANSI Z87.1 or higher provide essential eye protection against flying wood particles, while ear protection with an NRR (Noise Reduction Rating) of 25 or higher safeguards your hearing from the loud noise produced by sanding equipment. In addition to these protective measures, it’s advisable to use durable work gloves for handling materials and tools, ensuring that your hands are shielded from potential injuries.
Protecting Your Home: Preventing Dust Circulation and Fire Hazards
In addition to safeguarding yourself, it’s crucial to take steps to protect the surrounding environment. Covering home vents and grates effectively prevents dust generated during the sanding process from circulating throughout your living space, reducing the need for extensive cleaning after the project is complete. Properly disposing of oil-soaked rags is essential for minimizing the risk of fire hazards. Oil-soaked rags have the potential to generate heat as they dry, which may lead to spontaneous combustion if not properly handled.
Think of it this way: just like bundling up in a warm coat before heading out into the cold protects you from harsh weather conditions, using the right safety gear shields you from potential harm during the floor sanding process.
By taking these proactive safety measures both for yourself and your home, you ensure a secure and controlled environment conducive to completing the refinishing project successfully.
Safety should always be a priority when undertaking projects involving potential risks. By ensuring personal safety and taking steps to protect the home environment, you are setting yourself up for a successful hardwood floor refinishing endeavor.