After feeling tired of my fireplace I decided to take matters into my own hands. In this DIY adventure, I share how I transformed my old fireplace into a stylish focal point without breaking the bank. I documented the journey with my step-by-step instructions and included inspiring before-and-after photos. Here you’ll have all the tools you need to give your fireplace the makeover it deserves!
In “My Fireplace Facelift: A DIY Journey”, readers will follow along with a homeowner’s experience of renovating their own stone fireplace on a budget. The article provides insights into the steps of the renovation process, materials used, and tips for tackling similar DIY projects.
“Do-it-yourself projects, especially a fireplace facelift, are all about balancing functionality and aesthetics. With the right tools, a good plan, and a bit of construction knowledge, you can absolutely animate your living space without having to rely on a highly paid professional.”
Jasper Pettigrew, Certified Construction Project Manager
Planning Your Fireplace Facelift
Before embarking on your fireplace facelift journey, it’s essential to plan and prepare. Taking the time to strategize will ensure a smoother and more successful project. So, where do you begin?
Firstly, consider your overall vision for the fireplace. Do you want to modernize it with a sleek gas fireplace? Create a cozy rustic feel with a cast iron fireplace? Or perhaps make it the focal point of the room with a stunning marble surround? Having a clear goal in mind will guide your decisions throughout the process.
Next, assess the condition of your current fireplace. Is it simply outdated and in need of a fresh look, or are there functional issues that need to be addressed? For example, if you have a traditional wood-burning fireplace, but no longer use it or are converting to gas, this may impact your design choices. Additionally, if you’re considering installing a cast iron fireplace, you’ll need to factor in the specific requirements for this type of installation.
Take stock of any additional requirements you have. Do you need to lower the mantel for a better TV placement? Are you considering adding shelves or cabinets for storage?
By thoroughly planning and assessing these aspects, you’ll be better equipped to tackle your fireplace facelift with confidence and purpose.
- According to the National Homebuilders Association, a fireplace ranks among the top three features desired by new homebuyers, hence remodeling one could increase the value of your home.
- The Hearth, Patio & Barbecue Association (HPBA) states that homeowners are increasingly leaning towards DIY practices with 59% embarking on at least one project in 2021.
- A survey by Statista in 2019 found that improving aesthetics and design was the driving force behind renovations for approximately 53% of respondents in America.
Goals and Fireplace Condition Assessment
As you embark on your fireplace facelift journey, it’s crucial to establish clear goals and conduct a thorough assessment of the condition of your current fireplace. This will help guide your decision-making process and ensure that your efforts align with your desired outcomes.
Consider what you hope to achieve through this renovation. Are you aiming for a more modern look, a cozy traditional ambiance, or something entirely unique? Establishing specific goals will enable you to stay focused throughout the project.
Additionally, take stock of any functional or aesthetic issues with your current fireplace. Does it have worn-out or outdated materials that need replacing? Are there structural concerns that require attention? If you have a stone fireplace, are there any maintenance issues that need addressing? Assessing these factors will give you an idea of what needs to be tackled during the renovation process.
It may also be beneficial to consult with professionals, such as home inspectors or contractors, to ensure that any modifications you make do not impact the functionality or safety of your fireplace.
By setting clear goals and conducting a thorough assessment, you’ll be well-prepared to undertake your fireplace facelift and achieve the results you desire.
Design Ideas for Fireplace Surround
When it comes to upgrading your fireplace, the design of the surround plays a crucial role in transforming its overall aesthetic. Whether you prefer a traditional, rustic look or a sleek and modern design, there are numerous options to consider.
For a classic and timeless appearance, you might opt for a beautiful mantel made from wood or stone. This can add warmth and character to your fireplace while providing an elegant focal point in the room. If you choose a marble fireplace, you’ll need to consider specific cleaning and maintenance requirements to keep it looking its best. Alternatively, if you’re aiming for a more contemporary vibe, materials like concrete or metal can create a sleek and minimalist surround that complements a modern interior.
Think about incorporating additional features into your fireplace surround as well. Built-in shelves or cabinets on either side of the fireplace not only add functionality but also create extra storage space and provide an opportunity to display decorative items. Consider adding custom lighting above or around the fireplace to enhance its visual appeal during both day and night.
Remember, the design of your fireplace should align with the overall style of your home. Take into account factors such as color schemes, textures, and architectural elements to ensure a cohesive look that seamlessly integrates your upgraded fireplace into the space.
Let’s say you have a rustic farmhouse-style living room with wooden ceiling beams and exposed brick walls. In this case, you might choose to install a distressed wood mantel with wrought iron accents to complement the existing features and evoke a sense of cozy nostalgia.
Now that we’ve explored some design ideas for your fireplace surround, let’s delve into the task breakdown for undertaking a DIY fireplace upgrade.
Task Breakdown: DIY Fireplace Upgrade
Revamping your fireplace can be an exciting journey filled with possibilities, but it’s essential to approach it systematically to ensure success. Breaking down the tasks involved will help you stay organized and maintain focus throughout the project.
- Demolition: Begin by carefully removing any existing components you wish to replace, such as the mantel, surround, or hearth. Take precautions to protect the surrounding area and yourself during this process.
- Surface Preparation: After demolition, thoroughly clean the exposed surface, removing any debris or residues. This will provide a clean canvas for the next steps of the upgrade.
- Preparation and Planning: Determine the materials and tools you’ll need for your specific design and measure the dimensions to ensure accurate installation. Creating a detailed plan will save time and minimize errors during execution.
- Installation: Install the new fireplace components, such as the surround and mantel, according to your design preferences. Follow manufacturer instructions and use suitable techniques for securing each element in place.
- Finishing Touches: Once the components are installed, apply any desired finishings such as paint or stain to achieve the desired look. Consider adding accessories like decorative tiles, trim, or artwork to further enhance the aesthetic appeal of your upgraded fireplace.
- Safety Check: Before relighting your fireplace, consult with a professional chimney sweep or home inspector to ensure your modifications have not compromised safety or functionality.
By following this task breakdown, you can confidently embark on your DIY fireplace upgrade journey with a clear roadmap in hand. Remember to take your time, pay attention to details, and most importantly, enjoy the transformation process.
Removing Old Fireplace Components
The first step in transforming your fireplace is to remove the old components. This process requires careful demolition to ensure a clean slate for your makeover. Start by removing the existing mantel and stone veneer using hammers, scrap 2 x 4s, and screws. Take precautions by wearing ear and eye protection to safeguard yourself during this process. By carefully dismantling these elements, you pave the way for a fresh start in creating your new fireplace design.
Picture yourself with determination, gently prying away the outdated mantel and taking down the chunky stone veneer piece by piece. As each component is removed, you can feel the excitement building, knowing that a blank canvas awaits your creative touch.
Applying Surface Treatment
With the old components successfully removed, it’s time to give your fireplace a fresh surface treatment. This step is crucial in achieving the desired look and texture for your revamped fireplace. There are several options to consider: German smear, Limewash, Whitewash, just to name a few. However, for our DIY journey, we’ll focus on using joint compound as it provides excellent versatility and allows for customization.
Begin by preparing the joint compound according to the manufacturer’s instructions. You can add tint to achieve your desired color tone or keep it white for a more contemporary feel. Use a trowel or putty knife to apply multiple layers of joint compound onto the surface of the fireplace, making sure to smooth it out evenly. If desired, you can create texture or patterns with the tool as you go along.
As each layer dries, lightly sand the surface to create a smooth finish before applying subsequent layers. This process helps achieve the desired depth and brightness while ensuring a professional-looking result. Once you’re satisfied with the texture and coverage, it’s time to move on to the next phase of your fireplace makeover.
Some might argue that using joint compound requires more effort and patience compared to other surface treatments, such as whitewash. However, the advantage lies in the ability to control the texture and create a truly unique look. Plus, with some extra care and attention, joint compound can be transformed into a stunning focal point for your living space.
Having successfully removed the old fireplace components and expertly applied the joint compound, it’s time for the next stage of our DIY journey – adding those finishing touches that will elevate your fireplace makeover to new heights.
Budget Management for Fireplace Makeover
Embarking on a fireplace makeover is an exciting endeavor, but it’s vital to approach it with careful budget management. By setting a realistic budget and sticking to it, you can ensure that the project remains within your financial means. Let’s explore some essential tips for managing your budget effectively.
One of the first steps is to determine how much you’re willing to allocate towards the fireplace makeover. Consider factors such as materials, tools, and any professional assistance you may require. It’s also wise to set aside a contingency fund for unexpected expenses that may arise during the project.
Another aspect of budget management is prioritizing your spending. Determine which elements of the fireplace renovation are most important to you and allocate funds accordingly. For example, if obtaining a specific type of mantel or investing in high-quality paint is essential to your vision, consider allocating more of your budget towards these areas.
Researching and comparing prices for materials and tools can also help you save money. Look out for sales, discounts, or alternative options that offer quality at a more affordable price. Additionally, consider repurposing existing materials or sourcing second-hand items to further reduce costs.
Lastly, having an organized tracking system for expenses is crucial in managing your budget effectively. Keep a record of all the money spent on materials, tools, and any professional services. Regularly review your expenses against your budget to ensure you stay on track.
Now that we have discussed budget management for your fireplace makeover, let’s move on to estimating costs and potential savings associated with this project.
- When embarking on a fireplace makeover, it’s important to manage your budget effectively. Set a realistic budget and stick to it, consider factors such as materials, tools, and professional assistance needed, prioritize spending based on the most important elements of the renovation, research prices and alternatives, and track expenses regularly. By doing so, you can ensure that your project remains within your financial means and potentially save money in the process.
Estimating Costs and Savings
Before diving into a fireplace makeover project, it’s important to have a clear understanding of the potential costs involved as well as possible savings opportunities. By conducting thorough research and estimating expenses accurately, you can make informed decisions throughout the process.
Start by assessing the specific aspects you wish to change or update in your fireplace. Consider factors such as removing the existing mantel, replacing stone veneer, repainting, or adding accessories. Research the average costs associated with these tasks and add them up to form a rough estimate.
Keep in mind that costs can vary significantly depending on factors such as the size of the fireplace, the materials chosen, and whether you plan to hire professionals or tackle the project yourself. Take the time to obtain multiple quotes from contractors if you’ll be seeking their services.
Identifying potential savings is also crucial during the estimation process. Explore DIY options for tasks that you feel confident tackling yourself. Additionally, research cost-effective alternatives for materials and explore any discounts or sales available.
For example, instead of investing in brand new stone veneer, consider exploring options like German Smear, Limewash, or Whitewash techniques that can give your fireplace an updated look at a fraction of the cost.
By estimating costs and potential savings before beginning your fireplace makeover journey, you can better plan your budget and make informed decisions about how to allocate your funds wisely.
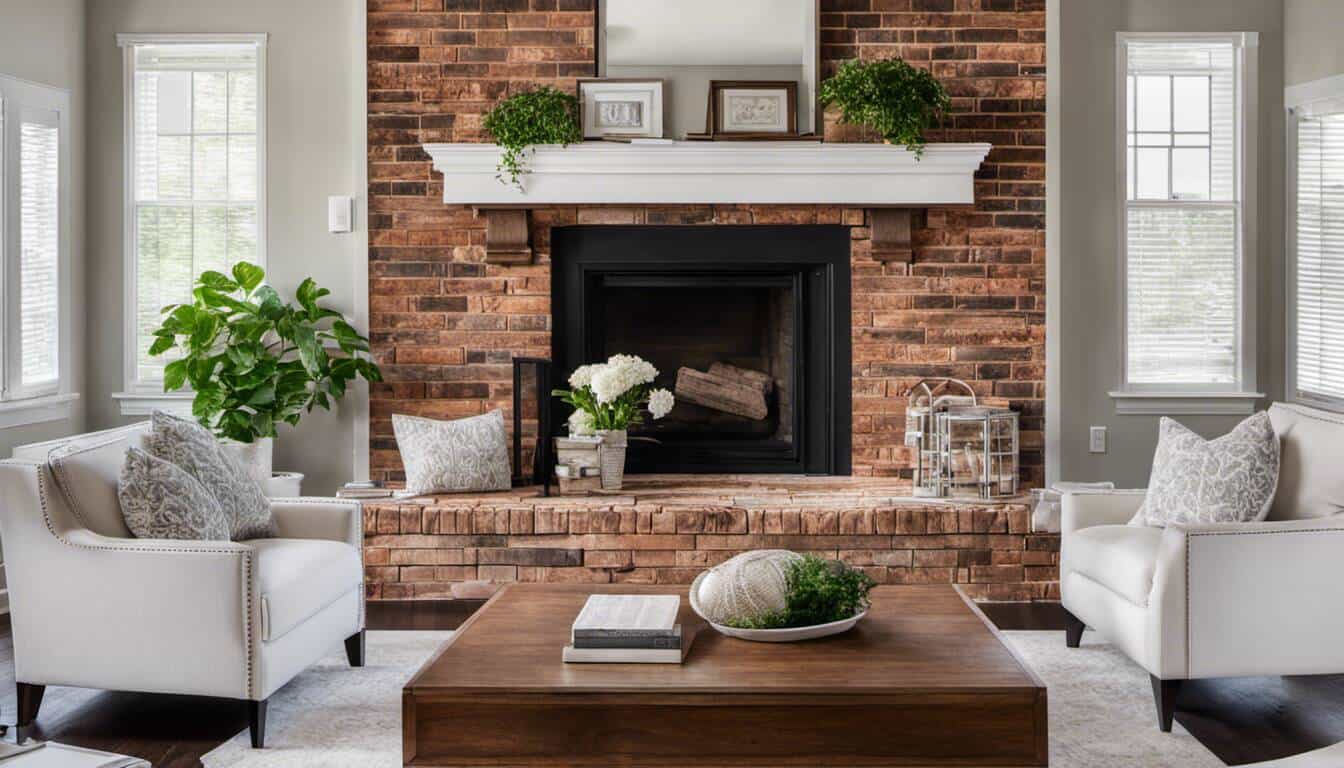
Captivating Before and After Photos
They say a picture is worth a thousand words, and when it comes to home renovation projects like a fireplace facelift, captivating before and after photos can showcase the stunning transformation in ways that words alone cannot. These visual representations allow us to truly appreciate the impact of the DIY journey and inspire others who might be contemplating their own fireplace makeover.
Imagine the power of a side-by-side comparison: on one side, an outdated and lackluster stone fireplace with a chunky mantel, sporting an uninspiring color scheme; on the other side, a sleek and modern fireplace adorned with clean lines, fresh paint, and carefully chosen decor. The transformative power is evident in these photographs and can make any skeptics believe in the possibilities of a DIY project.
Professional photographers or even smartphone cameras can capture these before and after shots, highlighting every detail of the fireplace’s metamorphosis. From capturing texture and finishes to showcasing improved lighting techniques or clever design choices, these images become visual stories that inspire and excite.
Planning Digital Visuals for Showcasing Transformation
When planning your digital visuals for showcasing the transformation of your fireplace project, there are several factors to consider. First and foremost, think about the best angles to capture the before and after shots. Experimenting with different perspectives can provide unique insights into how your fireplace has evolved.
Consider utilizing natural light sources to enhance the visual appeal of your photos. Brightness and clarity are crucial elements for displaying the true beauty of your renovated fireplace. Additionally, staging your space with well-chosen accessories can add depth and personality to your images.
If you’re documenting your journey on social media or a blog, it’s essential to curate a cohesive visual narrative that tells the story of your fireplace facelift from start to finish. This could involve providing progress updates along the way or creating captivating photo collages that highlight key moments of the remodeling process.
By carefully planning your digital visuals and capturing the essence of your fireplace transformation through before and after photos, you can create an engaging visual experience for your audience. These images not only serve as evidence of your DIY prowess but also inspire others to embark on their own creative endeavors.

I embarked on a similar fireplace revamp last winter; it’s crucial to invest time in planning, sourcing the right material is half the battle won.
I must say, stack stone veneers can make a major difference without causing too much hassle. Just one advice: don’t skimp on adhesive, apply generously but be mindful of spillage around edges which ruins the finished look.
Remember to pay attention to the type of stone veneer you’re using; some have corners that connect seamlessly for a professional look while others might need more finesse to blend perfectly.
Yes, the type of stone veneer can drastically change the entire look and feel of your fireplace. I’ve used two different ones for my project when I first started and learned soon enough that seamless corners are easier to handle.
Absolutely, Xylia! Seamless corners also prevent unsightly gaps, giving the veneer a much tidier overall finish in my experience.