Real hardwood floor – beautiful, durable, expensive. There’s no doubt that real hardwood floor is an investment when it comes to your home – one that costs, on average, $55 per square metre for materials PLUS $25 per square metre for labour.
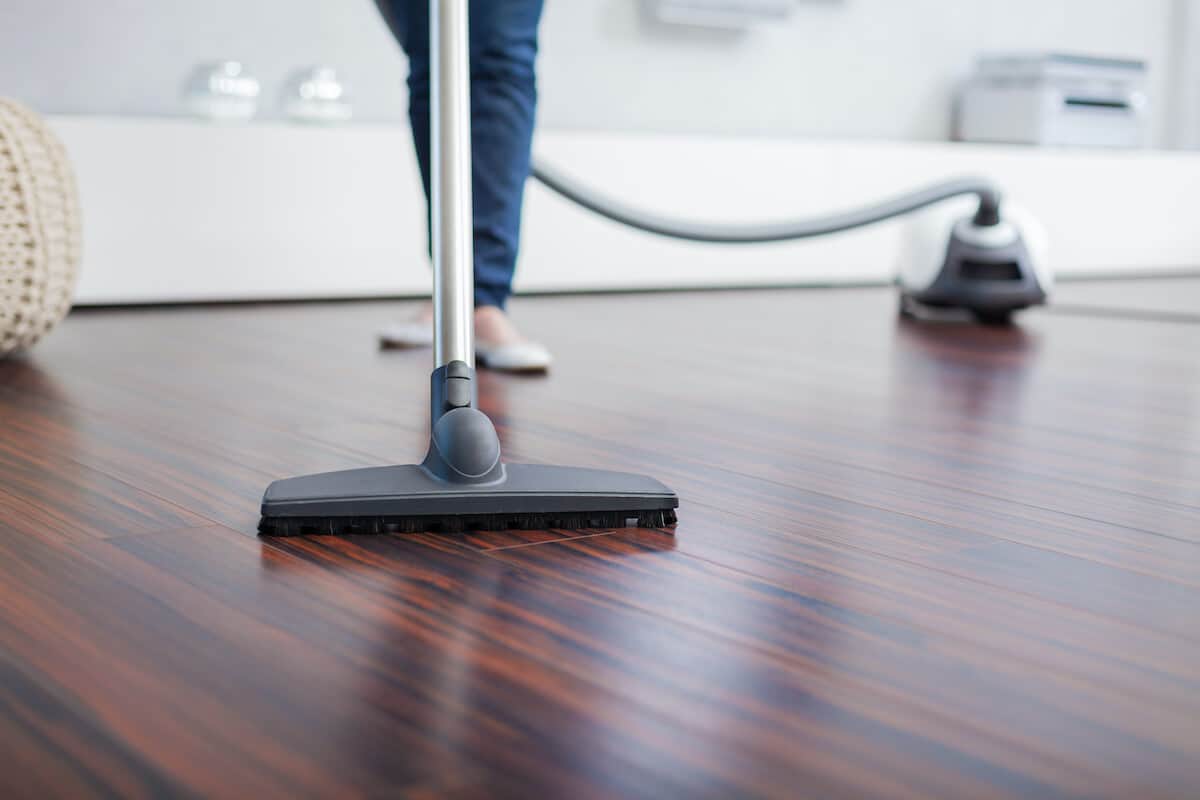
While you want to take care of your floors, there are hundreds of vacuum cleaner models on the market for the job – each of which might claim to be effective with the best features. So which is best? To answer this question, it’s important to consider the best hard floor cleaner machines available features on the market. So which is best?
In this review we tell you about our best vacuums for wooden floors and the close contenders. From vacuums which automatically adjust their suction settings when moving from rug to wood floors, to others which take on the challenge of pet ownership and allergy sufferers.
“In my decades of experience as a Certified Appliance Tester, I’ve encountered a vast array of vacuum cleaners designed for hardwood floors. It’s vital to understand that not all hardwood floors are the same – the best vacuum cleaner model greatly depends on the type and finish of your hardwood flooring. Trust my words, as I’ve spent countless hours testing these appliances on different surfaces; every meticulous detail matters when it comes to maintaining the aesthetics and lifespan of your hardwood floor.”
Alonzo Zilligen, Certified Appliance Tester
The Benefits Of Hardwood Floor Vacuums
While hardwood floors leaves laminate in the dust when it comes to aesthetics, it’s also far more demanding, requiring painstaking care.
Pick the wrong vacuum and you could run the risk of scratching that beautiful wood surface each time you clean. The wrong model can reduce your floor lifespan by 2 or 3 years. To avoid this, it’s crucial to know the best way to clean wood floors.
Pick well however, and you’ll whizz through the daily vacuuming at speed, leaving your hardwood floors free from dirt, dust AND scratches.
Aesthetics is only one part of the equation, maintaining the wood is the other!
u003cpu003eThe Shark Rocket Ultra Light Vacuum is the best vacuum for hardwood floors. It is one of the most versatile options available weighing only 13.9 pounds and a $160 dollars price tag. u003c/pu003e
Quality Features & Specifications For A Good Hardwood Vacuum
Getting all wide-eyed with the latest features & accessories can be distracting, and that’s why focusing on your cleaning needs is probably the best course of action in determining which is the best product for you. This is especially important when dealing with specific issues, such as how to clean sticky laminate floors.
As a result, we understand that some of the machines that have made it on our top list might not suit your needs or requirements which is why we highlight but a few considerations before your next purchase. You can end up spending as much as 50% more if you choose a machine with more features.
Soft Cleaning Brushes On Floors
A vacuum cleaner with soft brush bristles will not scratch your wooden floor. Avoid using machines beater brushes as they are more designed to force dirt, dust particles and pet hair from rugs, as they will scratch wood. You want enough suction to lift all debris from the surface so that when it’s time to polish or mop the floor, you don’t end up digging that debris into the surface which over time promotes scratching.
Best Suction Power Options
A vacuum cleaner that has low-to-medium suction is all that’s needed for cleaning hardwood floors. A good option would be a vacuum that either automatically adjust suction power when changing floor surfaces such as from hardwood to carpets and vice versa. It’s also important to know how to sanitize hardwood floors for a thorough clean. Alternatively you can source a model that you can manually adjust the suction when needed.
Wheel & Padding Type For Wood Floors
The type of wheels and under padding your vacuum cleaner has is also paramount. Plastic wheels and padding can easily scratch hardwood surfaces which is why an alternative material such as rubber or felt strip is better suited to avoid unnecessary scratches during passing. A quality cleaner is not all about suction power, manoeuvrability and state of the art technology, but also about the design of the physical machine itself.
Light Weight, Compact & Easily Storable
Heavier vacuum cleaners will add extra downward forces on your wooden floors and make them harder to manoeuvre, particularly if elder. This only increasing the likelihood of scratches occurring on your floor. Being compact and light means your machine can be easily stored away without taking up too much storage space.
Corded Vs Cordless Cleaners
The limitation of corded units mainly depends on the reach of the power cord, but they do hold an other advantage in that they are generally stronger vacuums and produce a more powerful suction strength than battery powered units.
As for cordless units, this will depend on the energy stored in the onboard battery. The advantage is there are no pesky cables getting in the way of your cleaning path. When considering cordless options, it’s important to understand vacuum cleaner battery run time to ensure it meets your cleaning needs. They also make for brilliant emergency units whereby starting them up without having to unwind several feet of cable and finding a power socket within the vicinity.
Luckily the more modern cordless machines are powered by advanced lithium-ion batteries that are capably of product comparable suction strength to that of corded units, but of course the disadvantage is remembering to charge the unit and charge downtime.
Vacuum Types
The type of vacuum cleaner you prefer will depend on your personal preference. Some people like canister vacuums while others may prefer the more modern lightweight upright stick vacuums.
As shown on this article, every vacuum has its pros and cons, but one common trend is the traditional upright vacuums with their additional cleaning hoses along with the lighter convertible stick vacuums tend to be the most popular.
This may be because they have less fiddly parts, are easier control when in use and there’s less chance of dropping them on your pristine wooden floors.
Before Buying Your Cleaning Machine
All the vacuums that we’ve featured in this review are safe for use on hardwood floors. However it’s important to note that some of the vacuums require you to manually change a setting to move from one surface to another. Some of these vacuums also feature dedicated hardwood floor attachments.
If you’re uncertain about how to properly care for your hardwood floors we recommend that you speak with flooring professionals for bespoke advice. Should you do so, take care to undertake due diligence on any cleaning products that they try to sell you.
There is also a trade off between weight and power. A 10lb vacuum will not have the same performance as a bigger version.
So without further ado, here’s our choice of the best vacuum for hardwood floors and why, along with the runners up.
WLUPEL Cordless Vacuum
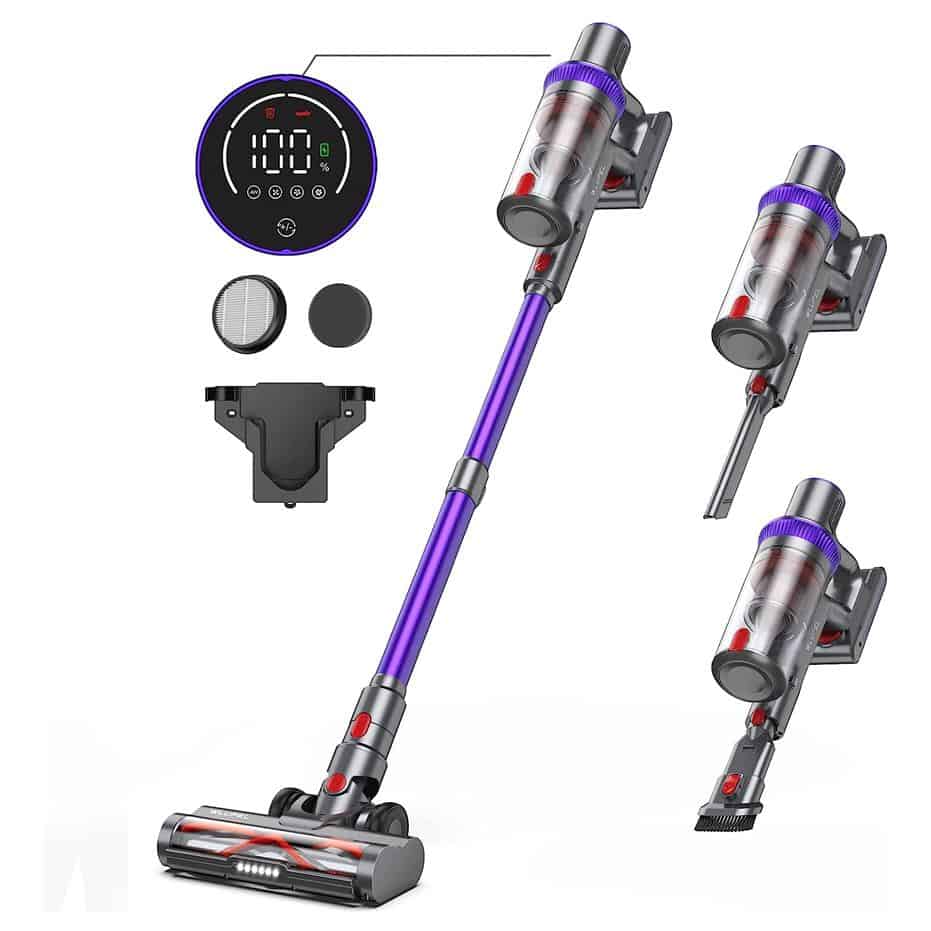
The WLUPEL Cordless Vacuum is your ultimate cleaning companion! With the upgraded digital touch screen, controlling this stick vacuum is a breeze. Get real-time status updates, including battery levels, suction performance, brush stuck alert, and suction blockage alert. No more accidental button presses with this advanced touch display.
Forget weak vacuums that leave residue behind. The WLUPEL cordless vacuum features a powerful 400W brushless motor, delivering an unprecedented suction up to 33kPa. It easily picks up all surface debris and deeply embedded dirt, outperforming 90% of other vacuum cleaners on the market.
Achieve a deep clean on any surface with the 2-in-1 upgraded roller. This cordless stick vacuum effortlessly handles hardwood floors, low and mid-pile carpets. Three adjustable suction modes make capturing pet hair, cat litter, pet food, and other messes a breeze.
No need to worry about running out of power during cleaning sessions. The WLUPEL handheld vacuum comes with a 7-cell 2200mAh battery, providing an impressive 50 minutes of runtime. The detachable battery allows for flexible charging options.
Cleaning and storing have never been easier! Bid farewell to dust inhalation, with a simple press of a key, the cup opens for effortless emptying. The included brush and flat nozzle can be conveniently stored on the wall-mounted rack for future use.
We stand by the quality of our product, offering a 36-month customer service and accessories replacement service. Rest assured, we are here to address any concerns you may have. Get your WLUPEL Cordless Vacuum now and experience cleaning efficiency like never before!
PrettyCare Cordless Vacuum
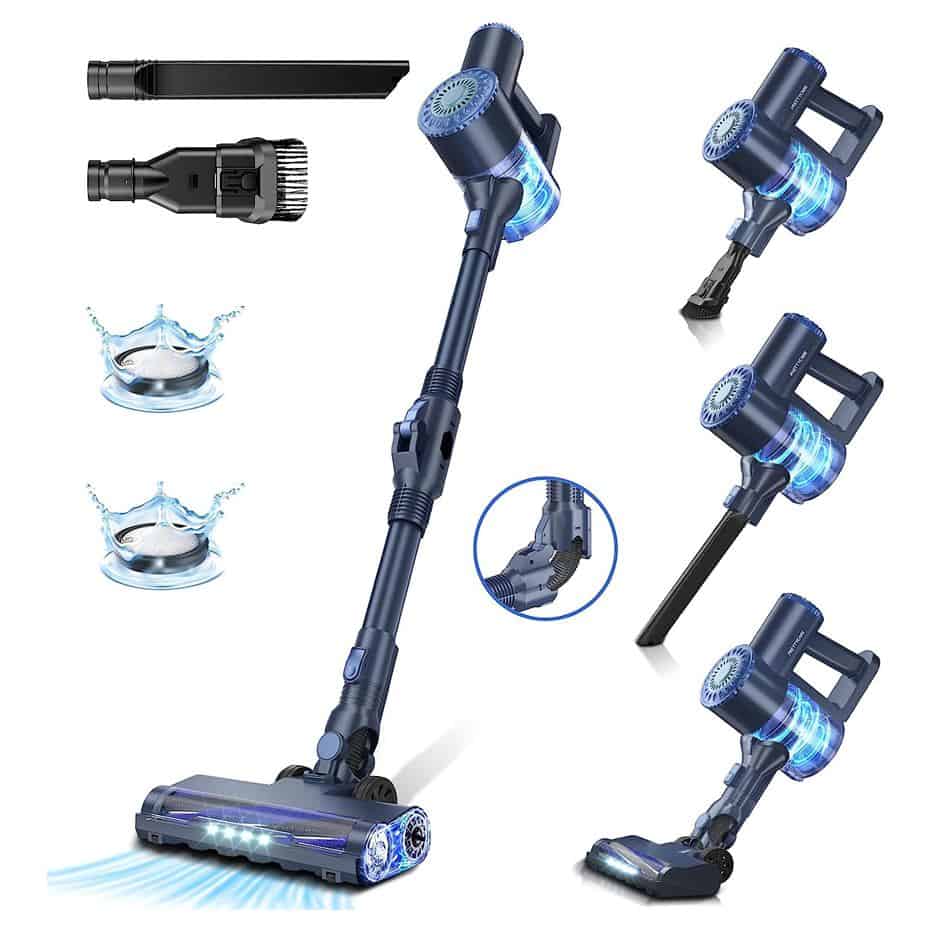
The PrettyCare Cordless Vacuum is the perfect cleaning solution for your home. With its innovative features, this wireless vacuum cleaner is designed to make your cleaning tasks a breeze.
The self-standing & bendable wand allows you to place the vacuum cleaner anywhere you want, and the 180° bendable wand helps you reach those hard-to-reach areas without bending over, ensuring a thorough clean under cabinets, beds, and more.
Equipped with a 6 stage double-cyclone filtration system, this vacuum ensures that 99.98% of microscopic dust particles are filtered out, providing you and your family with fresh air. The powerful suction + secondary refiltration leaves no dust escaping, ensuring a pristine environment.
With its powerful suction and large-capacity battery, the vacuum can handle deep cleaning for carpets, hardwood floors, and pet hair. The 6* large-capacity batteries and super-fast charging ensure a long runtime, meeting all your daily cleaning needs.
The 6-in-1 & lightweight design offers versatile attachments, including a 2-in-1 brush head and long crevice tool, enabling deep cleaning of curtains, beds, floors, and carpets. Weighing under 3 pounds, this portable vacuum makes house cleaning effortless.
The flexible LED brush & multifunctional use further enhance its capabilities, allowing easy cleaning in dark areas. The 1.2L large-capacity dust container with one-click dust release simplifies the cleaning process.
Upgrade your cleaning experience with the PrettyCare Cordless Vacuum and enjoy a spotless, fresh home with minimal effort. Note: Ensure thorough drying of the dust cup and filters after washing before reuse.
BuTure Cordless Vacuum
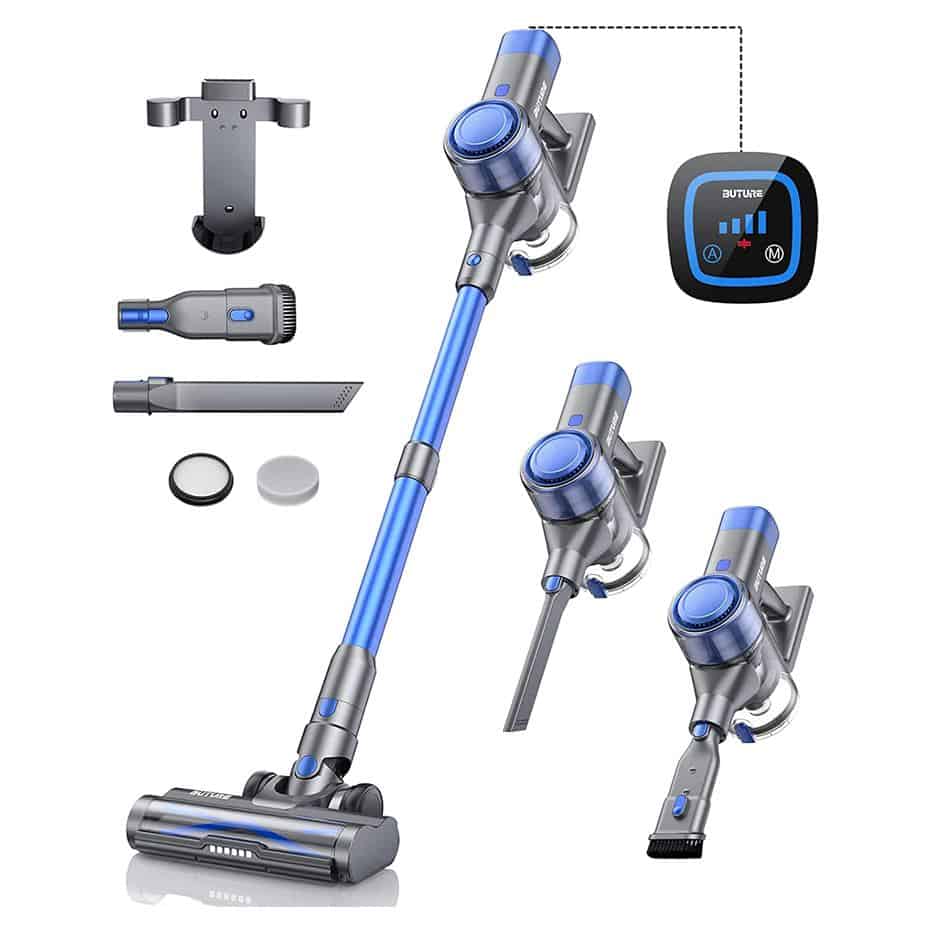
The BuTure Cordless Vacuum is a revolutionary cleaning solution that breaks the rigid and inflexible cleaning mode! With its Auto mode, this cordless vacuum cleaner automatically adjusts its suction power and runtime to adapt to different floor types, ensuring efficient cleaning without wasting battery life.
Say goodbye to the hassle of storing your vacuum separately from its charging station. The BuTure VC50 comes with a wall-mounted docking station that not only keeps your vacuum ready for the next cleaning session but also charges it while stored. The removable battery offers added convenience to meet your various charging needs.
Experience smart cleaning with the LED Touch Screen on top of the battery. Switch between Auto & Manual modes effortlessly while vacuuming and stay informed about battery life and maintenance. The advanced multi-layer filtration system captures pet dander and fine dust, promoting cleaner air in your home.
With three speeds available in manual mode, ranging from 15Kpa to 33Kpa, you can tailor the vacuum’s power for specific tasks. Enjoy up to 55 minutes of battery life in MIN suction mode, while the 1.2L large canister ensures you can clean your entire home in one go.
For pet owners, the BuTure Cordless Vacuum is a dream come true. The cleaner head, equipped with an anti-tangle comb, effortlessly lifts embedded dirt and pet hair from carpets and hard floors. LED floor lights on the head help you clean under furniture and beds, leaving no hidden dust behind.
With easy-to-attach tools like a crevice tool and dusting brush, this vacuum transforms into a handheld device, making floor-to-ceiling cleaning a breeze. Plus, you can rest assured with BuTure’s worry-free after-sales support, offering 24/7 assistance and 36 months of protection.
Upgrade your cleaning routine with the BuTure Cordless Vacuum and enjoy the convenience, efficiency, and thoroughness it brings to your home.
Shark HV322
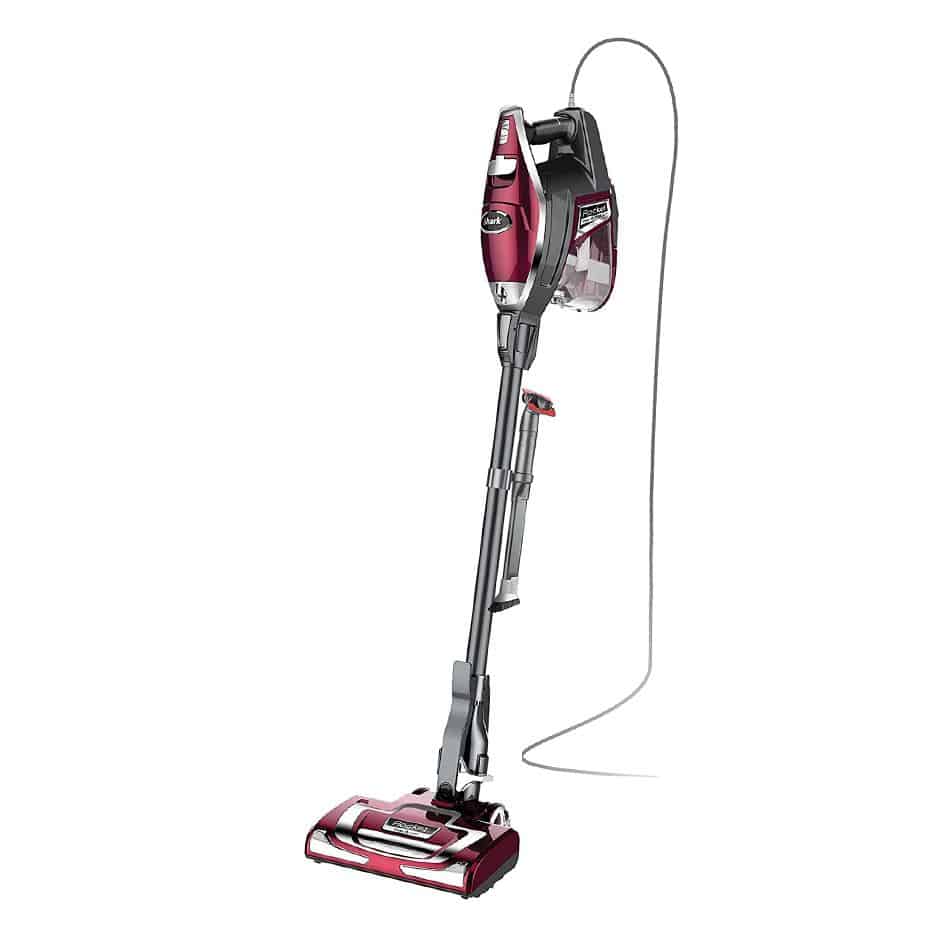
The Shark HV322, a powerhouse in the world of corded stick vacuums. With its powerful suction, this vacuum ensures thorough deep carpet cleaning and efficiently picks up pet hair on all surfaces, leaving your home spotless.
One of the standout features of the Shark HV322 is its lightweight versatility. Weighing in as an ultra-lightweight vacuum, it effortlessly converts into a handheld device, allowing you to easily tackle floor-to-ceiling cleaning tasks without strain or hassle.
For pet owners, this vacuum is a dream come true. The Shark HV322 comes equipped with specialized pet tools that specifically target embedded pet hair on various surfaces, including hard-to-access areas, ensuring that no trace of pet fur is left behind.
Tired of constantly emptying your vacuum’s dust cup during cleaning sessions? The HV322 boasts an XL dust cup capacity of 0.68 quarts, allowing for extended cleaning without frequent interruptions.
Enhancing its usability further, this vacuum comes with LED headlights on both the handheld unit and nozzle, revealing hidden debris and elusive pet hair around your home, making sure nothing escapes its thorough cleaning prowess.
With the Shark Rocket Deluxe Corded Stick Vacuum, you’ll also receive the Pet Multi-Tool and Pet Crevice Tool, completing your arsenal of cleaning accessories and ensuring no pet hair or dirt stands a chance.
Upgrade your cleaning routine today with the Shark HV322 and experience the power, convenience, and efficiency it brings to your home cleaning endeavors.
Our Top Choice Hardwood Floor Vacuum Cleaner
The WLUPEL Cordless Vacuum pips the Prettycare to the post for our choice of hardwood floor cleaning by a whisker.
It strikes the balance perfectly between advanced technology and budget-friendliness. And it’s light enough for older users and for those with limited mobility.
With all that said, what really makes the Shark Rocket our best vacuum for hardwood floors is the Dust-Away Hard Floor Hero attachment, which delivers on the promise of next-level bare floor cleaning.
References
https://redsea.com/en/what-are-the-different-types-of-vacuum-cleaners-and-which-one-to-buy
https://www.kohls.com/feature/vacuum-guide.jsp