Wood flooring, it’s the stuff that dreams made of! At least symbols of dreams realized. A new hardwood floor is the perfect final touch to jazz up any home and make it that much closer to being perfect. But, there may come a time when you might need to cut your existing flooring because of transitions, room changes, or other life events. And while it sounds intimidating, it’s completely doable! In this blog post, we’ll be giving you all the how-to’s necessary, so you can cut your wood flooring with confidence. Let’s get started!
If your wood flooring is already installed, you need to use a circular saw with a blade made for cutting hardwood. Make sure to measure the area carefully before you start cutting, and take all necessary safety precautions.
“Cutting installed wood flooring accurately requires a steady hand, correct tools and an understanding of the wood grain to ensure you avoid splintering. It’s a task that demands respect for the material and patient precision. Don’t rush it – measure twice, cut once.”
Mortimer Rutherford, Master Carpenter
Gathering the Right Tools
Gathering the right tools is crucial when cutting wood flooring already installed, as the wrong tools can lead to a poor-quality job, and an incorrect fit. To ensure that your project is completed successfully, you will need to have the right type of saw, blades and accessories on hand before beginning.
The main tool you should use when cutting wood flooring already installed is a circular saw equipped with a carbide-tipped flooring blade. Circular saws offer more control and better maneuverability than other saws such as jigsaws or reciprocating saws, allowing for more precision and accuracy when making cuts. The carbide-tipped flooring blade is designed specifically for hardwoods and engineered woods and ensures that cuts are clean and smooth. You will also want to make sure the depth of cut on your circular saw is appropriate for your wood thickness.
In some cases, it may be necessary to use a jigsaw or reciprocating saw to make faster, rougher cuts or in tight spaces where a circular saw cannot reach. Keep in mind that these saws require more skill than circular saws, so if you are not experienced with either of these types of saws, it is best to stick with the circular saw.
You should also make sure that you have the right safety equipment (safety glasses, hearing protection, dust masks etc.), as well as spare blades, clamps and other necessary items on hand prior to starting work. Additionally, while not always necessary, having a jigsaw guide can make cutting easier by providing straightness and accuracy.
Now that you have gathered the right tools for the job, it is time to measure twice with a tape measure in order to ensure accurate cuts.
Most Important Summary Points
When cutting wood flooring already installed, the most important tool to use is a circular saw equipped with a carbide-tipped blade specifically designed for hardwoods and engineered woods. Jigsaws or reciprocating saws may be used in tight spaces or to make faster, rougher cuts, although they require more skill to use. Safety equipment, spare blades, clamps, and a jigsaw guide should also be collected prior to starting work. Measuring twice with a tape measure is key to ensure accurate cuts.
Measure Twice with a tape measure
Before starting any project, it’s important to measure twice with a tape measure in order to ensure an accurate cut. This is especially true when cutting wood flooring that has already been installed. Not measuring correctly can result in unsightly gaps in the floor, incorrectly aligned pieces, and ultimately a higher level of frustration and more work required to correct mistakes down the line.
On the other hand, overly precise measurements should also be avoided. When wood expands due to changes in humidity or temperature levels, small variations can arise which may create slight distortions when measuring exactly between floorboards. During times of high humidity, a little extra allowance should be incorporated as overzealous measurements may lead to buckling or cupping further down the road.
With this in mind, use a tape measure with accuracy to set some guidelines for yourself during cutting; traditionally 1/8th of an inch is plenty for most cuts. Too much of an allowance will add extra time and labor to the job and too little could end up costing you more in the long run.
With accurate measuring complete, it’s now time to move onto prepping the wood flooring for cutting.
Prepping the Wood Flooring
Prepping the Wood Flooring is an important step in the process of cutting wood flooring already installed. The best way to ensure a successful cut is to make sure the material is properly secured and free of debris that could interfere with the cutting process.
First, check for loose nails or screws as these could disrupt the machine’s blades. If you find any, secure them using a hammer or screwdriver so they will stay in place. Then, sweep and vacuum the area to make sure there are no materials that might prevent the saw from cutting straight or cause it to slip while working.
Next, secure the planks to protect against warping or separation during the cutting process. This can be done with either wetted rope, bungee cords, or padded clamps. It is also advisable to add extra weight, such as books or bricks, directly onto the pieces being cut to provide added stability.
Finally, consider applying painter’s tape around the edges of each plank before cutting. This will add an extra layer of protection and help prevent chipping from occurring along the wood’s edges once cut.
Once your wood flooring has been prepped for cutting according to these steps, you can move on mark the cutting lines for a successful cut.
Mark the Cutting Line
Marking the cutting line is a vital step when cutting wood flooring that has already been installed. For the most precise and accurate cuts, it is important to identify the best location for this line to ensure an optimal result. There are two main methods for marking the cutting line: using a pencil and using a tape measure.
When using a pencil, you should be careful not to dig too deep with pressure when drawing your lines. Make sure to always double-check and erase any mistakes quickly with an eraser or soft cloth. Lightly draw small dots around the perimeter of the planned cut lines as check marks so that they’re easy to follow later on.
Alternatively, you can use a measuring tape or ruler to mark out exactly where you desire the cut. When creating these borders, be sure to label each side of the marked line so both edges are clearly identified. To avoid discrepancies, make sure your measurements are precise and take into account the width of the saw blade you plan on using.
Once your cutting line is drawn, double-check it one final time to make sure you are happy with its positioning before moving onto the next step: cutting the wood flooring.
Cutting the Wood Flooring
It is possible to cut hardwood flooring that has already been installed, although it requires great skill and precision. Doing this precisely often means more time on the job and the need for more tools. It can also be dangerous, and potentially damaging if not done correctly.
Before beginning any work, it is important to understand the space around you and plan accordingly. Some areas may have challenges like pipes or wiring located in the subfloor beneath you, and this needs to be taken into consideration when making your cuts. Consider which direction might be best to run your pieces relative to these challenges as well as possible transitions like doorsills.
Using a circular saw will provide some of the best results in terms of accuracy and repeatability. When setting up and using a circular saw you will want to ensure that it is set up correctly with adequate support both before and after your cutting line. This will help keep your blade straight as you cut rather than wobbling back and forth over your cut line, potentially producing a less accurate cut. Using masking tape along the line ahead of time can also help visually guide you where necessary and keep the saw from running off course during the cut. Make sure to check the depth of your cut against whatever type of jacking system you are using to make sure you do not cut too deep and damage other components below the wood flooring surface. Safety should always be considered first when using power tools on any type of work surface, so be sure to follow all safety protocols associated with using these tools.
The use of jigsaws may also provide good quality cuts in some instances; however, being that they are handheld, jigsaws tend to lack precision in comparison with techniques used with circular saws. Depending on the desired shape or applicability, jigsaws can provide for cleaner interior curves but are not ideal for outside straight cuts along walls or doorways due to their inconsistent pressure from one side of their blades relative to the other side.
Now that you have explored the various options for cutting existing wood flooring installation, it’s time to prepare for using a jigsaw for cuts requiring more intricate shapes than what could normally be produced via a circular saw alone.
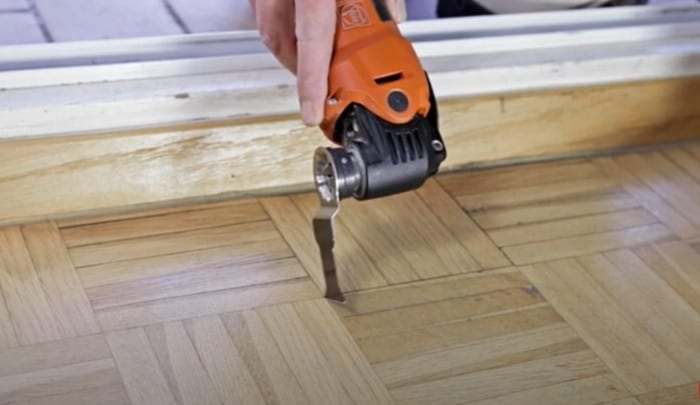
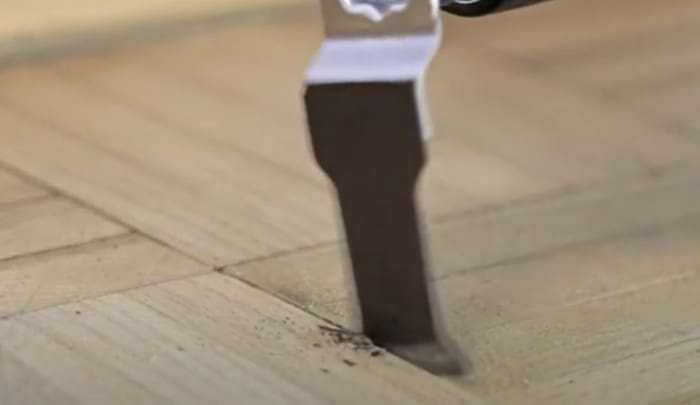
Use a Jigsaw for the Shape
Using a jigsaw is an excellent tool for making the shape you desire when it comes to cutting wood flooring already installed. While a circular saw may be a better tool for following straight lines, a jigsaw allows you to make a curved cut. If your floor pattern has intricate details that require curves or uneven cuts, then using a jigsaw is your best option.
When using a jigsaw, start by sharpening the blade and adjusting the speed on the saw according to the hardness of your wood material. Generally, a slower speed should be used with harder wood. Make sure that the blade goes slightly above the thickness of the wood to ensure clean, even edges. Cut slowly and look out for exhausts from any nails that may be hidden in your wood floors before beginning your cut.
Once it is ready to go, slowly guide your jigsaw along the line as you begin to cut through the wood flooring. Keep all fingers away from the blade at all times and only push down if absolutely necessary because it can cause damage if you are not careful. Once you have made your desired cuts, use sandpaper and other tools on hand to finish off any rough edges of the cut before finishing with sealant or varnish.
Finally, make sure that you’re wearing safety glasses at all times while using your jigsaw as splinters can fly off during the cutting process if you’re not careful enough. To ensure that everything runs smoothly while installing and cutting your wooden floors, always take the necessary precautions when handling power tools such as the jigsaw. Now that you know how to properly make use of a jigsaw when cutting wood flooring already installed, let’s move onto finishing off our cut in the next section.
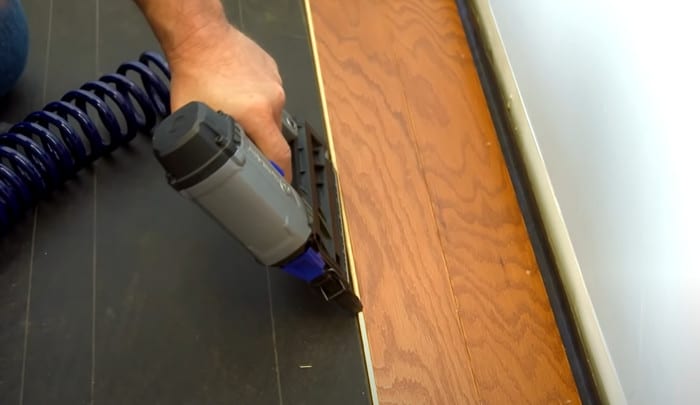
Finishing the Cut
Finishing the Cut: Once you have reached the end of your cut, you will have to properly finish off the end of the wood flooring. How you go about this largely depends on the type of wood you are working with and its thickness.
If you are cutting a floating wood floor made up of thin strips, all you need to do is tuck them into one another so they create a seamless line. Float-in systems usually come with metal pieces that can be slipped between pieces of wood to lock them in place.
However, if you are dealing with solid boards or planks, then you will need to use an edge grinder or router to remove excess material from the sides. This ensures that the floor will appear level and professional when finished. Alternatively, for particularly uneven cuts, you may choose to fill in any gaps with a putty knife and some wood filler.
When doing so, however, it is important not to start grinding away without double-checking that all your measurements were correct prior—otherwise you run the risk of removing too much material and compromising your finished product. That said, precisely grinding down each side may create more aesthetically-pleasing results compared to filling in any gaps with wood filler alone.
Now that your wood flooring has been properly cut, it’s time to move onto sanding away any rough edges—which should complete your installation project!
Sand away any Rough Edges
Once the wood is cut to size, it’s important to sand away any rough edges created from the cutting. To do this, use a fine-grit sandpaper and an orbital sander. It’s best to start with a coarse-grit paper and then step up to finer grits such as 120, 150. When sanding, use circular motions for a smooth finish.
When considering whether to sand the cuts, it’s important to consider both sides of the argument. On one hand, some people may think that sanding isn’t necessary because rough edges will eventually become smoothed by foot traffic on the flooring over time. On the other hand, the edges might risk tearing or snagging rugs or vacuums or visitors may be uncomfortable walking on potentially sharp edges. Therefore, preparing the cuts with sandpaper prevents this potential issue.
Overall, sanding away any rough edges ensures that everything looks smooth and finished before moving onto safety advice. This is essential for making sure the installation is of professional quality and safe for future use. Now let’s discuss the importance of taking safety precautions when handling wood flooring installation in our next section.
Safety Advice
Safety is of the utmost importance when cutting wood flooring already installed. Whether it is for a renovation project or replacing an old floor, potential hazards should be taken seriously and proper safety precautions are required to reduce the risks of injury.
Protective gear must be worn at all times including safety glasses, gloves, protective footwear and dust masks. A dust mask should always be used when cutting back wooden floors, as sawdust produced can cause significant respiratory problems if inhaled in large quantities without protection. Make sure that all power tools are operating properly and that blades used on saws and routers are sharpened. It would also be advised to wear ear protection when using noise-generating tools such as electric saws or drills.
Make sure that the area where you are working has good natural lighting, sufficient fresh air space and preferably no carpet or fabric items near where you will make the cuts. Working in an unventilated space with excess dust or fumes may result in dizziness, headaches, irritation of the eyes, nose or throat and other allergic reactions. In extreme cases, there could be fire hazard due to untended sawdust collecting in unswept areas which could ignite from sparks from power tools.
To ensure that there is no accidental damage to any surrounding property or persons while working on a renovation project, always move furniture away from the area before starting and secure any loose items so they do not get in the way of your work. It may also be useful to have a partner back up the saw blade with a block so the blade is not allowed to travel more than needed while making cuts.
Practice and care makes perfect – take your time when working on any project involving cutting into existing wood floors regardless of your level experience – one false slip up could result in an accident causing significant amount of damage that would cost much more money time to fix instead of taking it slow and steady from the start.
Practice and Care Makes Perfect
When it comes to cutting wood flooring that’s already been installed, practice and care makes perfect. This is because accuracy is key when dealing with cuts on pre-existing flooring, since the margin of error is much smaller than if the boards were not yet laid down. An advantage of the practice and care approach is that you can measure multiple times and make sure your measurements are completely accurate before committing to a cut. Another advantage is that by taking your time and practicing the cuts, you can become more familiar with the tools as well as gain a better understanding of how different surfaces respond to each other.
The main drawback of this approach is the length it may take for you to feel confident for a project like this. If this is your first time installing or fixing flooring, it could be difficult to jump into something like this without taking some time to practice and hone your skills. It’s also important to consider safety equipment in this situation; when it comes to saws and drills especially, eye protection such as goggles should always be worn when dealing with material like wood. Taking proper precautions, being methodical in one’s process, and ensuring all information researched has been thoroughly analyzed are all imperative steps before proceeding with any kind of installation.
At the end of the day, there’s no one right answer when it comes to cutting existing wood flooring. Whether novice or experienced in these types of projects, spending time practicing ahead of time will help ensure mistakes are limited while also providing an avenue for building confidence and improving skillset proficiency.
Most Common Questions
Is it possible to cut around obstacles such as cabinets or door trim?
Yes, it is possible to cut around obstacles such as cabinets or door trim when cutting wood flooring already installed. It’s important, however, to take extra precaution when cutting around these obstacles in order to ensure you don’t damage the current flooring. You can do this by measuring the area that needs to be cut out and marking it clearly with a pencil before you begin cutting. Using a sharp jigsaw blade designed for wood flooring and going slowly can help make sure that your cuts are clean and accurate. Additionally, it is important to wear hearing protection, safety glasses, and a dust mask when working with a jigsaw on existing flooring.
What tools do I need to cut wood flooring already installed?
To cut wood flooring that is already installed, you will need the following tools:
1. Safety gear – safety glasses, hearing protection, and a dust mask are all essential for any home improvement project involving cutting.
2. Circular saw – Use a circular saw to make a straight cut along the entire span of the flooring. Make sure the blade is sharp and well-maintained for best results.
3. Jigsaw – Using a jigsaw allows you to make curved or individual cuts in wood flooring already installed. To do so, make sure you use a jigsaw attachment with a specific blade designed specifically for cutting wood flooring materials.
4. Pry bar – This tool is useful to help lift up sections of the wood flooring that have been cut out of place and also helps reduce strain on your hands as you work with the tool over long periods of time.
5. Hammer and chisel – If necessary, use this combination when making cuts close to edges or walls where access is limited. The hammer can be used to deliver strikes against the chisel to create an indentation in your flooring material prior to cutting it accurately with another tool such as a circular saw or jigsaw blade.
Safety should always come first when handling power tools and several projects such as cutting pre-existing floors require multiple tools and techniques in order to achieve the best results – so take care and take your time!
What safety precautions should I take when cutting wood flooring?
Safety should be your top priority when cutting wood flooring! Here are a few key tips to follow:
1. Wear protective gear, such as safety glasses and gloves, to protect yourself from any flying debris or splinters.
2. Secure the room you are working in by closing off any doorways or exits near where you will be operating tools.
3. Use saw horses and sawhorses to support the wood flooring while you cut it, minimizing the risk of it bending or warping during the process.
4. Make sure you use proper technique when cutting the flooring. Be sure to hold down the boards securely with both hands and use controlled movements when pushing or pulling them through the saw blade.
5. Clear away any unwanted debris after each cut, ensuring that there is nothing blocking your work area or path.
Finally, always read and follow manufacturer instructions for any power tools or blades; this will help ensure best practices for safety when cutting wood flooring.
References
https://easiklip.com/blogs/diy-hardwood-floor-blog/what-s-the-best-saw-for-cutting-wood-flooring
https://www.goodhousekeeping.com/home-products/a40186610/best-hardwood-flooring/


Being an experienced carpenter, I measure thrice and cut once, that’s the secret to not waste any material. Also, always remember to use a sharp blade, it’s safer and gives you a cleaner cut, resulting in lesser chances of chipping the wood.
Absolutely, Benedict, precision is everything! I also lay emphasis on the type of saw being used. A circular saw is great for straight cuts, while a jigsaw works better for intricate cuts or circular patterns.
I recommend using a sturdy guide when you’re making cuts on your hardwood floors; it’ll help keep your saw straight and increase precision.
While a sturdy guide can be useful, depending on the type and thickness of your wood floor, using a quality circular saw with a sharp blade ensures both precision and safety without necessarily needing extra gear.
From personal experience, the right blade selection for the type of wood flooring you’re cutting is crucial; once I used a regular table saw blade to cut through teak flooring which resulted in ragged edges – lesson learned.
Rowan, you’re spot on about choosing the right blade – I’ve seen walnut flooring get ruined by rough cuts from using the wrong saw!
Kermit, you aren’t wrong there mate. I have lost count of how many times I’ve personally experienced damage from using the wrong blade; precision is key.
Couldn’t agree with you more, Quentin! I once made the mistake of using a metal-cutting blade on my oak floorboards while replacing a section damaged by water; needless to say, it was far from pretty. Now I make sure to double-check all my blades before getting started!