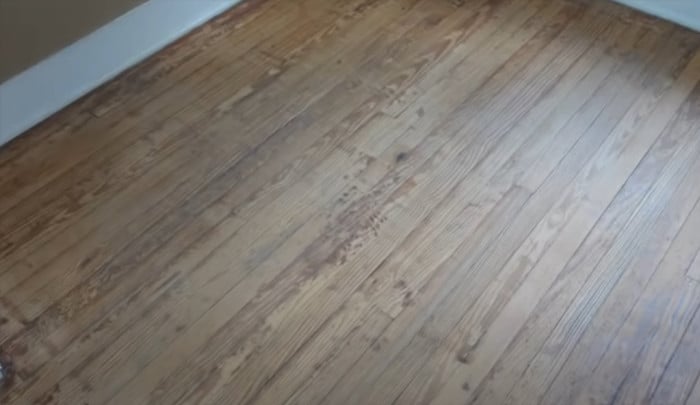
Home sweet home. There’s nothing quite like the cozy feeling of walking into your house on a cold winter day, wrapping yourself in a blanket of familiarity. Or the way the sun streams through your windows and brightens up every dark corner of your living room on a sunny day. But sometimes, your once-bright hardwood floors start to look a bit dull. They may be faded, discolored, and scratched, and it’s enough to bring the mood in your house right down. Fear not, because while not all hardwood floor issues can be fixed—sometimes it’s best to call in professional help—the good news is that you can normally tackle fading floors with a few simple tools and easy-to-follow instructions. Today, we’ll walk through how to fix faded hardwood floors and get your home back to its former glory. So grab your supplies and your heartiest DIY attitude: we’ve got lumber to fix!
Sanding and refinishing are the best methods to restore faded hardwood floors. For best results, it is recommended to hire a professional flooring company for the job.
“Restoring faded hardwood floors is an art and a science. It hinges on careful evaluation of the wood’s condition and selecting the right combination of sanding, staining, and finishing techniques to bring out the natural beauty that’s been hidden overtime. It’s a task that requires patience, expertise, and love for the material. As a woodworking veteran, I understand these nuances and adopt an approach that ensures each unique floor is given a new lease of life.”
Montgomery Burchell, Woodworking veteran
Evaluating Your Faded Hardwood Floor
Evaluating your faded hardwood floors is necessary before beginning the process of refinishing them. There are a few different approaches you can take when determining how to fix your fading hardwood. You may be able to address the issue by applying multiple coats of floor wax or giving the floor a sanding and recoating. Before making this decision, it’s important to determine whether the damage to your floor is superficial or structural. Superficial damages can usually be addressed with deep cleaning and minor surface repairs, while structural issues require more intensive work such as re-staining and sanding.
Additionally, some faded hardwood floors can be revived by professional refinishers who use specialized products designed to restore color and luster. While this option may be expensive, it can produce beautiful results. If you’re considering this route, it is important to do research to find an experienced professional who can provide quality results that will last.
On the other hand, if you want to avoid the expense of hiring a professional but don’t want too much DIY work, there are products available on the market that are designed for reviving wood floors without scrubbing and sanding. These products range from wood cleaners and conditioners to polishes that fill in scratches and seal in moisture. It’s important to carefully read product labels and compare prices before making a purchase.
Whichever approach you decide to take, evaluating your faded hardwood floor will help you identify potential problems, gauge the extent of the damage, and create a plan for restoring its original beauty. Next we’ll discuss ways of identifying the type of hardwood floor you have so that you can select the proper techniques for repairing it.
Identifying the Type of Hardwood Floor
To ensure the proper restoration of hardwood floors, it is essential to identify the type of floor beforehand. Different species and types of wood have different care requirements, each with its own specific approach to refinishing. It’s important to protect hardwood floors properly based on their unique characteristics. In addition, some wood finishes may not be compatible with certain treatments or techniques.
Solid wood floors are constructed from pieces of solid wood which are either nailed or glued into place. These types of floors are by far the most durable and can usually be refinished many times over their lifetime. While solid wood floors may boast long-term performance, they can also be more expensive than some other options.
Engineered wood floors are constructed from layers of plywood that layer together to produce a stable platform for hardwood. Most engineered wood floors can only be sanded and refinished two or three times before needing to replaced entirely as there is no more surface material left to refinish. With that said, these types of floors often require less maintenance and milder cleaning products than solid wood varieties due to the lack of finish absorption in engineered planks.
Vinyl plank flooring is a newer technology that has been gaining more popularity in recent years. This type of flooring is composed of thin PVC plastic strips fused together with a thin layer of vinyl protection on top. Vinyl plank flooring’s practicality makes it a popular choice for those looking for an easy-care option; however, this type cannot be sanded or shifted so it must be replaced if it becomes worn or damaged.
Identifying the type of hardwood floor helps determine the best method for restoring faded areas without damaging the overall structure and integrity of the wood or voiding any manufacturer warranties. With that in mind, it’s time to move onto checking for damage and assessing the overall condition in order to begin restoring hardwood floors back to their original splendor.
Check for Damage and Overall Condition
When fixing faded hardwood floors, it is important to check for damage and overall condition. Before you begin the repair process, take a few moments to assess the current condition of your hardwood floors, it is important to check for damage and overall condition. Before you begin the repair process, take a few moments to assess the current condition of your hardwood floors. Walk around your floor and inspect it closely. Look for any areas of wear and tear such as scratches, dents, discoloration, or stained spots that may need addressing.
You should also check the surrounding baseboards, furniture, and other objects such as carpets that are in contact with your hardwood floor. If these items are causing undesirable marks on the wood, they’ll need to be removed or adjusted prior to refinishing the hardwood floor. Additionally, you should consider if there are any water stains or warps present in the wood planks. These can be caused by improper moisture levels or a combination of temperature and humidity fluctuations over time.
It’s important to think about whether repairing your hardwood floor is really necessary. While some damage can be easily repaired with a few simple steps, more serious issues like warping may require a total refinishing job of all the boards in the area. This will certainly cost more money and is much more involved than just spot repairs here and there. Consider contacting a professional contractor to determine what kind of repairs are needed on your specific floor before committing to a large project.
Now that you have checked for any damage or overall condition of your hardwood floors, it’s time to move on to repairing your hardwood floor.
Repairing your Hardwood Floor
Repairing your Hardwood Floor can seem like a daunting task, however if the right steps are followed it’s relatively straightforward and simple. To successfully repair a faded hardwood floor there are several elements that need to be considered.
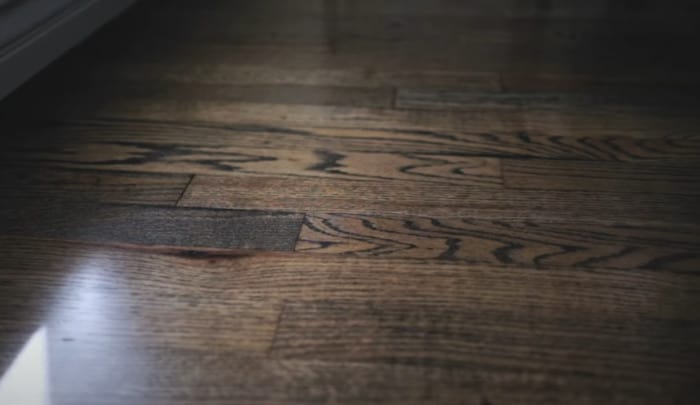
Firstly, it is important to establish what type of wood you have. Depending on the type of wood, the repairs may differ. Once you have identified the type of wood, you can assess what damage has been done- this step will determine what tools and techniques will be needed for the repairs. When evaluating the damage, check for visible gaps or loose boards that could affect the overall finish and stability of the repaired area.
Once any obvious damage has been identified and removed, take the time to lightly sand any rough patches and dust off the area in preparation for further treatment. Use sand paper grades of 120 or higher (depending on the condition of your floor) to thoroughly sand the surface well. This is done to help prepare for staining which improves wear resistance by closing off porous areas on the wood grain.
When deciding whether to stain or not stain your hardwood floors there are a few factors to consider such as budget, desired colour and personal preference before making a decision. Staining is an effective way to restore colour that has lightened over time while also lending a degree of protection from future wear and tear. On the other hand, if unsightly marks or stains are pervasive then it may be better to opt for an alternative solution such as water based polyurethane which may provide additional scratch resistance compared to staining alone.
When repairing hardwood floors, it is essential to consider all aspects including visible damage repair, sanding process and subsequent finishing options. With these components addressed there is sure to be a satisfying outcome regardless of whether you opt for staining or not.
Leading into next section: Having assessed and completed all necessary repairs as outlined in this section, it is now time to move onto sanding and re-staining the floor – an important crucial step in restoring your faded hardwood floors back to its original condition!
Most Important Points to Remember
The repair of a faded hardwood floor involves different steps such as identifying the type of wood, evaluating the damage and sanding the surface. Depending on budget, desired colour and personal preference, staining can be used to restore faded colours and act as a protective cover from wear and tear. Sanding is a crucial step in restoring the hardwood floor back to its original condition.
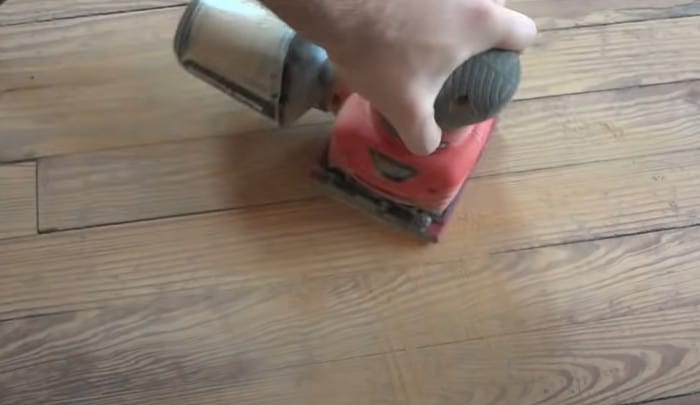
Sand and Re-stain the Floor
Sanding and re-staining your hardwood floor is an essential part of restoring its original beauty. Sanding the wood will remove any scratches, faded stain or other imperfections and refinishing your floor with a new stain will give it a brand new look. While this process may sound intimidating, it can be done with patience and diligence to bring back the original charm of your floor.
When sanding the hardwood floor, you should use an orbital sander and sandpaper to begin slowly taking off layers of wood. You should start with a coarse sandpaper to quickly level out the rough spots, but try not to remove more than 1/32 of an inch of material each pass. As you get closer to refinishing the bare wood, finish up using finer grade sandpaper until you have a smooth surface for staining.
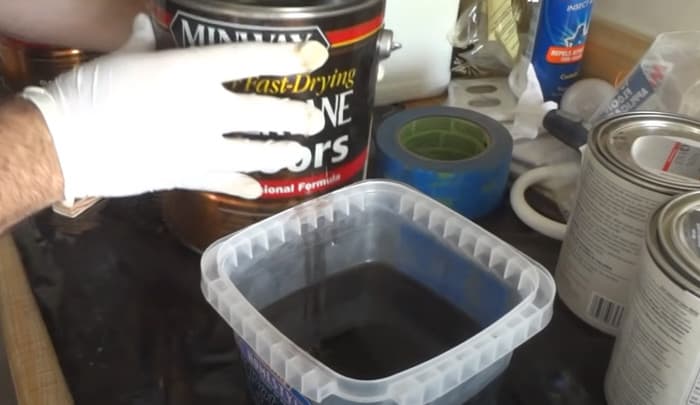
Re-staining your hardwood floors can be both exciting and intimidating. If you’re confident in doing it yourself, be sure to thoroughly research the stain brand you plan on using so that you are fully informed about its finish and application methods. Properly preparing the wood before staining is also crucial for achieving optimal results. The surface must be clean without dirt or matter that could inhibit the absorption of stain. Choose a humid day (not wet) so that there is enough moisture in the air for proper absorption and good coverage. Using a quality brush or roller as well as multiple thin coats will help ensure full coverage over wood pores and grain textures.
Once both processes are completed, it’s time to move onto cleaning and waxing your hardwood floor.
Clean and Wax your Hardwood Floor
After you have filled any cracks or crevices, you can begin to clean and wax your hardwood floor. This will give the floor a nice buffed sheen, protect it from further damage, and add in a layer of stain resistance.
When it comes to cleaning your hardwood floor, there are two options: either a chemical cleaner specifically designed for wood floors or just a simple mixture of mild soap and water. The chemical cleaners are very effective in removing buildup and patches that have been built up on your floor over time, so if this is a concern for you, you may want to go with that option. However, using just soap and water is also effective but will require more effort as you’ll have to use rags, instead of mop and bucket, to wipe down the floor.
To apply the wax to the floor, start at one corner of the room and work your way out in straight lines. Using a microfiber cloth to rub the wax into the floor will help remove any excess wax that has been left behind. You should also use slow circular motions while rubbing – this will help create an even layer of wax over the entire floor.
Additionally, be sure to avoid using too much wax! Too much wax can cause smearing or streaking on the floor which can be difficult to remove and make it look worse than before. Therefore it is best to apply just enough wax for a thin layer that barely covers the wood.
Now that your hardwood floors have been given a proper clean and waxing treatment, it is time move on to addressing different cleaning solutions for the best care results possible.
Different Cleaning Solutions
When it comes to the cleaning process of faded hardwood floors, you have several options. You could opt for a natural solution such as water, vinegar, or oil soaps; a store-bought hardwood floor cleaner; or a DIY cleaning solution. Each type has its own pros and cons, so it’s important to weigh your options to determine which is best for your floors.
When using a natural solution, it’s important to remember that a low pH balance is key. Vinegar and water are some of the most common mixtures used on hardwood floors. While they do a great job of removing dirt and debris, they can also be too acidic and cause discoloration over time. On the other hand, oil soaps carry less risk of discoloration but possess mild cleaning properties that won’t tackle tougher cleaning jobs.
Store-bought wood cleaners offer more powerful cleaning solutions than natural products. However, these harsh chemicals could also strip away layers of protective finish from top coatings and damage the wood underneath if applied incorrectly. Therefore, use caution when using any harsh chemical cleaner on your wooden floors.
Finally, there’s always the option of making your own DIY solution – one part dish soap and two parts water usually does the trick! This mixture will help loosen dirt and grime while maintaining a neutral pH balance.
It’s essential to clean faded hardwood floors prior to applying refinishing solutions. Depending on which type of cleaner you choose, be sure to follow directions carefully in order to avoid damaging the wood further. After you’re satisfied with the results of your chosen cleaner than move on to the next step — applying refinishing solutions!
Applying Refinishing Solutions
Hardwood floors can be given a new lease of life with refinishing solutions. The most common types are oil-based urethanes and water-based polyurethanes. Although both provide a good finish, there are differences in terms of their look and application process.
Oil-based urethanes tend to give a warmer, richer look and have better resistance to scratches and fading from UV light. They apply thicker than water-based polyurethanes, creating a more dimensional appearance. However, they take longer to set, require sanding between coats for a smooth finish, and have unpleasant odors that linger for several days after application.
Water-based polyurethanes create a satin or matte finish that has less yellowing over time compared to oil-based urethanes. As an added benefit, they dry quickly and don’t require additional sanding between coats. However, they are not as durable as oil-based urethanes, so they may need to be reapplied every two to three years depending on the amount of wear and tear on the floor.
Deciding which type of refinishing solution to go with depends on personal preference and budget considerations. If you’re looking for a long-lasting solution with warm undertones that requires little maintenance over time, an oil-based urethane may be the way to go. For those who are concerned about fumes or want a lower cost but less durable option, a water-based polyurethane is ideal.
Now that you’ve considered the pros and cons of different refinishing solutions, it’s time to move on to options for refinishing your hardwood floors.
- According to HomeAdvisor, the average cost range to repair hardwood flooring is between $99.80 and $1,597.
- Refinishing wood floors is more expensive than most other repairs, with HomeAdvisor estimating an average cost of $1,516 for a 250 square foot area.
- On average, minor repairs can cost around $200 while major repairs can cost between $500 and $1000.
Options for Refinishing
When it comes to refinishing faded hardwood floors, there are a few options available. The first option is to sand down the surface and apply a new coat of finish. This is a more involved process that requires a good amount of time and patience as well as some degree of skill and training with power tools. If done correctly, this method yields excellent results, restoring both the color and luster of hardwood flooring. However, if done incorrectly, it can cause further damage to the floors or even make them worse than before.
The second option involves applying a refinishing product directly onto the worn floors. There are many products on the market designed specifically for this purpose that come in aerosol cans and other forms. While these products may prove to be more economical and easier to use than sanding and refinishing, they also tend to deliver less desirable results. The final result may lack the depth and vibrancy of traditional sanding and refinishing methods unless multiple layers are applied.
Whether a DIY-er chooses to sand down and refinish their hardwood floors themselves or to utilize an available product directly on the wear spots, they should always consider safety measures, such as making sure all power tools are properly grounded or disconnected from electrical outlets before use. In addition, proper ventilation should be used during application of products and personal protective equipment should be worn at all times for best results with both processes.
Now that we’ve discussed the available options for refinishing faded hardwood floors, it’s time to take steps towards achieving a true gleaming shine by buffing and polishing the surface.
Buff and Polish for a Gleaming Shine
Buff and polish your hardwood floors is the last step of this process, as it provides a glossy appearance that can be restored with each refinishing. The most common way to do this is with a buffing machine and polishing pads. Be sure to use soft pads for buffing to avoid any damage, and apply wax-based hardwood floor polish for an extra layer of protection.
Some people may opt to hand-buff the floor instead, using either a cotton cloth or a soft sheepskin pad. This method requires greater precision and expertise than machine buffing, but has the advantage of producing even better results.
For either method, be sure to follow all of the manufacturer’s instructions carefully and wear protective gear such as eye protection and rubber gloves. Move slowly with the buffing machine or rag so that you don’t skid the surface of the wood, and take breaks often to check your progress. Avoid buffing in direct sunlight or steamy rooms, which can lead to uneven results.
No matter which method you choose, always remember to use gentle strokes when buffing your hardwood floors. Rough scrubbing can cause swirl marks in the wood’s finish, making it look patchy instead of glossy. Depending on the condition of your floor and type of finish used during refinishing, you may have to repeat this step several times until you achieve desired results.
After buffing your hardwood floors and polishing them for a gleaming shine, the next step is deciding how best to maintain their beauty over time. In the following section, we will discuss some final thoughts for keeping your hardwood floors in prime condition.
Final Thoughts for Maintaining Your Hardwood Floor
Maintaining your hardwood floor is an on-going process that can help ensure its beauty and longevity. Fortunately, with regular care and maintenance over time, you can keep it looking as good as new.
The first step in maintaining your hardwood floor is to make sure that it is free of dirt, dust and debris. Vacuuming or sweeping your floor on a regular basis will help reduce the amount of accumulation that results in discoloration and scratches. You should also use the appropriate cleaning solutions or hardwood-approved cleaners to remove any stubborn dirt or stains.
You should also take steps to protect your hardwood floor from potential damage. Using rugs or mats on high traffic areas is highly recommended, as this can protect the floors against scratches and scuffs. Additionally, avoiding wearing shoes when walking on the hardwood floor can help minimize the potential for damage over time.
Finally, professional refinishing services may be necessary to restore the luster of your hardwood floor over time. This can provide a fresh start for your wood floors and prevent dirt from accumulating in cracks and crevices due to wear and tear. However, many homeowners opt for DIY methods to maintain their floors rather than hiring outside services; depending on your comfort level with home improvements, this could be a good way for you to save money while still preserving the look of your hardwood flooring.
In summary, following these tips will help maintain the beauty and lifespan of your hardwood floors for many years to come. With regular maintenance, you can keep them looking as good as new while keeping repair costs at a minimum.
Common Questions Explained
Are there any tips to prevent hardwood floors from fading in the future?
Yes, there are several tips for preventing hardwood floors from fading in the future. First and foremost, keep your floors clean by sweeping or vacuuming regularly and mop them with a damp mop. Try to limit the amount of direct sunlight that comes into a room by using blinds or curtains to reduce fade marks. Place rugs in high traffic areas to protect your floors from scratches and help shield them from sun damage. Finally, make sure to apply a sealant finish that creates a barrier between the wood and environmental elements like dust, dirt, and moisture.
Are there any DIY methods to restore faded hardwood floors?
Yes, there are DIY methods to restore faded hardwood floors. The most important step to restoring your hardwood floor is to thoroughly clean the floor with a vacuum and then a damp mop. After that, many people recommend using a thin coat of polyurethane to seal in the existing floor and cut down on further fading. Additionally, you may want to consider refinishing the hardwood, either by sanding it lightly or using an abrasive Floor Buffer or Sander with grain papers that match your finish. Finally, using a cleaner or polish with UV protection will also help maintain your floor to prevent future fading.
What are the best products to use to restore faded hardwood floors?
When it comes to restoring faded hardwood floors, there are a variety of products that you can use. The best option will vary depending on the type and condition of your wood flooring, so it is important to do your research before purchasing any products.
Some of the best products for restoring faded hardwood floors include polyurethane finish, Danish oil finish, penetrating wax finish, and laminate flooring sealant. Each of these finishes provides a different degree of protection and restoration power depending on your wood’s condition.
Polyurethane is a popular option because it helps protect against scratches and spills, and also adds shine to dulled-looking floors. Danish oil finishes provide an attractive matte sheen that enhances the color of the wood without being too permanent like polyurethane or waxes. Penetrating wax finishes are great for protecting older woods because they help preserve the natural look of the wood. Laminate flooring sealant is ideal if you have vinyl or laminate hardwood floors that need to be restored. This sealant helps keep dirt and debris from accumulating beneath the surface, improving the longevity of your floor in the process.
Overall, when it comes to restoring faded hardwood floors, there are many different products available on the market. With some research, you can find the products that work best with your particular floor type and condition.
References
https://www.architecturaldigest.com/story/how-to-clean-and-maintain-hardwood-floors
Restoring old floors to their former glory has always been a challenge I welcomed with open arms. Back in ’98, I used an old, easy home remedy, mixing half vinegar, half vegetable oil, and a little elbow grease. Believe it or not, it worked wonders on my weary old floors! Plus, unlike professional floor restorers, there is no risk of harmful chemicals tainting the indoor air quality.
The vinegar-oil method is an old tale indeed, Ms. Rosendale. But personally, in my 40 years of carpentry, I would use a mixture of linseed oil and turpentine for natural wood restoration. Remember though that this process needs patience, as it requires several applications to truly see the results.
I definitely second Salvatore’s advice on using linseed oil and turpentine mixture for wood restoration, had quite a success with it myself last summer. If you opt for this, just remember to wear gloves and work in a well-ventilated space as turpentine can be quite strong. It would also be wise to test out this mix on an inconspicuous part of the floor first to ensure satisfactory results before applying it all over. I might add that while vinegar is good for cleaning wooden floors, it could fade the color over time so use sparingly or not at all if possible.
While I agree Quentin that turpentine can be useful, it’s key that we remember its potential hazards – not just regarding ventilation and skin contact, it’s also flammable, so needless to say, keep away from open flames or heating sources. It’s crucial to store any leftover mixture in well-sealed containers too.
Remember folks, always test your stain on a scrap or hidden area first. Every wood’s different and you never know how it’ll look until it’s too late if you don’t test first.
I second Tobias’ notion on testing the stain first. In my years as a carpenter, I’ve seen too many regretful faces after hasty staining jobs – no two types of wood react to stain in the same way.