
Your flooring is one of the first things that comes to mind when we think of our home’s construction and decor. Not only does the right flooring bring beauty to the space, it also offers safety and protection from the elements. With so many flooring installation options available, you can achieve any kind of look you want; from distressed wood to contemporary tile, there’s something to suit every style. But one detail that often goes overlooked when people are considering their flooring needs is the type of fastener they will use. Today’s flooring market is filled with a variety of fastener options, including metal staples, tacks, pins, and screws. However, if your flooring project will require trimming or intricate installation, the best fastener choice for the job is a flooring nail.
In this ultimate guide to flooring nails, we’ll explain what they are and why they’re better than other types of fasteners. We’ll also provide a few tips and tricks to ensure you pick the right nail for your project and ensure it’s properly installed. Let’s get started!
Commonly, 15 gauge finish nails or 18 gauge brad nails are used in hardwood flooring. For installation on a concrete subfloor, you may want to use ring shank, spiral shank, or cement-coated nails.
“Nail selection may seem insignificant in the grand scheme, but it can drastically affect the outcome of your flooring installation. The material, size, and type of nail you use can differ depending on the flooring material. I’ve helped countless homeowners avoid common pitfalls and unnecessary repair costs caused by improper nail use. With my extensive knowledge and experience, I can guide you in choosing the right nail for any flooring project.”
Jasper Goodfellow, Certified Flooring Installation Specialist
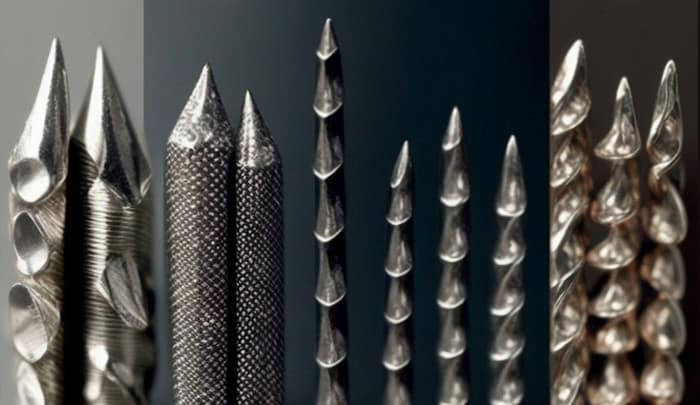
Types of Flooring Nails
When it comes to nails for hardwood flooring, there are several types to consider. One common type is a 15-gauge nail, which is the most appropriate size and thickness for hardwood floors since it’s nearly flush with the surface of the wood. This type of nail gives stronger support than thinner nails and is less likely to pop out down the road. For those wondering how to remove nailed hardwood floor, it’s important to note that the nail type can affect the removal process. Another type is a 20-gauge nail, which is a good option if you’re looking for something affordable and quick to install. For greater stability on high-traffic areas, you should opt for a thicker gauge nail such as 18- or 19-gauge.
Another type of flooring nail to consider is a pneumatic nailer—a specialized tool that uses compressed air to drive fasteners into wood surfaces quickly. While pneumatic nailers don’t offer much in terms of customization or control over where you place each fastener, they’re an efficient way to get the job done quickly and securely.
For even faster installations, electro galvanized flooring nails are another option. Since these come preloaded in a strip, all you have to do is drive them into the floor with hammer taps; this type of fastener also helps minimize gaps between boards.
The debate continues between using traditional nails versus screws for hardwood flooring installation; while some argue that nails are less likely to loosen over time, others prefer screws because they provide more even support and are easier to replace in case of damage. Whichever side you’re on, it’s important to use only stainless steel or coated fasteners designed specifically for hardwood floors, since they won’t corrode when exposed to moisture.
No matter what type of fastener you choose, be sure to plan your installation carefully before proceeding and read instructions thoroughly so that you can get the job done right the first time around. With this guide in hand and knowledge about different types of flooring nails, you can make an informed decision about which one will best suit your needs—moving on to the next section: what type is best for hardwood flooring?
What Type is Best for Hardwood Flooring?
When it comes to hardwood flooring, choosing the right flooring nails is just as important as picking the right type of wood. The good news is that you don’t have to guess which kind of flooring nails are the best for hardwood floors with so many different types available. Some nails may be better suited for certain floors than others, so it is important to assess your individual needs before making a purchase. There is even a difference between oak types, so make sure to perform a complete research.
When it comes to debate about what type of nail is best for hardwood flooring, opinions often vary. Many will argue that a round-head nail is best because it has large fasteners and can stay secure in the wood after installation. These nails also offer easy removal with minimal hiccups. On the other hand, some may prefer how flat-head nails are less visible after installation since they sit flush against the surface of the wood. However, flat-head nails do not have as much gripping power as round-head nails and may require extra security measures like adhesive strips to ensure they stay in place throughout their life.
Ultimately what type of nail you choose for hardwood flooring depends on your individual needs and preferences. It is important to weigh all of your options to make an informed decision that fits your budget and desired outcome. Now that you know more about the different types of flooring nails available, let’s explore what tools you need for proper installation in the next section.
Crucial Highlights
When installing hardwood flooring, it’s important to choose the right flooring nails to ensure secure installation. Different types of nails have different pros and cons (e.g. round-head nails offer strong grip but are visible, while flat-head nails are less visible but have less grip). Ultimately, the choice should depend on individual needs and preferences. To ensure a successful installation, it is important to have the proper tools for the job. This will avoid liftings down the road.
Tools Needed for Installation
Installing flooring nails correctly requires the right tools for the job. Certain projects may require additional tools or less, depending on their requirements. Here is a breakdown of the necessary tools that are typically needed to install flooring nails. It’s worth noting that the process can vary, especially when installing hardwood floors without a subfloor, which may require different techniques and tools correctly requires the right tools for the job. Certain projects may require additional tools or less, depending on their requirements. Here is a breakdown of the necessary tools that are typically needed to install flooring nails.
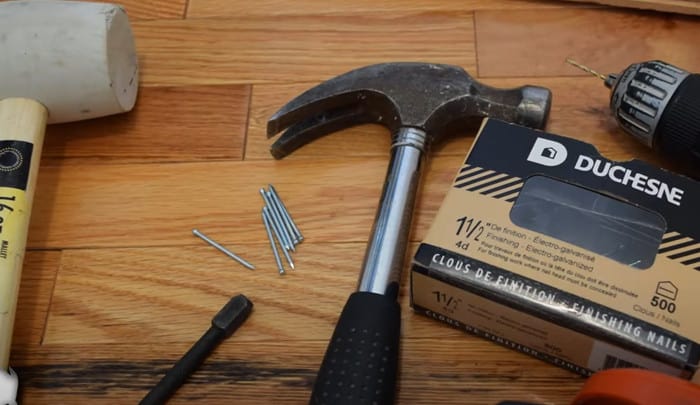
Hammer: A hammer is an essential tool for many home improvement jobs, including installing flooring nails. It’s important to choose a hammer with a proper weight and handle size that feels comfortable in your hands. Hammer types can vary, such as wood or rubber mallet hammers.
Drill: A drill is recommended when installing particularly large or difficult flooring nails. With the appropriate bit and extension, drilling holes into the subfloor can come in handy when setting large-headed nails into difficult surfaces, such as hardwoods or concrete.
Nail Set: A professional installer often uses a nail set to apply precisely the correct depth and angle of nail insertion into any given surface such as drywall or hardwood floors. This specialty tool offers more control than a standard hammer and is ideal for flush or near-flush installation of harder materials like pre-finished hardwood flooring.
The debate surrounding which type of tool is better can be subjective, depending on the task at hand and user preferences. Ultimately, it depends what type of jobs you do most often, whether it requires heavy-duty power tools or simply traditional hand tools. Depending on your specific needs, the perfect combination of tools may be different for everyone.
The next section will discuss different types of hammers, drills, and nail sets available and which one might be right for you based on your particular project and skill level.
Hammer, Drill, and Nail Set
When it comes to installing flooring nails, the hammer, the drill, and the nail set are the essential tools required. The hammer is used to drive in the nail-head, while the drill is used to pre-drill a guide hole for the nail prior to insertion. Finally, the nail set is used as a wedge to prevent nails from splitting or damaging the flooring material during insertion.
When deciding between manual and powered tools for these tasks, there are several factors to keep in mind. When using a manual hammer or drill, there is always a risk of overdriving nails or drilling too deep into the surface. On the other hand, powered tools offer a greater degree of precision and repeatability when driving nails with accuracy. Additionally, they can save time on jobs that involve setting large quantities of nails over a large area.
The debate between manual tools and powered tools will ultimately depend on one’s preference, budget, and complexity of task. In some cases existing hardware may dictate which type of tool to use. For example, if using an older wooden floor that is compatible only with finishing nails as opposed to counter-sinking screws, then a manual hammer and drill may be best suited for complete control over precise placement of nails. The layout of the tiles also plays an important role.
It can be difficult to choose between all of these options. For more information on selecting between manual and powered tools for flooring installation consider consulting a knowledgeable expert or researching other resources for tips and advice regarding material choice and power tool selection.
Having discussed the available options for hammers, drills, and nail sets – now let’s look at some guidelines for successfully installing flooring nails in the following section: Installing Flooring Nails.
- Flooring nails, also known as flooring cleats, should be 2 ½ inches long with galvanized or stainless steel coating.
- Concrete floors require masonry nails with a specially hardened tip to penetrate the surface.
- Common types of flooring nails such as finish and brad nails should not be used as they can easily pop out and damage the floor over time.
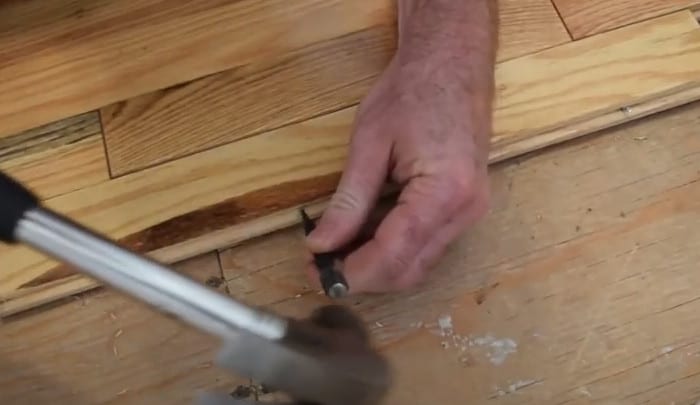
Installing Flooring Nails
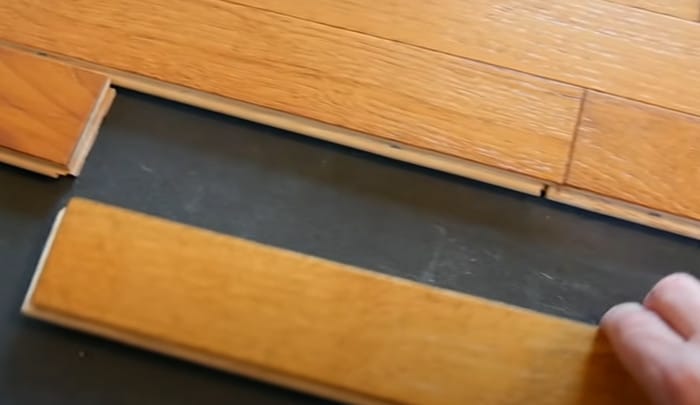
Installing flooring nails is a crucial step in the hardwood flooring installation process and is essential for achieving a durable, long-lasting floor. There are two primary approaches for flooring nail installation: face nailing with a hammer and pneumatic nailing with an air compressor or pneumatic gun. While this guide focuses on hardwood, it’s worth noting that installing laminate flooring involves a different process and often doesn’t require nails. While both methods will secure the flooring in place, there are pros and cons associated with each.
Face nailing is the traditional approach and is often best used when the flooring planks are thin; it’s also best adapted to solid wood floors. To complete this method properly, holes must be pre-drilled into the plank prior to nailing at approximately four inches apart along each edge. Once these holes are drilled nails of appropriate size are driven through them using a hammer. The benefit of this method is that these nails can be removed or substituted later if needed without causing damage to the surrounding planks. However, it’s an extremely time consuming process and requires many doses of extreme precision from the installer to ensure that nails are driven in straight and in the optimal locations (neither too shallow nor too deep) for achieving long term stability.
Pneumatic nailing involves using an air compressor or a pneumatic gun which features several advantages over manual hammer works. These tools reduce fatigue caused by repetitive manual hammer operations and improve accuracy by driving most nails flush with the surface as per instruction setting. Installers can also easily switch out fasteners in different styles, sizes, and types to meet their needs quickly and efficiently while avoiding splitting or warping of the plank surfaces induced by inappropriate fasteners. Additionally, this technology reduces noise pollution during installation operations and decreases chances of hand injuries due to its tool’s protective safety shield configuration. On the downside though, this technology carries relatively higher costs to acquire than manual tools; so users must decide if those upfront costs are worth reducing time spent on installation or not.
No matter how you choose to install your flooring nails, it is important to understand when nails should and shouldn’t be used for optimal results; underutilizing or overutilizing can both lead to premature failure of your hardwood floors over time. The next section will explore drilling holes and hammering points for installing nails safely and efficiently.
Drilling Holes and Hammering Points
Drilling holes and hammering points are important steps to properly securing your flooring with nails. When constructing the subfloor, you will need to drill conditions have been set up accordingly. Be sure that the hole is deeper than the nail for a secure fit. Drilling the holes before inserting the nails can give more stability and helps prevent splitting the wood when hammering into it.
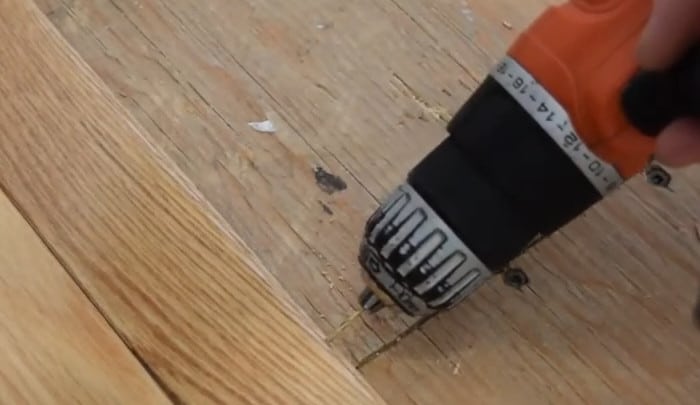
When drilling holes, use a pilot bit that is slightly smaller in size than the nail being used. This will create an appropriately sized hole and provides room for expansion of the wood after being nailed in place. For those working with laminate flooring, it’s important to know how to stagger laminate flooring for a professional look, even though it doesn’t involve nailing. Utilizing these measures can ensure a secure placement of floorboards or other materials needing to be fastened.
The alternative of not drilling holes is to simply hammer directly into wood without any prior preparation. This can provide satisfactory results in some cases, but always carries with it increased risk of damage to either the surface or even yourself if you slip with the hammer while driving nails into it. In some cases, people choose not to drill at all, but this should only be done if you’re confident in your abilities as there’s always an associated risk to working on jobs like this without proper guidance or training.
When taking on larger projects where hundreds of flooring nails need to be inserted in close succession, having drilled holes will make your life much easier – allowing for precise hit locations and avoiding excess strain from repeated pounding motions over and over again.
Whether you choose to drill or not is ultimately up to you, but keep in mind any risks and rewards associated with either choice in order to make an informed decision about which method is best for your project needs.
Now that we’ve discussed how drilling or not drilling plays into using flooring nails, let’s move on to the next section on considering nail length and size when choosing the right flooring nails for your project.
Nail Length and Size
Generally, nails used for flooring should be at least 3/4 the thickness of the floor material. When choosing the right length, you’ll need to assess the size of the boards being secured and the type of subfloor beneath them. In areas where there are two planks or more, longer nails may be preferred for extra support. Be sure to talk with your supplier about the specific length and size you may need for your project.
The size of a nail can also vary depending on its length. The shank diameter affects the total surface area of contact between the wood, helping it hold better, while a thinner one creates less splitting and less resistance when driving it in. Smaller nails (1″ or less) tend to look neater and are easier to work with, however thicker nails provide more holding power for larger pieces or those in high-traffic areas that require additional stability. Choose carefully depending on what is needed when it comes to strength, durability, longevity and appearance.
The discussion over nail length and size are ultimately dependent upon the specific job needs. Always consider factors such as project scale, budget, type of subflooring, level of traffic and type of flooring materials before making a decision on what size or length to use. With these considerations in mind, you’ll have no problem selecting the right flooring nails for any job.
As proper hammer selection is an important factor when securing flooring properly with nails, let’s move onto discussing “The Power of the Hammer” in our next section.
The Power of the Hammer
The power of the hammer is an important factor when selecting the appropriate flooring nails. By properly utilizing the power and force of a hammer, flooring professionals are able to drive nails into hard materials and secure them firmly for stability. In addition, the power of the hammer can be used to better manipulate the nail angle and allows for greater precision in setting the nail.
On the other hand, it is still possible to drive nails with too much force and accidentally split or crack wooden planks. To ensure that this doesn’t occur, it is essential to understand how to best regulate force when using a hammer. As such, developing an understanding of how much strength is necessary to set each type of nail correctly is essential.
Overall, it’s important to keep in mind that while using a hammer can give flooring professionals greater control, too much force can damage the very material being nailed down. With that in mind, let’s move on and explore how to determine what type of force professionals should use when driving their nails. In some cases, you might need to cut installed wood flooring, which requires careful consideration of existing nails and fasteners.
Next we will discuss planning out nail force and determining what type of strength is necessary for each project.
Determining Nail Force
When it comes to determining the strength and longevity of a flooring nail, its nail force should be determinative. The force of the nail, or how much pressure must be applied to penetrate the material and hold the two sections together, is a critical factor in choosing the right type of flooring nail.
The force that is needed to penetrate your substrate can depend on a variety of factors, such as the type of flooring surface you are working with. Some surfaces may require more force to keep nailed sections connected while some may only need a light tap to accomplish this goal. Determining the necessary nail force is vital since too little may cause loose nails that can tear up your surface or allow squeaking on certain surfaces. Too much force, however, could damage the hardwood and cause cracking.
The type of hammer you use can also affect nail force considerably. A 20 oz durable hammer designed specifically for construction use could transmit more power than an 8 oz hammer made for furniture assembly, thus requiring more skill and precision when swinging with it. However, other factors such as humidity levels, temperature differences and environmental conditions must also be considered before choosing a hammer size and nailing force because they could affect either by various degrees.
Finally, one should always think in terms of quantity when it comes to flooring nails; buying the right number and types will save time in installation and maintenance costs in the long run which will be beneficial for everyone involved.
Now that we’ve gone through all there is to know about Determining Nail Force, let’s move on to our Conclusion and Overall Flooring Nails Review.
Conclusion and Overall Flooring Nails Review
Conclusion and Overall Flooring Nail Review
In conclusion, selecting the right flooring nails for a specific project is an important decision. The correct type of nails can make a difference in terms of quality and longevity, as well as convenience during installation. In most cases, the decision will come down to choosing between staples or cleats.
Staples are great for achieving a secure connection that is easy to install and remove. They require minimal effort to attach, making them suitable for smaller projects. While they may not be as durable as cleats, they are certainly cost-effective.
Cleats are strong and long-lasting, perfect for larger projects where durability is essential. They offer superior stability and can be used with softer flooring materials, such as parquet and laminate. However, due to their increased thickness and size, these types of nails may cause greater damage when removed from the flooring surface.
Overall, both staples and cleats have their advantages and disadvantages. It really depends on the individual project requirements in terms of size, budget, material, and purpose in order to select the best option for the job. Each type of nail comes with its own set of potential drawbacks and benefits that should be weighed carefully before making a final decision.
Responses to Common Questions with Detailed Explanations
What types of flooring materials are typically secured with nails?
Nails can be used to secure many different types of flooring materials, such as hardwood, bamboo, laminate, cork, and vinyl. Hardwood flooring is usually fastened with cleat nails—these are slightly angled and have a wide head that helps lock the material into place. Bamboo flooring typically uses glue and staples for installation, but some people use finish nails to secure certain boards. For laminate flooring, you can use cleats or finish nails to attach it to the subfloor. Cork and vinyl, on the other hand, are generally secured with glue or double-sided tape rather than nails, although you can still use screws for additional security.
What are the advantages of using flooring nails?
Flooring nails offer a number of advantages, which make them an ideal choice when it comes to finishing a floor. First and foremost, flooring nails provide more secure grip than screws or nails without the need for glue or adhesives. This makes them extremely popular among DIYers who want a strong, long-lasting hold.
Additionally, they are much quicker to assemble than other types of fasteners, making them perfect for anyone who is pressed for time. Flooring nails also don’t require pre-drilling so installation is much simpler and can be done with fewer tools.
Finally, flooring nails have incredible holding power when driven into most woods–providing up to five times the tensile strength of other fasteners. This makes them great for any job where extra strength is needed and provides added peace of mind that floors will be safe and sturdy even over time.
How are flooring nails installed?
The installation of flooring nails depends on the type of flooring being installed. For solid hardwood or engineered hardwood floors, nails should be fired into the subfloor using a pneumatic flooring nailer. For tongue and groove style engineered wood, a fastener like a cleat nail or staple is needed to secure the joint. For floating floors or laminate flooring, an adhesive with fasteners is used to attach the planks together and secure the planks to the subfloor. Fastening materials including flooring nails should always be approved and labelled by the manufacturer so they can be sure they are compatible with the flooring being installed.


I beg to differ on the point about the type of fastener being overlooked. In my extensive experience as a flooring contractor, the fastener is crucial and is not a detail that professionals in the field take lightly. It directly influences the longevity and safety of the flooring installation.
I completely agree with Theodore’s view. When I redid the flooring in my own home, the selection of the right fastener made a noticeable difference in the installation process and eventual lifespan of the flooring.
When I was working on my log house project, each fastener’s selection played as crucial a role as choosing the actors for a film, every character matters. A miss in either can jeopardize the entire setup, be it a home or a movie.
Zorin, I couldn’t agree more with your selection analogy. In my years as an architect, I’ve seen projects compromised due to faulty or ill-chosen fasteners—like casting a novice actor in a vital role, one weak link can destabilize the whole structure.
As a professional who has installed a variety of floorings for over 20 years, I couldn’t stress more the importance of suitable fasteners. I once worked on a refurbishment project where previous contractors had selected inadequate fasteners that ultimately led to squeaky floors — educational but regrettable experience indeed!
Just like Peregrine said, selecting the right fastener can be likened to choosing the right foundation for your house—you may not see it, but the entire performance depends on it. As an interior designer who interacts with a variety of elements during home makeovers, I often find that a good-quality fastener aids tremendously in preventing future hiccups like squeaks or loose tiles that compromise aesthetics and functionality.
As a civil engineer, I absolutely have to stress the point on the importance of quality fasteners in flooring operations – it’s one area where saving pennies could result in pounds worth of damage over time.