
Welcome to the ripe world of restoring parquet flooring! If you’re like most homeowners, you’ve probably thought about replacing your flooring due to age and wear or simply wanting to change up the aesthetic to something more modern or traditional. But if your current flooring is parquet, you don’t have to look any further in your search for a new surface. With the proper preparation and installation, you can restore parquet flooring to its former glory. In this blog post, we’ll walk you through the step-by-step process of revitalizing your parquet flooring, so you can launch into this exquisite project with confidence!
To restore your parquet flooring, start by sweeping and vacuuming the floor as well as filling in any holes or cracks. Then, apply a water-based polyurethane finish to the floor and use an orbital sander to buff it up to a shiny finish.
“Restoring parquet flooring isn’t just a job for me, it’s an art. The secret is understanding the nature of the wood, the history of its use and the best techniques to bring it back to its former glory. With over 25 years in the business, I’ve learned that patience, the right tools and a deep respect for the material are key in turning battered parquet into a real masterpiece once again.”
Fergus McKinney, Flooring Restoration Specialist
Clean Up: Preparing Your Parquet Flooring
Before you can begin to restore any parquet flooring, it is important to adequately prepare the surface. This includes a thorough cleaning and removal of dirt, dust, and stains. In doing so, you will ensure that the restoration process can be carried out properly and the results will be successful.
There are two methods of cleaning in preparation for restoring parquet flooring – professional cleaning or manual cleaning. Professional cleaning involves using commercial grade chemicals such as cleaners, sealants, and primers. These aggressive cleaners are ideal for removing deep-seated dirt, grime, grease, and stains. However, this method should only be used by experienced professionals as improper use may harm the finish of the floor.
The second method is manual cleaning which involves using a combination of products in order to lift and remove dirt from the surface. This method is less harsh on the wood but may require more effort. Manual cleaners such as mild detergents and oil soap are recommended for this purpose. Additionally, a soft brush can be used to scrub stains away or lift dirt off of ridges and grooves in the planks of parquet flooring.
To make sure your flooring is clean prior to restoration, it is advisable to vacuum up any loose particles first. This will ensure that no residue remains that could affect the application or adherence of new products during the restoration process.
Once both dry and wet vacuuming has made sure that all dust and dirt has been removed, it is now time to remove any visible stains on your parquet flooring. Depending on what type of staining you’re dealing with, there are various commercial spot removers available that can help tackle tough marks without damaging your flooring finish.
With proper cleaning now complete, you are ready to move onto the next step in restoring your parquet flooring – removal of dirt, dust and stains!
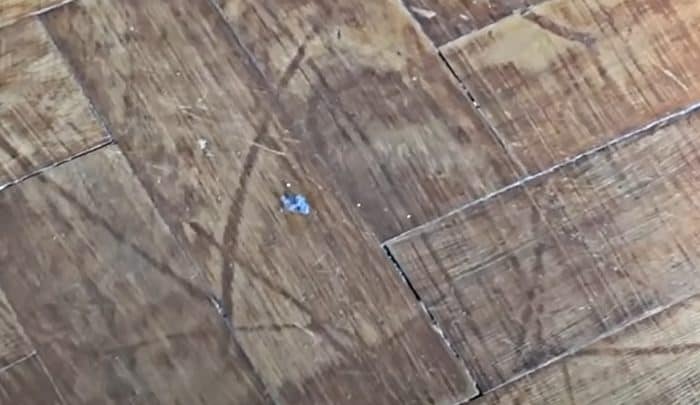
Remove the Dirt, Dust, and Stains
Removing dirt, dust, and stains from the parquet floor is essential in preparing the surface for sanding and refinishing. This step requires a thorough cleaning of the parquet blocks to ensure all debris is removed before moving on to the next stage of restoring the floor. Proper cleaning not only enhances the appearance but also ensures better adhesion of finishes and treatments is essential in preparing the surface for sanding and refinishing. This step requires a thorough cleaning of the parquet blocks to ensure all debris is removed before moving on to the next stage of restoring the floor. Though it might be tempting to try chemical cleaners or power washers, these can damage the wood and lead to bigger problems down the line.
Instead, begin by removing dirt and dust with a broom or vacuum. For hard-to-remove areas, a soft brush should be used in combination with a vacuum cleaner for deeper cleaning. It is also important to remove any existing wax or sealant using stripper applied with a cloth. If you are confronted with stubborn stains and marks, aim to lift off as much as possible without abrasion then use white spirit when necessary. When applying anything to the floor it should be applied lightly so as not to damage the wood nor leave any abrasive scratches or marks.
Having taken steps to remove all dirt, dust, and other debris from the parquet flooring, it’s now time to sand and refinish the parquet blocks according to latest industry standards.
Key Takeaway
Preparing to sand and refinish a parquet floor requires thoroughly cleaning it of dirt, dust, and stains. Chemical cleaners and power washers should be avoided as they can damage the wood. Dirt, dust and debris should be removed by sweeping or vacuuming, and a soft brush in combination with a vacuum cleaner should be used for hard-to-remove areas. Wax and sealants should be removed with stripper applied with a cloth. When removing stubborn stains and marks aim to lift off as much as possible without abrasion then use white spirit when necessary. Apply all products lightly so as not to scratch or damage the wood and once all dirt, dust and debris has been removed it is time to sand and refinish according to latest industry standards.
Sand and Refinish the Parquet Blocks
Sanding and refinishing is an essential part of restoring a parquet floor. Sanding helps remove grime, dirt, and old finishes that have been built up over time. Once the sanding process is complete, it’s time to refinish the parquet blocks and bring them back to their former glory. This process not only restores the appearance but also helps to protect the wood from future wear and tear. The majority of parquet floors are made from wood, making sanding the wood an important part of the restoration process.
Before beginning the sanding process it is important to decide between dry or wet sanding. Dry sanding can be done with a standard electric sander and has the advantage of producing very little dust. On the other hand, wet sanding allows for more control over the areas being sanded and gives a cleaner finish with less dust particles in the air. Both types of sanders are effective at removing all surface build-up, however, wet sanding can take longer due to having to wait for each area to dry before proceeding.
Debating both sides, both methods (dry and wet) are viable options when refinishing parquet blocks depending on preferences and the type of job required. Most professionals recommend using dry methods as they provide a more detailed finish with less mess compared to wet sanding; however, wet methods allow greater control over which areas receive sanding and produces less dust in comparison. In any case, safety should always be taken into consideration while using power tools such as electric sanders – use proper precautions including wearing goggles and masks as necessary to avoid potential harm or discomfort.
Now that your parquet blocks have been effectively sanded and prepped for refinishing, it’s time to move onto the next step: using the appropriate sanding grinder.
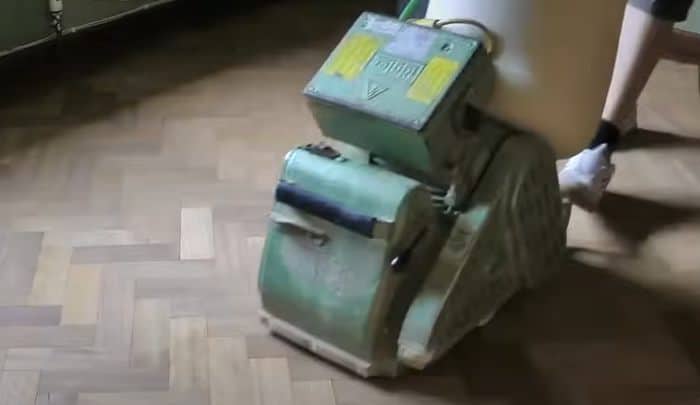
Use the Appropriate Sanding Grinder
Sanding the parquet flooring is an essential part of the restoration process in order to bring it back to its original appearance. The type of sanding tool used will depend on the condition of the floor, which can range from deep scratches and gouges that require aggressive sanding to only light scratches and superficial issues that require gentle sanding. For this step, it is important to use a specialized sanding grinder, as opposed to other types of floor sanders. This tool is designed for edging, which means that it focuses on detail work around corners and in tight spaces. It also does not leave behind swirl marks like other types of equipment can.
When selecting a sanding grinder, debate exists over whether it’s best to choose an electric or pneumatic version. Electric models are typically seen as more reliable because they don’t rely on compressed air like pneumatic models do. However, they tend to be more expensive initially and often require additional accessories such as power cords and dust collection systems too. On the other hand, pneumatic models have less upfront costs but may need additional parts such as hoses and compressors if you don’t already own them. Ultimately, users should consider their skill level, budget, available resources, and type of project when selecting a sanding grinder.
Once you have selected an appropriate sanding grinder, you are ready to start the restoration process with a smooth surface for applying a polyurethane finish.
- The average cost to strip and refinish parquet flooring is between $2.10-$2.90 per square foot.
- The cost of restoring parquet flooring can vary depending on the size of the area and the complexity of the work involved.
- The National Wood Floor Association suggests that a homeowner should budget between $3.00 and $7.50 per square foot for parquet floor restoration.
Applying a Polyurethane Finish
Making the decision of whether to apply a polyurethane finish to your parquet flooring is an important step in restoring the wood, and should be approached with care. Polyurethane finishes provide greater durability when compared to wax or varnish, offering protection against scratches and wear-and-tear. They also come in different gloss levels – high gloss, low gloss and satin – allowing you to customize the look of your restored parquet flooring.
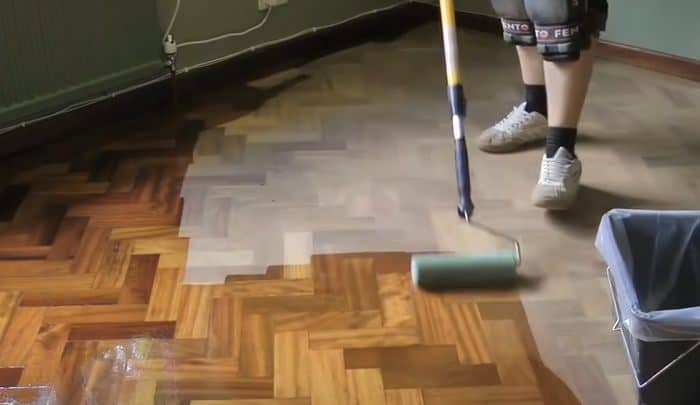
On one hand, advocates of polyurethane argue that it is a more economical option that offers prolonged protection for your wooden floors. The strong protective finish can last up to 10 years and requires minimal maintenance over time. Additionally, modernized water-based polyurethane products have fewer intense fumes than their predecessors, making them safer for interior use and more environment-friendly.
On the other hand, some homeowners are concerned about the long-term effects of using polyurethane on their parquet flooring. Protective coatings made from oil-based polyurethanestend to yellow or become brittle with time, and are difficult to regularly maintain without damaging the wood. Also, applying a urethane finish is labour intensive as several layers need to be applied for full coverage; each layer needing to be sanded down before the next coat is applied – overall creating potential problems if done incorrectly.
Considering the pros and cons of using a polyurethane finish help you make an informed decision on how you want to restore your parquet floors. After taking this into account, you can move onto the next step – deciding whether to apply wax or varnish to restore shine back into your parquet flooring.
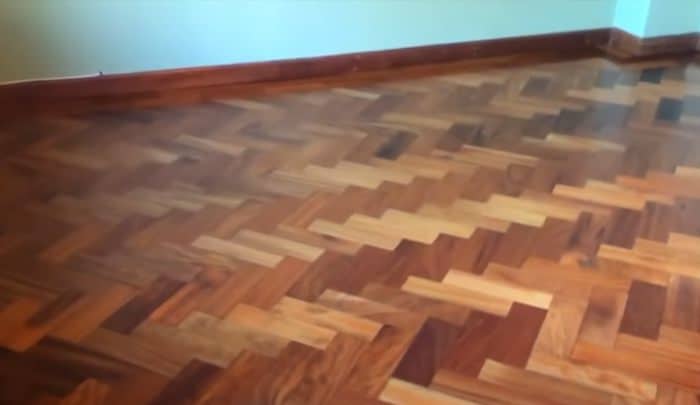
Wax or Varnish to Restore Shine
Restoring the shine of your parquet flooring is an important part of the restoration process. You have two options; waxing or varnishing. Waxes are applied to the surface in liquid form, often in paste wax form, which must be allowed to harden before buffing to a high gloss finish. Varnishes come in both water-based and oil-based formulas, depending on the manufacturer and type used. When applied correctly they provide a hard wearing protective finish that repels dirt and moisture and holds the shine for longer.
When deciding whether to use wax or varnish there are a few things you should consider. Wax provides a deep shine but does not last as long and can require more frequent reapplication than varnish. On the other hand, varnish can be more difficult to apply as it tends to create streaks when brushed on, so additional time may be required for this step. Both also require specialised products and tools that can be costly if you don’t already own them.
Whether you choose wax or varnish, make sure your parquet floor is clean, dry, undamaged and free from dust before applying either product. This will ensure any imperfections are minimised and that the finished product has a professional quality look and feel.
Now that you have decided which material to use for restoring shine on your parquet floor, let’s move onto the next section: Maintenance Tips to Protect Your Parquet Flooring. Regular cleaning and maintenance of your floor will help protect it from scratches, dirt build-up, wear and tear over time.
Maintenance Tips to Protect Your Parquet Flooring
Good preventive maintenance is essential for keeping your parquet flooring clean and in good condition over time. Here are a few tips that can help you protect your parquet floor from wear and tear, dirt, and damage. Pets can also cause certain problems, such as bad smells.
Clean Regularly: To keep your parquet floor looking its best, it’s important to regularly sweep or vacuum the surface to remove any dirt or debris that has accumulated. Additionally, it’s important to damp mop the floor using wood-safe cleaning solutions from time to time to keep it looking clean and fresh. Avoid using excessive water on a parquet floor, since too much water can cause the wood planks to warp or crack.
Choose Low-Heel Shoes: High heels can cause deep scratches in the surface of your parquet floor, so it’s important to ask guests to avoid wearing them when they visit your home. Consider providing slippers for visitors who do not wish to take off their shoes.
Area Rugs are Helpful: Adding area rugs over high traffic areas of your parquet floor can act as a protective layer between foot traffic and the wood planks, thus reducing wear over time. Be sure to regularly vacuum area rugs and replace them if they become damaged.
Furniture pads: When moving furniture items around on your parquet floor, be sure to use protective furniture pads on the legs or bottom of the piece of furniture. These pads will prevent scratching and denting of the wooden planks when furniture is moved around.
Be Mindful of Moisture Exposure: Moisture can be incredibly damaging for parquet floors; too much moisture can cause warping and cracking in the wood planks over time. In order to prevent this from occurring, make sure that areas near sinks and tubs have proper drainage systems installed and always mop up any spills quickly with minimal moisture.
In extreme cases, it might be necessary to remove parquet flooring altogether and replace it with a more cost-effective and low-maintenance option, such as vinyl. However, this decision should be made after careful consideration of the floor’s condition and your long-term goals for the space-tile-on-stairs/https://www.amazinghomedecorco.com/vinyl-tile-on-stairs/”>vinyl.
Frequently Asked Questions
What cleaning materials or products are best to use when restoring parquet flooring?
The best cleaning materials or products to use when restoring parquet flooring will depend heavily on the condition of the floor and the materials used in its construction. If the floor is in good condition and made from a sealed type of wood, then a gentle soap and warm water solution can be used for light cleaning. If there are deeper imperfection or a waxed finish, a mild detergent can be used with a soft brush, such as a toothbrush, to reach into small crevices. For more stubborn stains, use mineral spirits or diluted bleach solutions. Finish with another layer of sealer to protect the floor from further damage and to give it an even look. It is important to test any cleaning product on an inconspicuous area first always before using it on the entire floor.
What maintenance is required to keep my parquet flooring looking its best?
Maintaining your parquet flooring is critical to preserving its beauty and longevity. The best way to keep your parquet floor looking its best is to regularly sweep, vacuum, or dust mop the surface to remove dirt and debris. For those wondering about installation options, it’s worth noting that parquet can even be installed without a subfloor in some cases, although proper maintenance remains crucial regardless of the installation method. This helps prevent scratches and damage that can occur from daily wear and tear. You should also use a damp cloth to clean spills as soon as possible.
For a more thorough cleaning, use a mild cleanser specifically formulated for hardwood floors. Before applying a cleaner, make sure it doesn’t contain anything abrasive or acidic. These substances can strip away the protective sealant on your flooring and dull the finish.
It’s also important to routinely treat your parquet floor with a wood-safe polish or wax. This helps protect the wood from scratches and stains while providing an attractive sheen. Reapply the polish or wax every few months, making sure it’s thoroughly spread across the entire surface of each tile.
Overall, regular care and maintenance will go a long way in keeping your parquet floor looking its best for years to come.
What specific steps should I take to restore my parquet flooring?
The steps you should take to restore your parquet flooring depend on the type of damage and maintenance it needs. Generally, the steps for restoring your parquet floor include:
1. Cleaning the Floor – First, you’ll want to thoroughly clean the floor with a vacuum and broom to remove any dust, dirt or debris that could impede the restoration process. For more stubborn stains, you may need to scrub with a mild cleaner and warm water.
2. Sanding or Refinishing – Depending on how much damage is present, you may need to sand down the surface of the floor or refinish it. If the damage is minimal, simply buffing and polishing could be enough; if more significant work is required, refinishing may be in order. Make sure to use appropriate sandpaper and protective gear during this step.
3. Sealing and Finishing – Once the floor is restored to its original condition, it’s time for sealing and finishing – which will help protect it from further wear and tear. Use a sealant that’s specially designed for parquet floors, and follow the instructions for best results.
4. Maintenance – Remember that keeping your parquet floor clean and maintained will ensure it looks great for years to come. Regular vacuuming and spot cleaning can go a long way in preserving its beauty!


The benefits of restoring parquet floors can’t be said enough, the process truly rejuvenates old, scratched, or dull floors and breathes new life into them. Speaking from personal experience, it was a challenge to restore my living room’s original parquet floors, but its transformation was astonishing, boasting an unmatched rustic and timeless appeal.
As someone who has recently finished restoring the parquet flooring in my own home, I couldn’t agree more with Nurmi; the process can indeed be challenging but ultimately rewarding as it results in not just a revived classic look, but also a heightened sense of accomplishment.
Harrison’s right about the reward of this process matching its challenge; nothing compares to unveiling the renewed beauty of a once dilapidated parquet floor.
When I embarked on my first restoration project involving parquet flooring back in the 80s, the sense of achievement from seeing that worn-out floor sparkle again was tremendously rewarding—certainly worth all the elbow grease.
Is it possible to use oil-based polyurethane instead of water-based? Does it affect the durability or look of the floor over time?
Based on my experience, Thalia, oil-based polyurethane usually imparts a warmer hue and has a more durable finish compared to water-based ones. But it also takes longer to dry and so you might have to deal with the smell for a while longer.