If even a Pinterest-influenced home renovation or floor installation has ever caused you to roll your eyes in dismay and disbelief, then you’re likely no stranger to laminate floor locking problems. It’s hard to get right and even harder when things go wrong. But don’t worry – it’s not just you! Even the best DIYers, floor fitters, and craftsmen out there face similar problems. Thankfully, the handyman in you is here to help the homeowner in you decode some of the most common laminate floor locking problems and provide step-by-step solutions so that you can quickly and easily fix them yourself.
You can attempt to reinstall the pieces and adjust the tongue and groove connection until they lock together. If that does not work, you may need to replace the damaged pieces with new planks.
“Laminate floor locking problems can often be attributed to installation errors, but homeowners shouldn’t fret. Oftentimes, by ensuring correct alignment and using the right tools, these locking problems can be fixed. It’s crucial to follow manufacturers’ instructions on acclimation and installation. Remember, patience is key in this process!”
Mortimer J. Bracknell, Certified Flooring Inspection
Common Mistakes When Installing Laminate Flooring
Due to the ease of installation and affordability of laminate flooring, many do-it-yourselfers attempt DIY projects to install their own laminate flooring. However, there are some common mistakes that can be made when installing laminate flooring that could hinder its locks from interlocking properly or its overall durability.
One of the most important steps in the installation process is to check and make sure all materials used have acclimated to the room. It is important to let laminate planks sit in the room where it will be installed for at least 48 hours before beginning the process is to check and make sure all materials used have acclimated to the room. It is important to let laminate planks sit in the room where it will be installed for at least 48 hours before beginning the process. Failure to do so could cause the planks to expand and contract due to moisture content; therefore, creating gaps between each piece, preventing them from interlocking as intended.
It can also be a challenge finding the starting point of your first row. Make sure you measure, measure again, and again just to be sure you’re starting at the correct spot, with a straight line. If not laid correctly, it will cause your planks not to align flush against one another and not lock together properly.
An underlayment should always be used when installing laminate flooring no matter what type it is. A proper moisture barrier provides protection from moisture from below, as well as sound and noise reduction from above. Not using an underlayment also compromises integrity by allowing planks to move within their grooves not allowing them to lock firmly.
It is easy to overlook transitions pieces such as quarter round or t-moldings when figuring out how much material is needed for an installation project. Neglecting this crucial step could leave you with extra space around door frames or along walls where there’s no way for planks to come together and interlock securely causing gaps along the edges that are difficult or impossible to fix after the fact. This is especially problematic when installing laminate flooring on uneven concrete.
Whether you choose floating click lock or glue down installation methods, one major mistake can prevent your floors from locking correctly even if all other steps were taken correctly: too much glue! Glue should only be used sparingly – otherwise you could end up ruining your entire project by having too much on one plank which prevents it from fitting securely into place leading to unsightly gaps throughout your entire flooring system.
Installing any type of floor covering without consideration of potential issues that might arise along the way is not a good idea and will inhibit these links from working properly unless done correctly – even if all other steps were taken correctly – leading professional grade installations that last for years if the job was done right in the first place!
This next section will discuss what causes laminate flooring not to lock, what options are available for fixing these problems before they become more serious, as well as suggestions on how professionals can avoid making these mistakes when installing new laminate floors in customer homes.
What Causes Laminate Flooring Not to Lock?
Laminate floor locking problems are often caused by the failure of tongue and groove pieces to join together securely. This type of issue is frequently encountered during floor installation, as well as afterwards if the floor has become loose or misaligned in some areas. The core issue is usually caused by either an improper alignment of the tongues and grooves or an incompatibility between the materials used for the laminate flooring.
The first possible cause for laminate flooring not to lock properly is due to an incorrect alignment of the tongue and groove. Older methods of laying out and installing laminate floors, such as glue-down installation, can lead to slight discrepancies in the alignment that can cause difficulties when attempting to lock two planks together. In addition, some styles such as click-lock, floating, and snap-and-lock require precise measurements and accurate angles in order to ensure a solid connection between two adjacent pieces. If this is not followed correctly, it can create a gap which will prevent them from being snapped together properly.
The second possible cause is related to compatibility issues between different types of materials used in a single installation. Although most laminate floors are compatible with one another, certain variations such as type of wood or thickness could result in two boards failing to lock together due to incompatible measurements between their respective tongues and grooves. Additionally, some laminates may also be brittle and unable to handle any pressure when attempting to interlock them like a jigsaw puzzle; meaning that even though they fit technically, once locked they aren’t strong enough to stay connected without having gaps between them.
Improper alignment of the tongues and grooves as well as incompatibility between different types of materials can both result in laminate floor not locking securely, creating gaps and preventing the floor from forming a stable surface overall. Understanding what causes these difficulties can help narrow down potential solutions when troubleshooting laminate floor locking problems. In the following section, we will discuss how proper alignment of tongues and grooves is necessary for resolving such issues.
- A common cause of laminate flooring not locking together is insufficient space between boards.
- Poor installation techniques, such as improperly cutting or marking boards, can also prevent a secure locking of boards.
- According to the National Wood Flooring Association, inadequate moisture levels in subfloor material, as well as warping due to excessive moisture, can also lead to locking difficulties in laminate flooring.
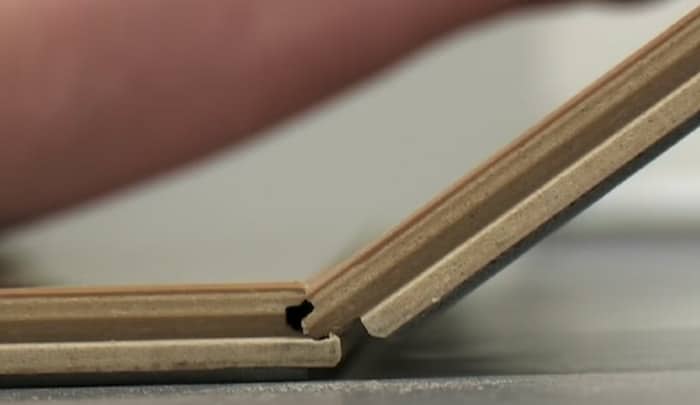
Improper Alignment of the Tongues and Grooves
Tongue and groove locking systems are a common and reliable method of connecting laminate planks together. But unfortunately, if this system is not properly aligned during the installation process, it can lead to serious issues such as gaps between the planks and difficulty when locking them together. The goal should be to get the highest level of alignment possible so that the tongues and grooves fit tightly together, allowing each plank to easily snap into place.
One of the advancements in modern tongue and groove systems has been a guide strip attached to one side of the tongues that keeps them from shifting from side to side not only after initial installation but also over time before the planks are locked into place. In order for this to work, all the grooves must be cut at precisely the same width or else they won’t fit together correctly. Even with this advance, however, there are still times when improper alignment of the tongues and grooves can arise.
If you find that you have gaps between your planks after installation — particularly at high-traffic areas such as doorways — then improper alignment of the tongues and grooves may be the cause. To remedy this problem, examine each plank for any areas where the tongues don’t fit into their corresponding grooves tightly. If necessary, brush out any debris from these areas to ensure a tight seal and then re-position the planks until they connect securely without any pressure applied.
Once proper alignment of the tongues and grooves is achieved, it’s important to remember that additional problems may arise in the future if these planks aren’t secured down properly. Using an adhesive along with other recommended fastening methods should eliminate any potential issues related to improper alignment caused by movement over time.
The next section will discuss solutions for addressing gaps between the planks caused by improper installation or shifting due to foot traffic over time.
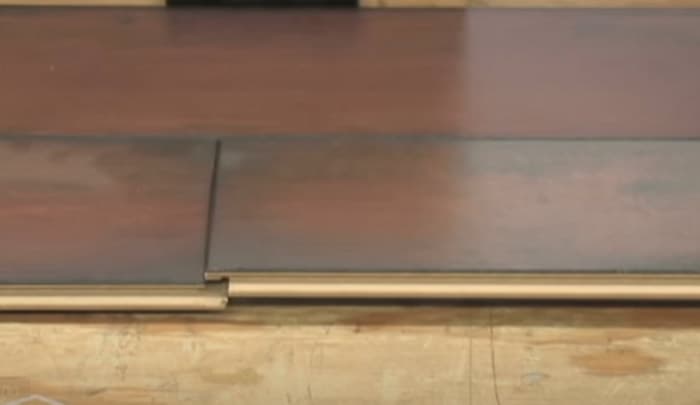
Gaps Between the Planks
For gaps between laminate planks, there are a few potential causes that can affect the locking process and require troubleshooting. The most common cause of gaps in laminate flooring is uneven subflooring, which shifts the boards and causes them to become misaligned. It is important to inspect the entire floor prior to installation and make sure that any slight dips and valleys are evened out with a self-leveling compound and trowel. Additionally, gapping can be caused when two ends of adjoining planks do not fit together snugly due to rough cuts or milling during manufacturing. If this problem arises, it is possible to use a plank filler or caulk that is matched to the color of the planks for a seamless result.
In cases where the floor has been improperly installed originally, it may also need to be reinstalled in order for the gaps to be eliminated. This means taking apart the entire floor and starting from scratch, which can be time consuming but often results in an improved outcome. On the other hand, many professionals argue that removing existing floors can damage them further in addition to wasting time and money on additional labor costs. Therefore, if DIYers decide they would like to remove their floors themselves they must take into consideration the potential risks associated with doing so.
It is important to remember that no matter what methods you choose to solve gap issues, proper adherence to manufacturer instructions should always be followed when repairing laminate flooring. Failure to do so could result in further damage and unlocking problems that are difficult and expensive to repair later on.
Now that you understand possible causes of gapping in laminate planks and how to address them, let’s move on to discuss excess moisture and humidity which can both cause warping in laminate floors as well as unlock joints.
Most Important Points to Remember
Gapping in laminate flooring is most commonly caused by uneven subflooring which needs to be evened out with self-leveling compound prior to installation. If gaps occur due to rough cuts or milling during manufacturing, plank filler or caulk can match the color of the planks for a seamless result. If the original installation was done improperly, it may need to be reinstalled but this can potentially cause further damage and take more time and money. Proper adherence to manufacturer instructions should always be followed when trying to solve gap issues and excess moisture and humidity can cause warping and unlocking of joints.
Excess Moisture and Humidity
When exposed to the right conditions, laminate flooring can become susceptible to a variety of problems. One of these issues that is commonly associated with laminate flooring is damage caused by excess moisture and humidity. When there is too much moisture present in a room or area, it can cause the locking system of the floor to malfunction and become warped or distorted. This can make it difficult for connecting panels to fit together easily and securely. Additionally, the swollen planks may also detach from each other due to excessive moisture content in the air.
It should also be noted that certain environments may also cause more serious damage to laminate flooring over time as high levels of humidity and moisture can weaken the construction materials, exposing them to possible splitting or cracking. Laminate wood floors are not designed to withstand extreme temperatures or humidity conditions so homeowners should be aware of how their environment could affect their floors long-term.
On the other hand, ensuring your home has adequate ventilation and taking preventive steps to elimineate moisture sources or at least reduce them to safe levels can help reduce potential damage associated with humidity or excess moisture on laminate flooring products.
Therefore, when troubleshooting laminate flooring locking problems caused by excess moisture and humidity, homeowners must consider both the danger of potential damage as well as preventive solutions that can help protect their investment and maintain long-term durability.
Having discussed the potential problems arising from excessive moisture and humidity, we now move onto the next section which will focus on prevention and solutions for managing these problems.
Prevention and Solutions
When it comes to preventing laminate floor locking problems, there are several steps that can be taken prior to installation. First, keep the floors as dry as possible by protecting them from spills or moisture during the installation process. Get rid of any debris or dust in between planks before installing the flooring. Make sure the subfloor is leveled correctly and all nails are secure. And finally, read through all of the manufacturer’s instructions to ensure accuracy in both measurement and placement.
Once installed, there are still several solutions for addressing laminate floor locking problems. Inspect each plank for loose pieces, visibile warping, and any other issues that could disrupt a snug fit between planks. If necessary, replace damaged planks or add spacers for support where applicable. Additionally, recoating with a special adhesive can often help with any warping or gaps found when joining two planks together.
Implementing these precautions and solutions should help alleviate many of the causes of laminate floor locking problems; however, if these measures do not yield satisfactory results, it may be wise to hire professional installers to ensure long-term success. This will be discussed in more depth in the following section on “Hire Professional Installers”.
Hire Professional Installers
Hiring professional installers to lay down laminate flooring may be the best choice for many homeowners, especially if they have a complex area or want to ensure the job gets done correctly. Professional installers can recognize potential issues from the start and address them accordingly. They will also consider the different tension requirements for each room in order to ensure that your floors are securely in place and there won’t be any problems with them in the future. In addition to this, professional installers know how to properly space and seal expansion gaps so that extra moisture is kept away from your laminate flooring.
On the other hand, DIY installation of your laminate flooring can save you money and give you a sense of accomplishment at completing a job on your own. While it is possible to install laminate floors on your own, it takes skill and patience, as mistakes can lead to costly repairs. It is important not to underestimate the difficulty of the job at hand, as a small mistake can quickly become a huge problem over time. If you are not confident in your ability to do this without assistance, then it is recommended that you hire a professional installer who knows what they’re doing instead.
Overall, hiring a professional installer may be more expensive up front but could end up saving you money in the long run as they will help ensure that your floors are securely installed and free from future issues due to their expertise and knowledge of installation procedures within the industry. To move forward with a successful flooring installation, proper sealing of gaps with glue is essential–the next step we’ll discuss further.
Seal Gaps with Glue
When laminate boards rub against each other and cause an unpleasant noise while walking, it is important to seal the gap between the boards. This can be done by using glue, which helps hold the boards together so they do not move and create a clicking sound. The same principle should be applied when dealing with gaps caused by uneven subfloors, as the glue helps keep the boards leveled and prevents any friction that may occur when walking on them.
Glue-down installation is not required for all laminate floors but in some cases it may be necessary. Advantages of sealing gaps with glue include increased noise reduction and extended longevity of a laminate floor. However, there are also drawbacks. Glued floors have higher installation costs due to the additional cost of materials needed, and it takes more time to install glued laminate than floating floors because of drying time between setting boards in place and sealing them together. Additionally, once glued down, a laminate floor cannot be easily removed or replaced like a floating one can.
Ultimately, deciding whether or not to glue down your laminate floor is up to you and will depend on the size of your budget and amount of time you are willing to spend on installation. It is important to keep in mind that if you choose not to go with glue-down installation, your laminate floor may not last as long as it would if it were securely glued down.
With this knowledge in mind, it is now time to piece together DIY installation tips for your project. In the following section you will learn more about specific tools needed and how to properly install your laminate flooring without hiring a professional.
DIY Installation Tips
DIY Installation is a great way to save time and money on your laminate flooring project. However, it is important to be aware of some of the dangers that accompany a DIY installation. While DIY projects can certainly benefit a homeowner looking to save money, they often lack the expertise and experience that comes with a professional installation.
One element of DIY installations that should not be overlooked is preparation. You must ensure the subfloor is level and clean before installing the laminate. Without proper preparation, your floor could be prone to buckling or other water damage over time. Furthermore, you should make sure all boards are securely fit against each other; if not, the individual boards may come apart and create unsightly gaps in between.
In addition, you also have to take into account what type of transition pieces you will use between rooms such as doorways and closets. When selecting transition pieces for DIY installations, it is important to choose pieces that match the space correctly in terms of color and size for a seamless look. If this step is not done properly, it can make for an unsightly visual effect when looking down the length of your floor.
Finally, if you decided to use glue during your DIY installation process it is equally important to pay close attention to instructions specific to the brand and product being used. Different glues come with different requirements so make sure read all instructions carefully prior to applying any glue.
Ultimately, while DIY installations can save homeowners time and money, there are some necessary considerations that come along with taking on this project yourself. With these tips in mind and an understanding of what can go wrong during the process, DIY laminate flooring installations can be achieved successfully with minimal errors or issues in the long run.
Overall Conclusion: Although DIY installation offers numerous benefits including saving time and money, there are certain elements one needs to keep in mind when embarking on a do-it-yourself laminate flooring project . In this section we explored some tips for successful DIY installation from preparation of the subfloor to selection of transition pieces and glue application requirements. In our conclusion section next we will explore overall assessments of typical installation problems that could arise during a DIY project.
Overall Conclusion
When it comes to troubleshooting laminate floor locking problems, the most important thing is to take the proper steps in order to resolve any issues. Making sure that all pieces are properly aligned and secured when first installed is essential in preventing any potential issues. If a clicking sound does occur when walking on the floor, this may mean that the laminate boards have shifted slightly. By carefully taking off the boards, resetting them properly and re-installing them, this issue should be resolved. In cases where a gap between the boards appears, addressing this issue quickly with a high quality glue can help to prevent further shifting and separation.
Having a professional inspect and assess any installment of laminate flooring can also provide peace of mind by ensuring that everything was installed correctly in the first place, as well as providing assistance if any issues arise afterwards. Whether you choose to handle any locking problems yourself or enlist assistance from a professional, careful attention should be paid to each step of the installation process in order to ensure long lasting, quality results.
Responses to Frequently Asked Questions
How can I ensure that the connection between the planks is secure?
To ensure that the connection between the planks is secure, it’s important to first clean the surfaces of each plank and then apply a generous amount of adhesive towards each side. This helps fill any gaps and forms a strong bond between each plank. Additionally, you should use clamps or a roller to press down on planks while they dry – this helps to get rid of any air bubbles and further strengthens the connection between each plank. Once the adhesive has dried and set, your planks will be securely connected from edge to edge.
What tools do I need to properly install a laminate floor?
The primary tools you’ll need for installing a laminate floor are a tape measure, hammer, saw, pull bar, tapping block, and spacers. A saw is necessary to cut pieces of the laminate flooring to fit in any awkward areas such as around doorways or along the walls. This can be either a hand saw or circular saw. You’ll want to use a pull bar and tapping block to press the tongue-and-groove edges of the laminate pieces together for a snug fit; this prevents gaps in between floor planks. Spacers should be used during installation to create an expansion gap between the walls and the edges of your laminate flooring. Finally, a good sturdy hammer can help you lock all the planks together.
What type of underlayment should I use when installing a laminate floor?
When it comes to installing a laminate floor, using the right type of underlayment is essential in order to ensure that the locking problems are minimized. The best type of underlayment to use when installing a laminate floor would be foam or felt underlayment. Foam and felt underlayments both provide excellent moisture protection for the flooring and help reduce sound transfer, as well as providing cushioning and support for the laminate planks. Additionally, both foam and felt underlayments are easy to install and create a layer of insulation between the floors and the subfloor, helping to prevent any movement which can cause the individual planks to come loose.
Overall, using either foam or felt underlayment when installing a laminate floor is an essential part of successfully troubleshooting any potential locking issues. Not only do both types of underlayment provide superior insulation and protection against moisture damage, but they also help reduce movement of individual planks which can lead to unlocking problems.
References
https://www.realsimple.com/home-organizing/decorating/tips-techniques/wood-flooring-alternatives


I remember when dealer-specific locking systems used to get me in a twist, but I’ve found that a good set of tools and a whole lot of patience can make the job much easier.
I couldn’t agree more with you, Titania, patience is definitely key when dealing with laminate floor locking problems. I remember one case back in my contracting days where a homeowner was frustrated with his DIY flooring project. I recommended he slow down and take his time, ensure he’s using the right tools and follow the correct steps. Sure enough, once he took his time, the project became much more manageable and less stressful.
Federico nods in agreement with Vincent’s comment. Having spent decades in this trade, I’ve witnessed the disastrous effects of rushing a job due to impatience or underestimating the complexity of a task. Ultimately, success in this field, whether it be repairing laminate floors or building a three-level house, stems from a combination of patience, using the right techniques, and adhering to the step-by-step process.”
Absolutely D’Amico, I couldn’t agree more with your sentiment. In my experience, patience and adherence to the outlined process can often be the difference between a perfect fit and endless issues with your laminate flooring.
Totally align with you there, Ormond. I have seen far too many flooring situations go haywire simply because the person didn’t take adequate time or neglected the process. Patience, careful attention to the details, and doing it properly from get-go can save you from countless pitfalls down the road.
Oh, I can relate! I had quite the experience battling with my laminate flooring last summer; turns out it was moisture buildup that was causing the locking issues. A dehumidifier proved to be my salvation.
Oh Jemimah, moisture buildup can be quite insidious! I had a similar issue when I relocated to our current home here in humid Florida; using a good quality moisture barrier under the laminate proved effective for me.
Linus, I agree completely! While living in Arizona, which is quite dry, I didn’t really appreciate the need of a good moisture barrier until I worked on a project in a humid area. That barrier made all the difference.